Top 3 Best Download Free Backup Tools Work with A Restore Tool
The top 3 best free backup tools that work with the arestore tool are:
With the rapid advancement of technology, security alerts and data breaches have become increasingly prevalent, posing a significant threat to individuals and organizations alike.
Besides cyber-You can lose your data due to hard drive failure, system crashes, and viruses, but don't worry, data attacks are also a risk.
This blog provides guidance on how to safeguard your valuable asset from problems and secure your data using a backup tool with a restore tool.
Backup Tools with A Restore Tool: What Is It?
Backing up a tool with a restore tool is a straightforward process. It means using a tool specifically designed for restoring data or settings to help safeguard the original tool, ensuring it remains intact and functional. This approach is often used to prevent data loss or system crashes, and can be particularly useful in situations where the original tool is critical to operations.
Abackuptoolisavaluablecomputerrestoresoftwarespeciallydesignedtorestoreyourcomputerfromsystemcrashes,disasters, hard disk failures, malware, or any other malicious activity
The backup tool securely copies original data from your device to a desired location, allowing for easy access and retrieval at any time.
A backup tool is a software that helps you restore your data from one computer to another computer or device.
Top 3 Best Backup Tools with A Restore Tool
To restore important files, folders, and external hard drives in various Windows versions, consider using top-rated backup tools, which can help you recover your data across different versions of Windows.
1. Qiling Backup
Several third-Qiling Backup offers a one-stop-shop solution for all-in-one back-ups and restore software, integrating multiple solutions available on the internet, providing a unique experience to its users.
Qiling Backup is a top-rated and affordable backup software that provides reliable backup services with 13 years of experience. It offers robust data protection with advanced backup and disk imaging capabilities, allowing for instant restoration of data anytime.
Qiling Backup provides features like daily/weekly/monthly schedule backup, as well as incremental and differential backup capabilities.
Qiling Backup offers valuable services for home, Mac, and business users, providing free data backup and restoring software to back up system, files, disk, and partitions for home users.
This software offers a range of features, including file and folder backup, archiving, disk cloning, and folder syncing, making it a professional backup solution for Mac users.
Qiling Backup offers unmatched enterprise services:
- Business data protection.
- To minimize downtime on your Workstation, Windows Server, MS SQL, and Exchange database, implement proactive maintenance strategies. Regularly update your operating systems and software to ensure you have the latest security patches and features.
For businesses and enterprises, Qiling Backup offers a fascinating opportunity to create high-margin services for service providers and Managed Service Providers (MSPs). With 13 years of experience and a massive user base of 20,000,000, Qiling Backup provides a high level of data security, including free 250GB of cloud storage, making it an attractive solution for those seeking reliable data protection.
You can follow these steps to back up your data:
Step 1. Click the "File backup" button to start backup.

Step 2. Local and network files will be listed on the left, allowing you to expand directories and select files for backup.

Step 3. Select the destination where you want to save the backup, following the on-screen guide.

Step 4. To encrypt the backup with a password, click on "Options" and then select the "Backup Options" tab. This will allow you to customize the backup task and explore other available options.

Set the backup schedule and choose to start back up at certain event in "Backup Scheme".

Step 5. You can save the backup to your local drive, Qiling's cloud service, and NAS.

Step 6. Qiling Backup allows users to back up data to both third-party cloud drives and its own cloud drive.
To back up data to a third-party cloud drive, select the "Local Drive" option, scroll down to "add Cloud Device", then add and log in to your account.
Step 7. Click "Proceed" to start the backup task. Once completed, it will be displayed on the left panel as a card. You can further manage the backup task by right-clicking on it.

2. Windows File History
File History Windows 10 is a quick and efficient way to back up important folders and files.
File History regularly backs up your files, folders, documents, music, desktop files, pictures, video, and your drive (Google Drive or OneDrive) files available offline on your system.
File History provides a complete history of your files, allowing you to easily and quickly restore original files, even if they are deleted or corrupted.
To restore your files with Windows File History, follow these steps: Go to the Start menu, type "File History" in the search bar, and select the File History app. Then, select the "Restore personal files" option from the left menu. Next, select the date and time when you want to restore your files, and choose the files you want to restore. Finally, click on the "Restore" button to complete the process.
Step 1. Go to the searchbar on your computer screen.
Step 2. Type Restore your File with Files historyin the search bar.
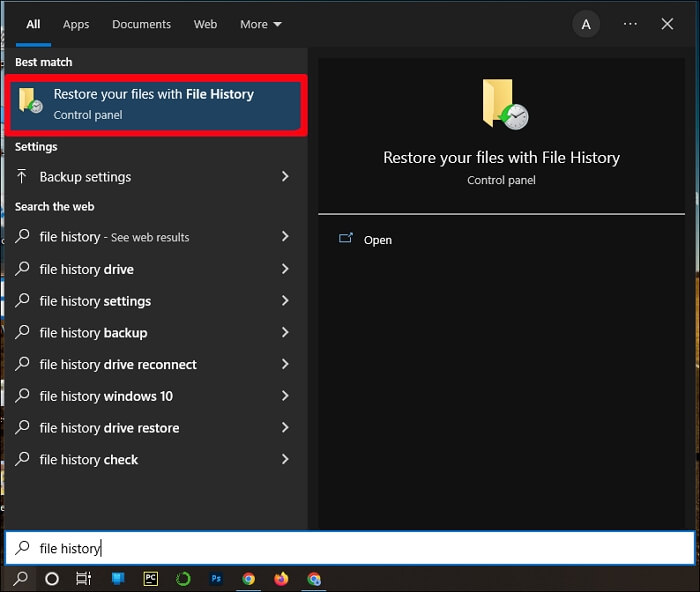
Step 3.Click "Restore your File with File History".

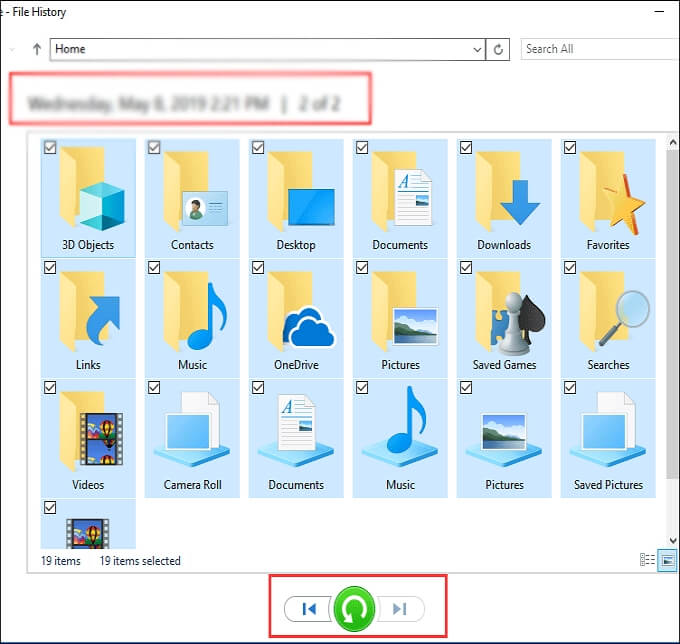
Step 4. Now type the file name you want to restore and scroll up and down to locate it.
Step 5. Choose the file you want to restore to its original location and select the restore button.
If you want to backup your important files to another location rather than the original location, then right-click on the restore button.
To restore your files, click on the "Restore To" option and select a new location to save your files, choosing the desired destination for the restored files.
3. Windows Backup and Restore (Windows 7)
Consider using a cloud-based backup service like Backblaze, which provides automatic and continuous backups of your data, as well as the ability to restore individual files or entire systems. This can be a cost-effective and convenient solution for individuals and businesses alike, especially when compared to the time and effort required to set up and manage on-premises backup systems.
To restore your important files, you can use your computer's backup features to copy them to an external storage device, such as an SD card, USB drive, or external hard drive. This way, you can easily access your files and keep them safe.
If your computer has Windows7, then follow these steps to backup your files from it to another device.
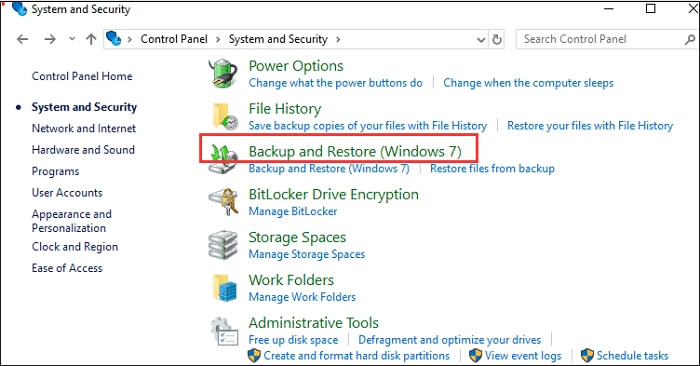
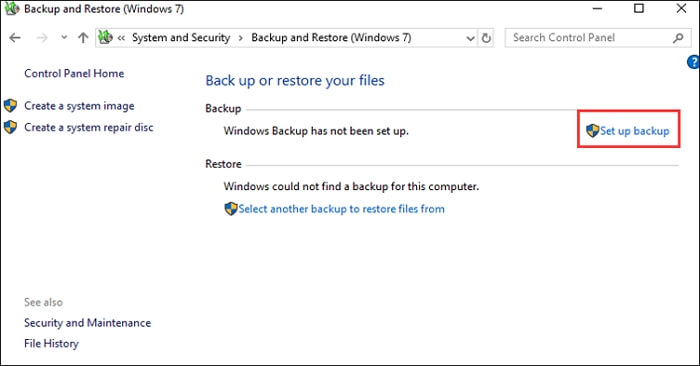
Step 1. To access the Backup and Restore feature in the Control Panel, go to the Control Panel, click on "System and Security", and then click on "Backup and Restore".
Step 2. Choose Set up backup.
Step 3. Connect your external storage device to your Windows 7 computer, then click on the "Refresh" button to update the file system and make the external storage device visible in the system.
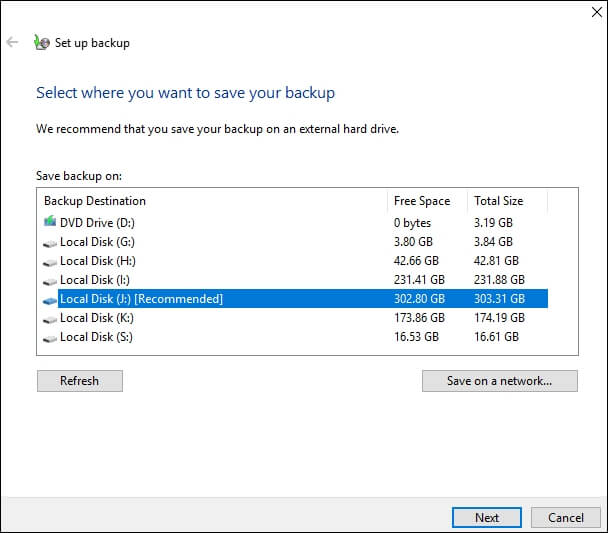
Step 4. To restore your data, go to the backup destination, select the external storage device you are using, and then choose "Next".
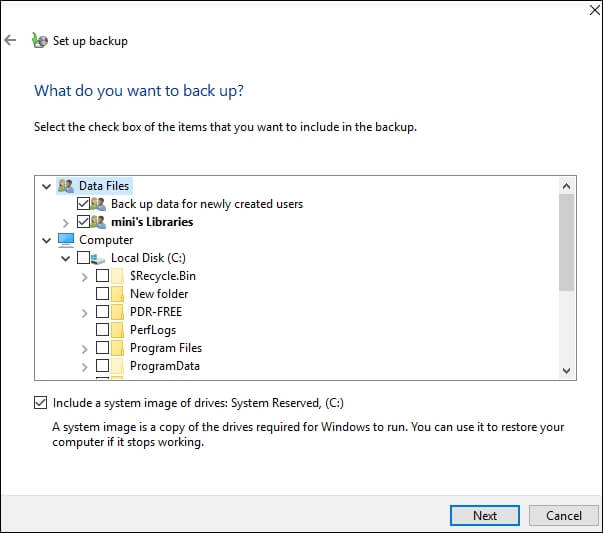
Step 5. Select Let me Choose and then click "Next".

Step 6. In Windows 7, the feature automatically backs up files, documents, music, pictures, and videos, but you can also manually add more files to back up by expanding the location under your system and selecting them to include in the backup.
Step 7. Now uncheck the Include a system image of drives checkbox, then click Next.
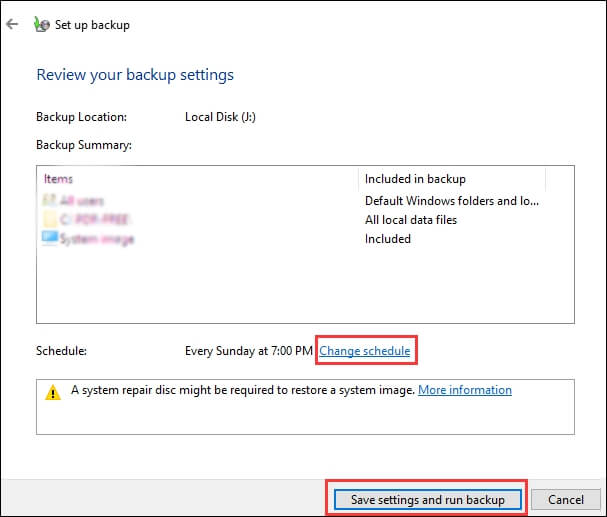
Step 8. Click "Change schedule".
Step 9. Uncheck the "Run backup on a schedule" checkbox, then select OK.
Step 10. To start backing up your additional files to the external storage device, go to Save settings and backup.
Step 11. Carefully remove the drive to avoid data loss.
Step 12. To safely disconnect the external storage device, click the "Eject" button before removing it from your PC. This ensures a smooth and hassle-free removal process.
Tips for Advanced Backup and Recovery on a PC/Laptop
To select the right backup software, consider the type of data you need to back up, the frequency of backups, and the level of data protection required. Some software may offer additional features such as versioning, encryption, or cloud storage integration, which can be useful depending on your specific needs. Ultimately, the goal is to choose a tool that fits your unique requirements and provides a reliable way to protect your data.
Here are a few useful suggestions that will help you with advanced backup and recovery of your valuable assets on your computer or laptop. You can set up an external hard drive to automatically backup your files, use cloud storage services like Google Drive or Dropbox to store your data, and consider investing in a backup software like Qiling to automate the process.
1.Full, Differential, and Incremental Backup
There are three types of backup: full, incremental, and differential backup. A full backup is the most reliable option for advanced backup and recovery of your data, as it backs up everything in your system. For subsequent backups, differential or incremental backup can be used, which restore changes in system files after the last backup.
You can get the original file without missing any updates by using this method. This way, you can find the original file, and you will also receive any updates made to that file.
2.Keep Backups Onsite and Offsite
Choosing between onsite and offsite backup can be a challenge due to the numerous benefits of each option for users. Both methods have their advantages, making it difficult to decide which one is best for individual needs.
To ensure high-level protection of your valuable data, it's essential to have both onsite and offsite backups. This dual-layered approach safeguards against various risks such as fires, viruses, damages, natural disasters, and other unforeseen events that could compromise your data.
3.Set the Backup Schedule
Setting a backup schedule helps manage data and ensures quick recovery by scheduling daily, weekly, and monthly backups at a convenient time.
4.Compress Large Backup Images
Compressing large files like images can speed up the recovery process, as it reduces the time taken to restore them.
5. Encrypt Confidential Backup Data
To ensure the security of confidential data, it is recommended to encrypt it before backing it up. This will protect the data from unauthorized access.
FAQs about Backup Tools Work with a Restore Tool
If you're still having trouble with backup tools, try using a restore tool. Here are some common questions and answers to help you troubleshoot:
1. Which tool is used to perform backup and restore?
You can use various tools to backup and restore data, including Windows' file history feature, and Qiling Backup.
2. How do I restore my backup folder?
To restore your backup folder using Windows File History, go to Settings, Update Security, and click Backup. Click the "more options" link, then scroll down to the bottom of the File History window and click "Restore files from a current backup," which will display your backup folders.
Related Articles
- Free Download Qiling Backup Full Crack + Serial/Keygen
- Backup User Profile in Windows 10/11 or Transfer to New PC [Complete Guide]
- Top 7 Best Auto Backup Software for PC Updated in 2022 [FREE DOWNLOAD]
- How to Clone HDD to Solid-State Disk Without Reinstalling Windows 11 or Windows 10
- Move Programs/Apps/Software from C Drive to Second Hard Drive in Windows 10/8/7
If you're looking to move programs, apps, or installed software from your C drive to another partition or a second hard drive in Windows 10/8/7, this page provides a reliable method to do so without reinstalling them. - How to Restore When Outlook Favorites Misssing[2022 Guide]
If your Outlook favorites have gone missing, don't worry - this guide includes the solutions. We'll cover the most common reasons why favorites disappear and provide step-by-step instructions to get them back, as well as recommend an Outlook backup tool to keep your Favorites folder data safe.