Can You Restore a Windows System Backup to a New PC?
A system image can move an installed Windows environment to another PC, but a successful restore does not guarantee booting, driver compatibility, or a transferable Windows license. Plan both the backup and the first boot.
Check the new PC before restoring
Compare the old and new machines' boot modes, storage-controller type, disk capacity, and Windows edition. The destination must have enough usable space for the restored system. A motherboard change may trigger activation. A manufacturer-tied license may not be transferable even if the restored Windows starts.
Back up any files already on the new PC because a system restore can overwrite its target disk. Keep the source computer and original image untouched until the migration is validated.
Create the system image on the old PC
- Attach a healthy external drive and make a Qiling System backup of the Windows and boot partitions, not just personal files.
- Wait for the backup to finish and browse to the image file to confirm it exists.
- Create Qiling bootable recovery media if the new PC cannot launch Windows. Test that the new PC can boot the media and detect the backup drive before performing the restore.
After restoring to different hardware
Boot the new PC from the restored disk and inspect Device Manager. Install chipset, storage, network, and graphics drivers from the new PC maker. Check Windows Update and Activation, then test applications that may bind licenses to the old hardware. If boot fails, revisit boot mode, selected image partitions, and driver compatibility instead of repeatedly overwriting the source.
Stage 1: Back Up Windows with Qiling
The first stage creates a complete system image on an external drive before anything is changed on the new PC.
Step 1. Connect a separate backup drive and open Qiling Disk Master. Under Backup and Recovery, choose System backup.

Step 2. Check the automatically selected Windows and boot partitions. Keep the required EFI/System Reserved and recovery partitions included where shown.

Step 3. Use the destination browse icon to select the external drive that you will connect to the new PC, click OK, and check the available space before proceeding.

Step 4. Click Proceed and wait for the image task to finish. Confirm the image exists and prepare Qiling recovery media for the destination PC.

Stage 2: Restore the Image to the New PC
Step 1. Boot the new PC from Qiling recovery media, connect the backup drive, choose Recovery, and browse to the system image. Verify the backup point belongs to the old PC.
Step 2. Select the complete Windows system and required boot partitions from the image. For a bootable migration, do not restore only C: when EFI or System Reserved is separate. Click Next.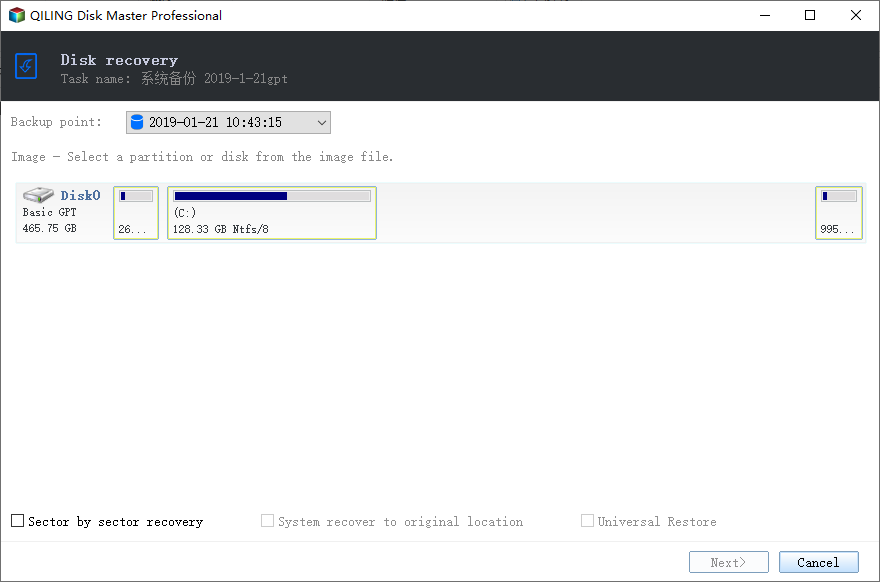
Step 3. On the backup-point screen, enable Universal Restore before clicking Next if motherboard or storage-controller hardware differs. This assists driver adaptation but does not waive Windows licensing or guarantee every app will transfer.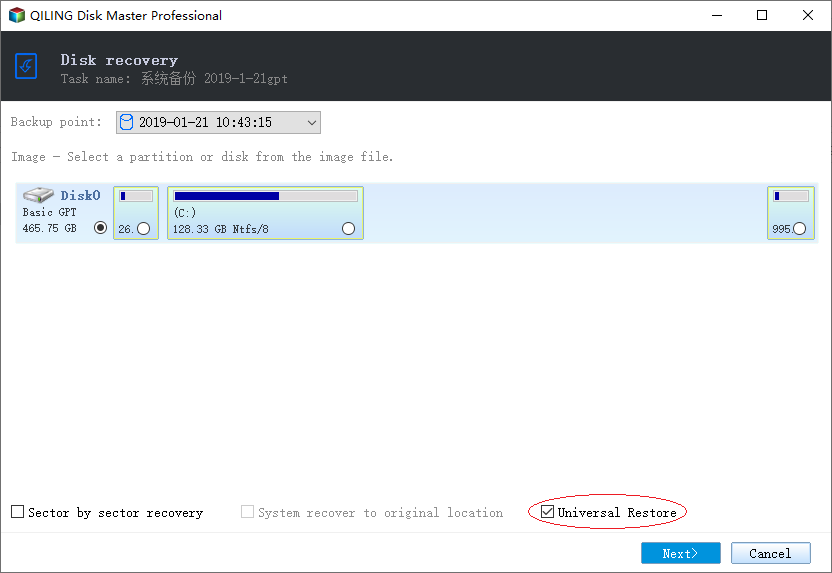
Step 4. Identify the new PC's destination disk by model and size, select it, and click Next. The disk's existing data may be overwritten.
Step 5. Review the target in the preview, click Proceed, confirm the overwrite warning, and wait for completion. Remove recovery media, boot the new disk, install its drivers, and check activation.
Frequently Asked Questions
Can an image from any PC be restored to any other PC? No. Hardware support, disk layout, boot mode, drivers, and licensing can prevent a successful migration.
Should I keep the old PC? Yes, until the new PC starts and the files and applications are verified.
Conclusion
Create an external system image, restore its complete boot layout to the correct target, and treat hardware drivers and activation as separate checks.
Related Articles
- Windows System Backup and Restore Tutorials
Compare system images and recovery choices in Windows. - Windows File Backup and Restore Tutorials
Protect personal files before resets or disk changes. - Windows Cloning Tutorials
Find boot-drive and SSD migration guides.
Products
Articles & Tutorials
- Data Recovery
- Data Backup
- File Recovery
- File Backup
- System Backup and Restore
- Disk and Partition Clone
- Technical articles
- Mobile articles
- Disk Master Help
- Windows Data Recovery Tutorials
- Windows Secure Delete Tutorials
- Windows Partition Management Tutorials
- Windows File Backup and Restore Tutorials
- Windows System Backup and Restore Tutorials
- Windows Disk Backup and Restore Tutorials
- Windows Clone Tutorials