How to Create Windows To Go with Non-certified USB Flash Drive
Windows To Go is a feature that allows users to create a bootable USB external hard drive with a Windows live system, enabling them to start up Windows on any computer, eliminating concerns about system startup issues like boot failures or malware infections.
Here's the list of Windows To Go certified USB stick!
- Imation IronKey™ Workspace W300 / W500 / W700
- Kingston DataTraveler Workspace
- Spyrus Portable Workplace
- Spyrus Secure Portable Workplace
- Spyrus WorkSafe
- Super Talent RC4/ RC8
- WD My Passport Enterprise
To create a Windows To Go drive, you need a supported flash drive that meets the system requirements, which includes a minimum of 32GB of storage space. This means that not all flash drives are compatible, and the cost of a certified drive can be relatively high, starting at 32GB.
Can you create Windows To Go with a non-certified USB flash drive
Users' attempts to create a Windows To Go workspace on a non-certified USB flash drive will fail, usually with an error message stating that the drive is removable and not compatible with Windows To Go.
A majority of users rely on popular USB 3.0 flash drives from SanDisk, Kingston, Toshiba, or Samsung, which are not Windows To Go supported. To address this, third-party Windows To Go creators have been developed, allowing users to install personalized Windows operating systems on their portable drives, even if they are not certified.
Finally, let's create your own Windows To Go on any USB drive!
To make a portable Windows operating system like Windows To Go, you can use software like Qiling Backup that supports system cloning and creating a portable Windows operating system with ease. Simply download and install the Windows backup software on a PC, and you're ready to go.
Tip
You can use any USB flash drive with Qiling Backup, but make sure it has enough free space to hold the system partition, or that there's enough unallocated space before any existing partitions.
To create a Windows To Go drive using a non-certified USB flash drive, you'll need to follow these steps. First, download the Windows To Go Creator tool from Microsoft's website.
USB requirements:
1. To check the system C drive's disk space usage, you can use the built-in Disk Management tool in Windows. Assuming the C drive has a total capacity of 40GB, you'll want to prepare a qualified USB drive with a capacity larger than 40GB. This will ensure that the drive has enough space to hold the system image. You can use a USB drive with a capacity of at least 64GB to be on the safe side.
2. Use an empty new USB drive to avoid any data loss. This way, you can be sure that all your important data is safely transferred before the system clone overwrites it completely.
3. Correctly connect the USB drive to your machine and make sure that Windows has detected it and assigned a drive letter to it.
To create a portable Windows USB drive and boot from it, follow these steps: Insert a USB drive with a minimum of 8GB of free space, and download the Windows 10 Media Creation Tool from Microsoft's official website. Run the tool, select the "Create installation media for another PC" option, and choose the language, edition, and architecture of the Windows installation you want.
Step 1. Launch Qiling Backup. Click "System Clone" in the tools page.

Step 2. On the "System clone" window, the software will choose the system partition and boot partition by default. Click "Next".
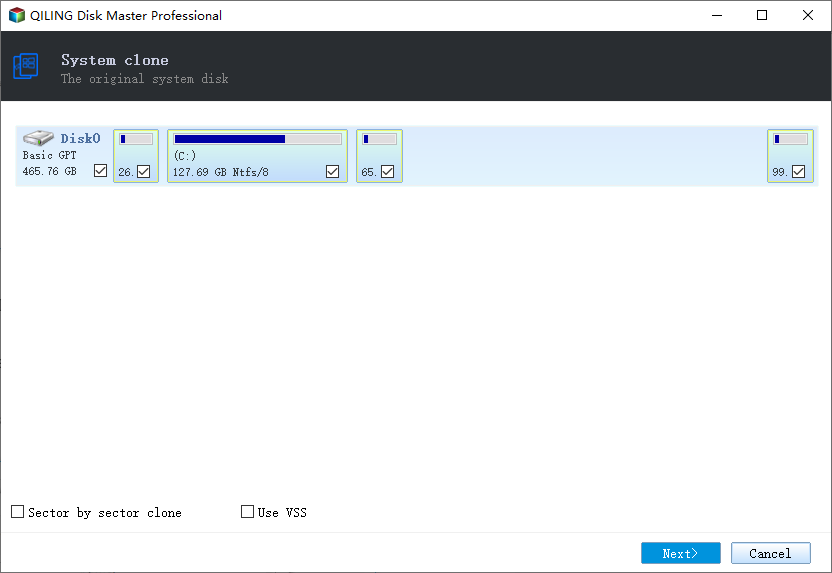
Step 3. Just Choose the USB drive as the destination disk.

Step 4. The software will start cloning the default partitions of your desktop/laptop to the USB drive, and once the cloning process is complete, you can safely remove the USB drive.

Step 5. Boot from the USB drive.
- Connect your portable USB to the computer
- Restart the computer and press "Del" to enter BIOS
- To boot from a portable USB, change the boot order in the PC's BIOS to prioritize the USB drive over the internal hard drive. This can be done by entering the BIOS settings, navigating to the "Boot" tab, and adjusting the boot order to place the USB drive first.
- Save the changes and your system should boot up from the USB drive
Related Articles
- 6 Solutions for Windows 10 Can't Create Recovery Drive
- Top 9 Best Backup Software for Windows
- How to Install Games on SSD
- How to Clone GPT Disk to SSD in Windows 10/8/7 Without Boot Failure
- Reset Lenovo Laptops with OneKey Recovery Without Data Loss
- How to Backup Windows 10 to DVD [Windows 10 Backup]
Learn how to back up Windows 10 to DVD or other media. Create system and file backups to protect your PC from data loss.