Windows 11 Backup to External Hard Drive Guide [3-Minutes Solution]
Regularly backing up your computer's primary hard drive is crucial to prevent data loss. This can be done by copying all your files and folders to an external hard drive or storing them in the cloud. On a Windows 11 computer, backing up to an external hard drive can be achieved through various methods.
To ensure your files are safe, follow the "Rule of Three": make three copies, store two in different external mediums (like a hard drive and cloud storage), and remove one physical copy from the premises.
To mitigate the risk of data loss, creating a backup of your data is essential, especially as the amount of stored data continues to grow. This helps prevent loss of important files and information.
Using an external hard drive as a backup for your files is a great way to ensure your data's safety. In case of system failure or a virus attack, you'll have a secure copy of your files, giving you peace of mind knowing that your data is protected.
To create backups, you can use various solutions such as cloud storage services like Google Drive, Dropbox, or Microsoft OneDrive, which allow you to store your files online and access them from anywhere. Alternatively, you can use external hard drives or USB drives, which provide a physical storage option that can be taken with you.
- Backup and Restore
- Backup Software
- File History
Knowing the various backup options available today allows you to choose the one that best suits your needs. Regardless of the form of backup you decide to use, the process is straightforward. To back up your data, simply keep this tab open and follow the instructions provided. We'll discuss how to perform and recover backups in this article, and you can find more information in the sections below.
How Do I Backup Windows 11 to An External Hard Drive
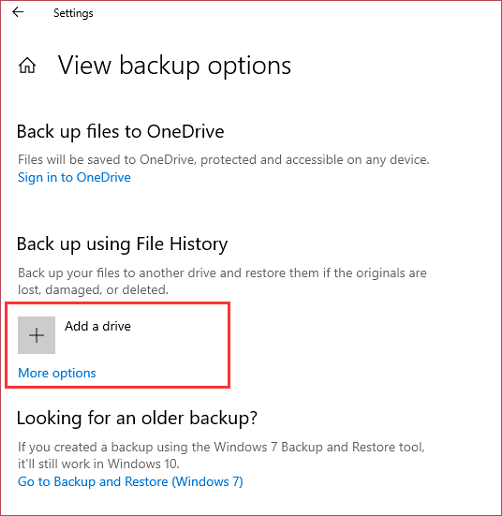
To backup your Windows 11 computer to an external hard drive, go to Settings > System > Backup, and click on "Add a drive" under the "Back up using File History" section. Then, select the external hard drive as the backup location and follow the prompts to set up the backup. You can also use the built-in tool "Backup and Restore (Windows Backup)" to create a system image and save it to the external hard drive.
Here, we have listed three ways that you can use to back up files to an external hard drive in Windows 11. You can use the Windows built-in program or reliable backup software. We'll then go through each of the three approaches with you. Possible solutions are given below to backup Windows 11 to an external hard drive.
Solution 1.Windows 11 backup and restore
Solution 2.Windows 11 backup software
Solution 3.Windows 11 file history
Let's introduce these solutions with their pros and cons.
Solution 1. Windows 11 Backup and Restore
The Windows 11 Backup and Restore feature allows you to back up and restore files, as well as create a system image, including the operating system, programs, and settings. This can be done on a scheduled basis, automatically backing up data files from libraries, desktop, and primary Windows directories.
Solution 2. Windows 11 Backup Software
In Windows 11, users have limited control over backup directories, and the built-in backup strategy only includes specific directories. If users want to backup additional directories, Qiling Backup is recommended, providing users with more flexibility and control over their backup process.
Qiling Backup allows users to back up their files to various locations, including network disks, cloud storage, external drives, and local drives, and also includes the ability to back up folders in the backup plan, making it more capable and customizable than the built-in backup application.
Solution 3. Windows 11 File History
Windows 11's File History feature allows you to frequently back up files from your desktop, documents, music, photographs, and video folders. This approach creates multiple backup copies, enabling you to restore original files if they are lost, damaged, or erased.
| Solutions | Pros | Cons |
|---|---|---|
| Windows 11 Backup and Restore |
It provides direct access to your Backup, keeping essential information on-site, and ensuring that your data is not accessible to anyone else, even without an internet connection. |
There are no uptime or recovery time promises, and implementing this system would likely require a significant capital expenditure for infrastructure and hardware. |
| Windows 11 Backup Software |
Mac OS has implemented various accessibility features to ensure that users with disabilities can fully utilize the operating system. In addition, cloud storage options are also available, offering users a convenient and secure way to store and access their files. Many cloud storage services are free, providing users with a cost-effective solution for their storage needs. |
The application has a slow speed when creating photos and lacks comprehensive system failure information, making it difficult to troubleshoot and resolve issues. |
| Windows 11 File History |
This program automatically backs up each folder location you've chosen, allowing you to customize the number of saved versions and the frequency of file saves. |
If you want to secure files, you must first place them in one of the specific folders that File History has chosen as its default selection. |
Editor's Pick: We recommend using Qiling Backup for Windows 11 beginners, as it is user-friendly and automates the backup process.
Windows 11 Backup to External Hard Drive via Backup & Restore
The software backs up desktop files, primary Windows directories, and data files saved in libraries, as well as creating a complete system image that includes the operating system, programs, and settings.
Windows 11 does not provide an option to back up data to an external drive, but instead offers the option to back up data to OneDrive.
To backup your PC to an external hard drive in Windows 11, start by connecting the external hard drive to your computer and making sure it's formatted to the NTFS file system. Next, open the Settings app and navigate to the "Update & Security" section, then click on "Backup" and select the external hard drive as the backup location.
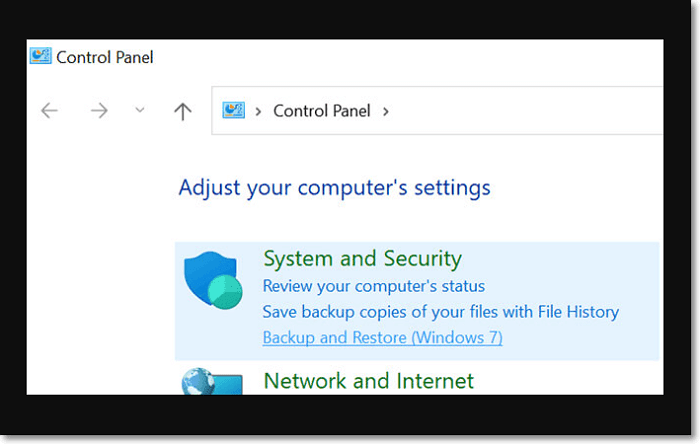
Step 1. To access the backup and restore feature, go to the Control Panel, navigate to the "System and Security" section, and select "Backup and Restore" from the options available.
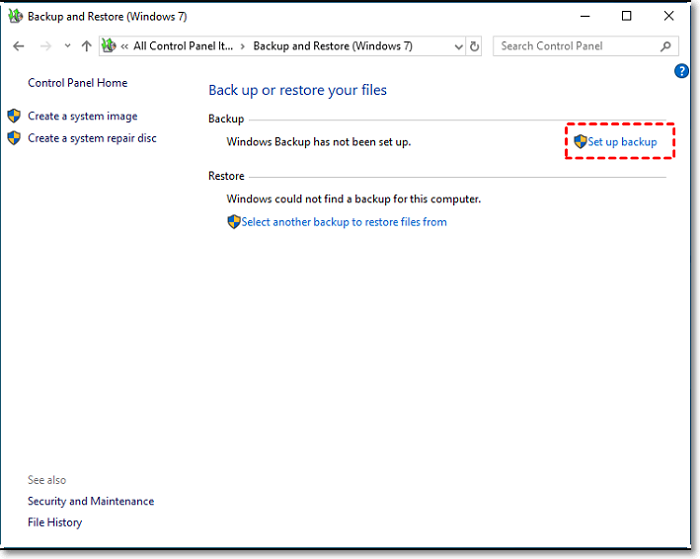
Step 2. Under "Backup," choose the "Set up Backup option".
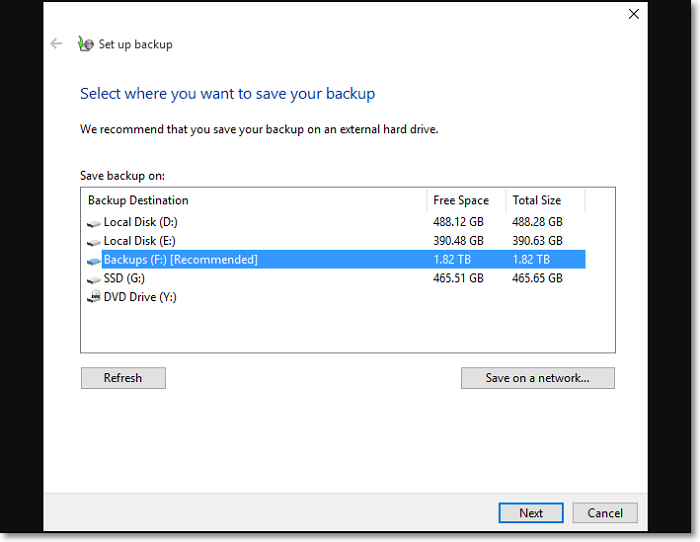
Step 3. Go to the "Backup and Restore" section in the settings, and then select the drive where you want to save your backup. If prompted, enter your admin password to confirm the action.
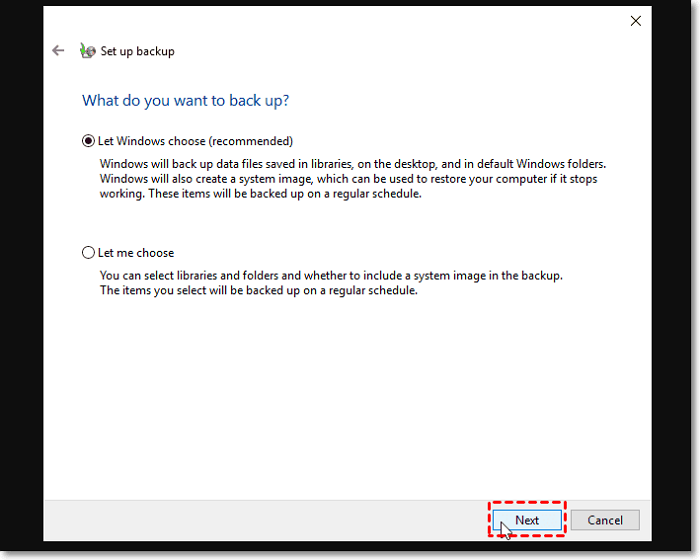
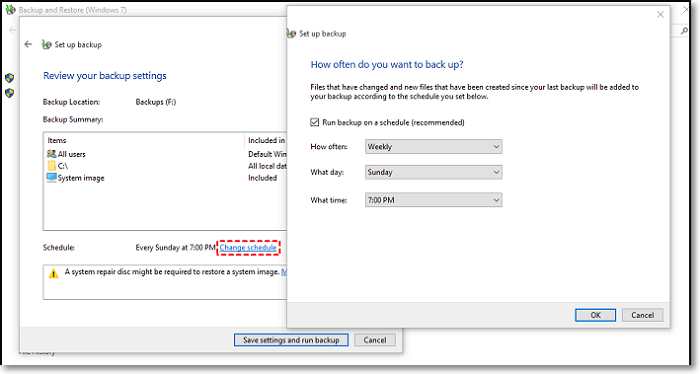
Step 4. Select "Let Windows Choose" and click "Next" to let Windows automatically select the files to back up, which will include files from libraries, the desktop, and default Windows directories.
Step 5.Click the Save Settings buttons and Run Backup.
Additional suggestion: How to Use Backup and Restore to Restore the Backup
To recover lost files, start by checking the "Recycle Bin" or "Trash" on your computer, as deleted files are often stored there. If the files are not in the Recycle Bin, try using a file recovery software like Deep Data Recovery Wizard or Disk Drill to scan your computer's hard drive for any recoverable files.
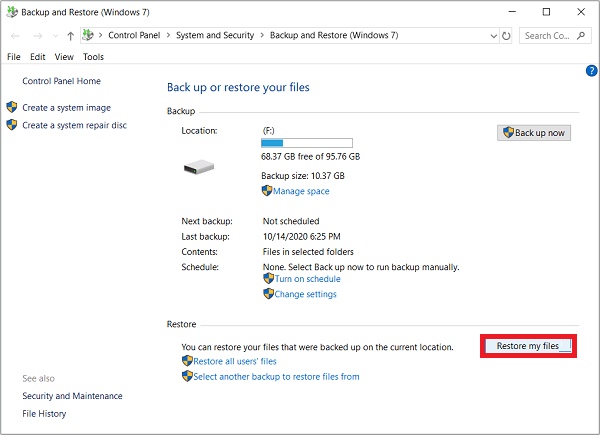
Step 1. To update and restore your Windows, go to Settings, then click on "Update & Security" under the "Backup" section.
Step 2. Click the Restore my files button in the "Restore" section.
Step 3. To restore the desired folders from a Backup, click the "Browse for folders" button and select the folders you want to restore, then click Next to start the restoration process.
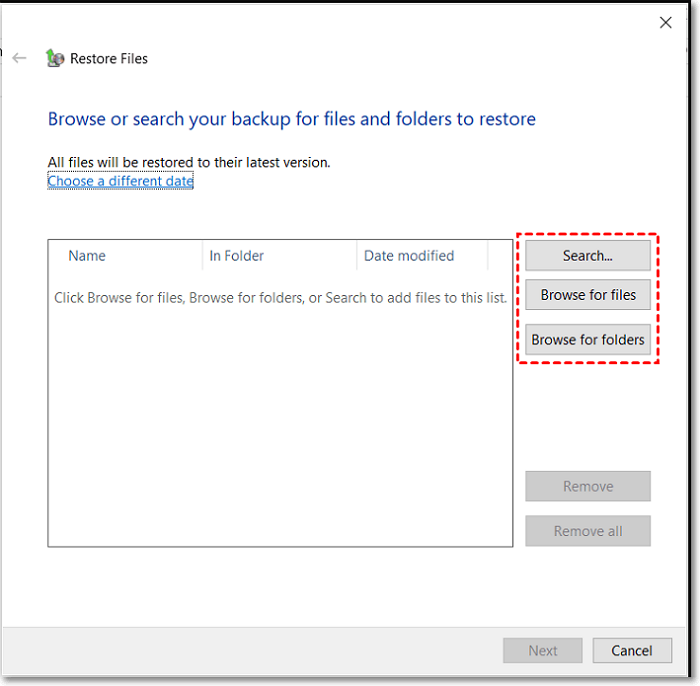
- Browse for files: To restore files, start by clicking on the "Add Files" button, which will allow you to select and add the specific files you want to recover.
- Browse for folders: To restore folders, click the "Add Folder" button to select the folders you wish to restore.
- Search to add files: To add a file or folder to a OneDrive folder, you can use the search feature to find the item you want to add. This will allow you to quickly locate the file or folder you need, rather than having to browse through your computer's file system.
Windows 11 Backup to External Hard Drive via Backup Software
Windows 11 Backup and Restore can meet your immediate data backup and recovery needs, but it falls short in providing differential backup capabilities and system backup. To better secure your data, consider using Qiling Backup as an alternative to Windows 11 Backup and Restore. This specialized backup program allows you to partition and clone disks in Windows 11, and creates backups of your system, disk, file, and partition.
You will know how to use it by following the steps below:
Step 1. To start the backup process, launch Qiling Backup on your computer and click the "System Backup" option on the home screen.

Step 2.The Windows operating system information and system related files and partitions will be automatically selected, so no manual selection is required. To proceed, choose a location to save the system image backup by clicking on the illustrated area.

Step 3. The backup location can be another local drive on your computer, an external hard drive, network, cloud, or NAS. We recommend using an external physical drive or cloud to preserve system backup files.

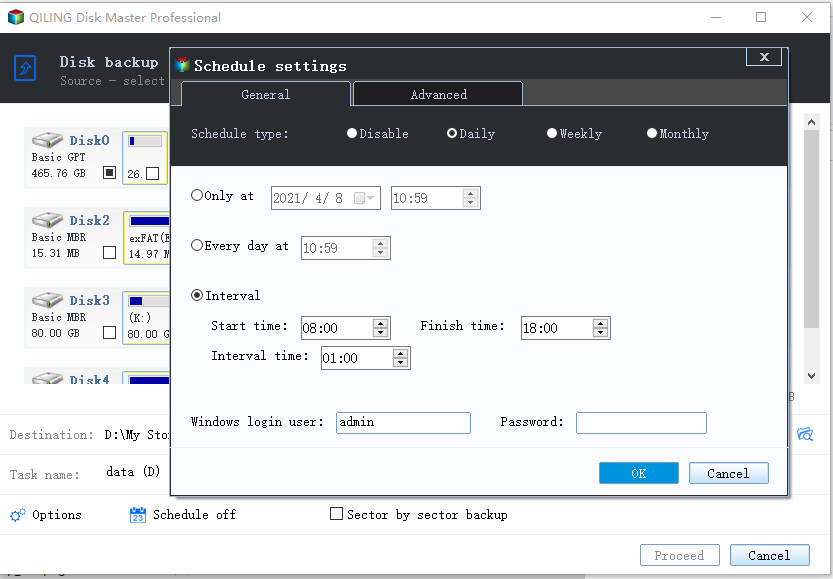
Step 4. The Windows system backup process allows for customization settings such as enabling an automatic backup schedule on a daily, weekly, or monthly basis, or upon an event. Additionally, differential and incremental backup options are available. Upon clicking "Proceed", the backup process begins, and the completed task is displayed on the left side in a card style.
This program includes a ton of other functions that Backup and Restore does not, such as.
- Differential and Incremental Backup: Back up only updated or new files to save time and storage space.
- Backup Plan: To automatically back up your files on the schedule you previously established, you can set up a task in your calendar or use a backup software that allows for scheduled backups. This way, your files will be backed up at the same time every week, month, or year, depending on your preferences.
- Pause and Resume: You can pause the backup procedure for a while and resume it later.
- Backup options: 7-Zip allows you to split the backup image into smaller files and compress it.
Cloud data backup is possible with services like Google Drive, Dropbox, and OneDrive.
Windows 11 Backup to External Hard Drive via File History
To back up files using File History in Windows 11, you can enable the feature to automatically save files from your desktop, documents, music, photographs, and video folders at regular intervals, creating multiple backup copies that can be restored in case of file loss, damage, or deletion.
Step 1. To start the backup process, first attach an external hard drive to your computer. Then, go to System, click on Storage, and then select Advanced storage settings. From there, choose "Add a drive" from the Back up using the File History menu.
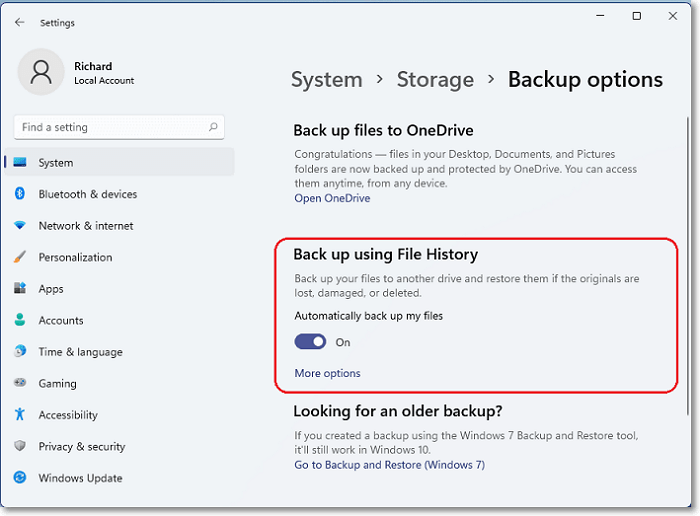
Step 2. To enable the "Automatically back up my files" option, click the toggle switch to the "on" position.
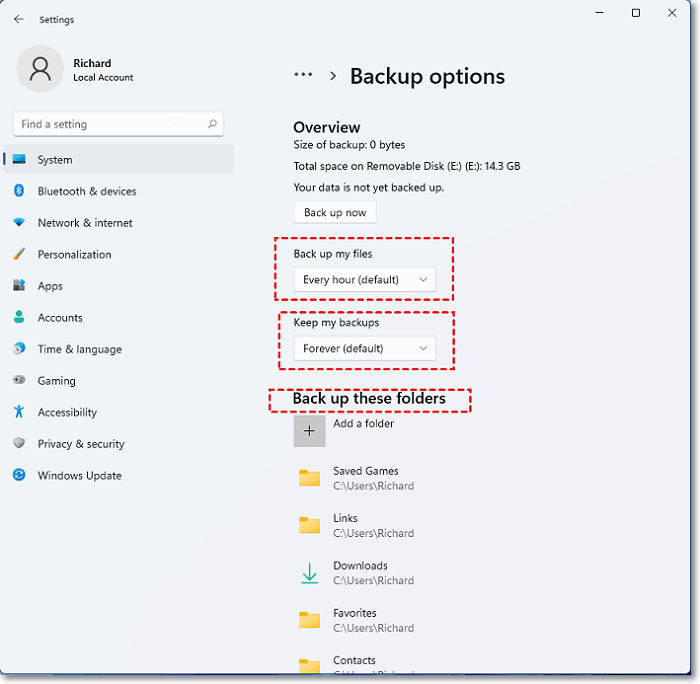
Step 3. File History allows you to set the frequency, duration, and types of backups that it keeps, giving you more control over your backup process.
- Backup my files: File History automatically backs up your files at intervals ranging from 10 minutes to 24 hours, allowing you to customize the backup frequency to suit your needs.
- Keep my backups: The option is set to keep backups forever, but can be adjusted to retain them for 1 month to 2 years before deletion.
- Back up these folders: To add extra folders to your backup, click "Add Folder" and view the complete list of folders in the window. You can also select a folder and click "Delete" to stop Windows from backing it up.
Step 4. Once the drive is connected to your computer, Windows 11 will automatically backup your files. To initiate the backup process, save and depart when finished, then select "Backup now".
Extra suggestion: How to Use File History to Restore the Backup
Here are the steps to restore files from your external disk using File History in one paragraph:
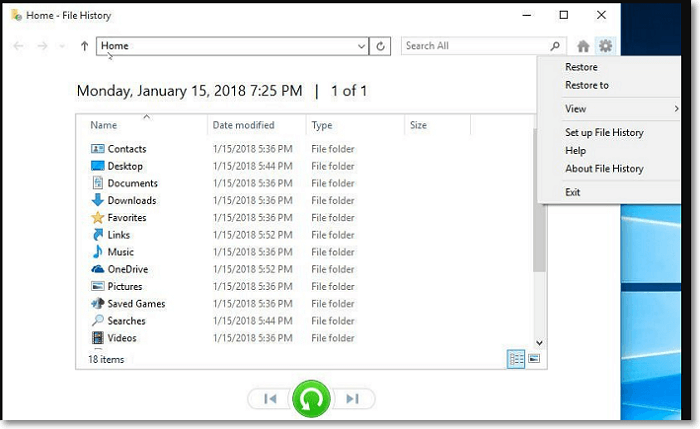
Step 1. To restore files from a current backup, go back to the File History's Backup choices box and click on the bottom option that says "Restore files from a current backup."
Step 2. Click on the backup version you want to restore, then click on the "Restore" button to start the process. Make sure you have enough space on your device for the restored data. If you're restoring a large backup, it may take some time to complete.
Step 3. To restore your device to its original settings, select the "Restore" option from the menu, or click the gear symbol and choose "Restore to."
Tips:
- Please click the restore option below to return to the original place.
- To restore a file, click the gear icon, choose "Restore to," and select the new place you want to restore the file to.
Bonus Tip: Windows 11 Automatic Backup Solution
You can automatically back up your computer data and hard drive partition files on Windows 11 and Windows Server computers by setting up a routine backup plan, ensuring your important files are safely stored.
You might consider using File History to set up a scheduled backup on your computer, offering flexible backup plans for specific days or a scheduled event. This approach is a quick and practical way to assign automatic backup tasks for your files, making it a useful tool for maintaining data security.
Regularly backing up personal files, critical data, and even certain encrypted information on your computer can provide a second chance to immediately restore your data in case of loss or computer crash.
To set up a scheduled backup, consider using Qiling Backup, which is considered the best Windows schedule backup program for 2022.
To Wrap Up
To back up your Windows 11 data to an external hard drive, you have three possible solutions: using the built-in File History feature, the built-in Backup and Restore feature, or a third-party software like Qiling Backup. Among these, Qiling Backup is the most recommended option, offering scheduled automatic backup and making the process easier and more efficient. It's a great solution for backing up and restoring your essential data, and it's worth downloading today to save time and ensure your important files are protected.
FAQs about Backup Windows 11 to External Hard Drive
If you still have doubts, read the answers to further questions to understand better.
1. Does Windows 11 have a backup program?
In Windows 11, you can use built-in tools like Backup & Restore and File History, or rely on cloud storage like OneDrive, or third-party software for backing up your data.
2. What happened to Windows backup in Windows 11?
While Windows 11 still includes the Backup and Restore tool, allowing you to save a system image to external storage, you can also utilize third-party local and cloud solutions for backup purposes.
3. How do you backup everything on a computer to an external hard drive?
To back up your files, use File History to save them to a network site or external drive. To access your backups, go to Start, click Settings, click Update & Security, and then click Backup. You can then select an external drive or network location for your backups after adding a drive.
Related Articles
- How to Cloud Backup for Windows 7 | 2022 Detailed Guide
- How to Copy or Clone Windows XP OS to HDD/SSD
- How to Clone GPT Disk to SSD in Windows Without Boot Failure
- How Do I Clone M.2 SSD to Larger M.2 SSD on Laptop/PC [Complete Guide]
- Seagate Backup Software Download | Back Up Seagate External Hard Drive
Users often turn to reliable Seagate backup software to overcome issues with their hard drives, allowing them to successfully perform backups. - Seagate One Touch VS. Seagate Expansion: Which is Better
Here's a brief summary: The Seagate One Touch is a portable external hard drive designed for data backup and transfer, featuring a compact design, high-speed transfer, and a user-friendly interface. The Seagate Expansion, on the other hand, is a desktop external hard drive that offers more storage capacity and a more affordable price point. Ultimately, the choice between the two depends on your specific needs and preferences. If you need a portable and convenient solution for data backup and transfer, the Seagate One Touch might be the better choice.