How to Sector-by-Sector Clone an SSD in Windows
A sector-by-sector clone attempts to copy readable sectors across the source disk, including unused areas. That is different from a standard clone that may move only occupied data and resize partitions to suit a new SSD.
Know when sector mode helps
Sector mode can be useful when a fixed, exact layout is required or a supported encrypted disk must be preserved without interpreting the file system. It is usually unnecessary for a normal Windows SSD upgrade and can be slower or less flexible than a standard clone.
It cannot recreate sectors the SSD no longer exposes. TRIM may already have discarded blocks from deleted files, and encryption can limit what is meaningful after copying. A sector copy is not automatically a forensic acquisition; formal evidence work also requires write protection, independent hashes, and documentation.
Check actual capacities and drive health
Compare byte capacity, not only marketing labels such as 1TB. Two drives sold with the same nominal size can have different sector counts. The target must have room for the complete source layout. A smaller SSD is generally unsuitable for a sector-by-sector clone.
Check the old drive for read errors before starting, keep a separate backup, and attach the target through a reliable matching interface. Repeated full-drive reads are a poor choice for a clicking or disconnecting source.
Verify the copied disk
After the operation, inspect the destination partition layout and test it in its intended use. For a boot disk, disconnect the source for the first startup and check Windows Boot Manager. For an archive, independently compare hashes or use the verification procedure required by your organization.
Do not assume that a larger destination will automatically expand C:. Sector mode often preserves the source layout, leaving extra space unallocated for a separate partition adjustment.
Run a Sector-by-Sector SSD Clone in Qiling Disk Master
The sector option appears on the source-selection screen. Select it only after confirming the target has at least the source's actual byte capacity and any target data is backed up.
Step 1. Connect the replacement disk with an enclosure that matches its SATA or NVMe interface. Open Qiling Disk Master and select Tools and utilities > Disk/Partition clone. Use a reliable SATA or NVMe connection, stable power, and a healthy source SSD.

Step 2. On the source screen, select the whole disk row by model and capacity, not just its C: partition. Select the complete source SSD row, not one partition. Click Next.

Step 3. Select Sector by sector clone on this source screen only if the complete source fits on the target and every readable sector is needed. Select the checkbox before moving to the destination screen. This reads the full source and can take much longer than an ordinary clone.
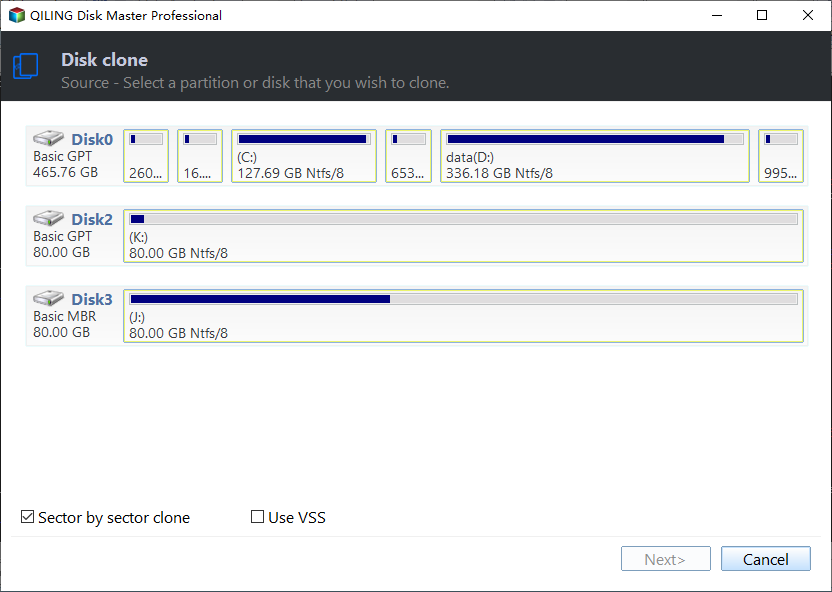
Step 4. Choose the replacement disk as the destination by model and capacity; click Next. Confirm the target's exact identity and capacity; its contents will be replaced. All existing destination data will be overwritten.

Step 5. Review the source and target disks and the resulting partition layout. Ensure the destination can hold the entire source geometry and that the selected mode remains enabled. Click Proceed, accept the overwrite warning, and wait for completion without disconnecting either drive.

Step 6. Test the destination on its own. For evidence work, apply separate write-blocking and independent validation procedures. Keep the source unchanged until the result is verified.
If the source reports unreadable sectors, stop and assess recovery options rather than repeatedly rerunning the same clone.
Frequently Asked Questions
Is sector cloning best for every SSD migration?
No. A standard clone is generally more flexible when moving to a different-size SSD.
Can it recover deleted SSD data?
Not reliably. TRIM, reuse, and encryption may make deleted content unavailable even when all exposed sectors are copied.
Conclusion
Use sector mode only for a specific layout or evidence-related working-copy need, confirm real capacity, and independently verify the result.
Related Articles
- Make a Forensic Copy of a Hard Drive
Learn why a sector clone alone does not establish evidence integrity. - Standard SSD Clone
Compare the simpler route for routine Windows upgrades.
Products
Articles & Tutorials
- Data Recovery
- Data Backup
- File Recovery
- File Backup
- System Backup and Restore
- Disk and Partition Clone
- Technical articles
- Mobile articles
- Disk Master Help
- Windows Data Recovery Tutorials
- Windows Secure Delete Tutorials
- Windows Partition Management Tutorials
- Windows File Backup and Restore Tutorials
- Windows System Backup and Restore Tutorials
- Windows Disk Backup and Restore Tutorials
- Windows Clone Tutorials