For Backup Beginners: Windows 11 Backup vs Windows 10 Backup vs Qiling Backup
Quick navigation:
| Workable Solutions | Step-by-step Troubleshooting |
|---|---|
| Create a backup in Windows 11 |
1. With file history 2. Backup with windows...Full steps |
| Create a backup in Windows 10 |
1. With file history 2. Backup and Restore (Windows 7)...Full steps |
| Create Backups in Qiling Disk Master |
1. Click on various backup options 2. Customize backup plan...Full steps |
Windows 11 inherits many features from its predecessor Windows 10, but also has some differences, including in backup options. This guide provides a simple overview for beginners on how to create backups using Windows 11 Backup, Windows 10 Backup, and Qiling Backup.
What has changed in Windows 11 backup options?
When Windows 11 was released, it brought significant changes to its interface, ease of use, and performance. One notable change is the built-in backup functionality, which allows users to create backups in two ways: by backing up file history to an external hard drive and by syncing files and folders with OneDrive.
In Windows 11, the File History feature has been moved from the Settings to the Control Panel, where users can find it after searching. The backup section now only displays three options: OneDrive Folder Sync, Remember My Apps, and Remember My Preferences, suggesting a shift towards cloud drives for file backup, possibly influenced by macOS.
How to create a backup in Windows 11?
To avoid data loss, most users rely on their PC to access files, but it's essential to create a backup beforehand, regardless of the operating system, such as Windows 11 Backup, Windows 10 Backup, or Qiling Backup, ensuring your files are safe.
With Windows 11, you can easily create backups using two methods: File History and Windows Backup. To create a backup with File History, you can follow the instructions, and for Windows Backup, you can also follow the instructions. Both methods allow you to create backups of your important files and data, giving you peace of mind in case something goes wrong.
1. Create a backup with file history
File History in Windows 11 is used to save different versions of a selected file. Unlike previous versions, users can only add the default folders, and not folders of their choice. To use File History, follow the steps below.
Step 1. Search File History in the taskbar and click the best match.
Step 2. Connect an external hard drive as a backup drive.
Step 3. Open File History will copy files from Desktop, Library, Contacts, and Favorites.
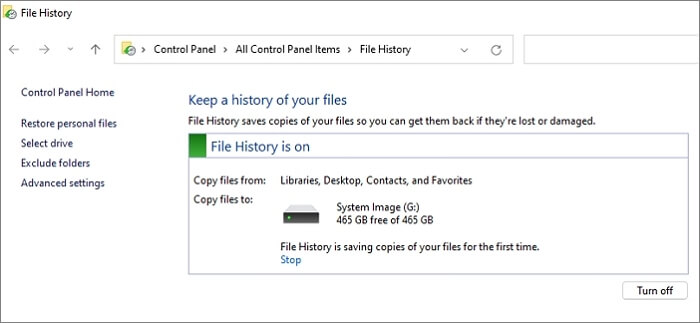
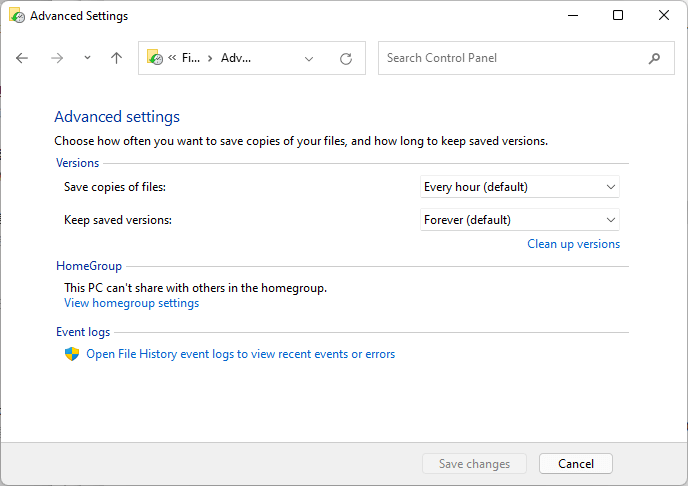
Step 4 File History can be set to automatically backup files at regular intervals, and users can choose how often backups are made and how long previous versions are kept.
You can turn off File History backup from settings if you want to stop backing up your files.
2. Sync files and settings in Windows Backup
Windows Backup is a feature in Windows 11 that automatically backs up selected settings to your Microsoft account. To turn it on and start syncing, you can follow these steps:
Here's how to turn on Windows Backup:
step 1. Go to Settings > Accounts > Windows Backup, here you will see the new Windows Backup feature.
Step 2. To sync your folders with OneDrive, choose what you want to sync, click on "Manage sync settings", and content from your Desktop, Documents, and Pictures folders will be available on all your devices.
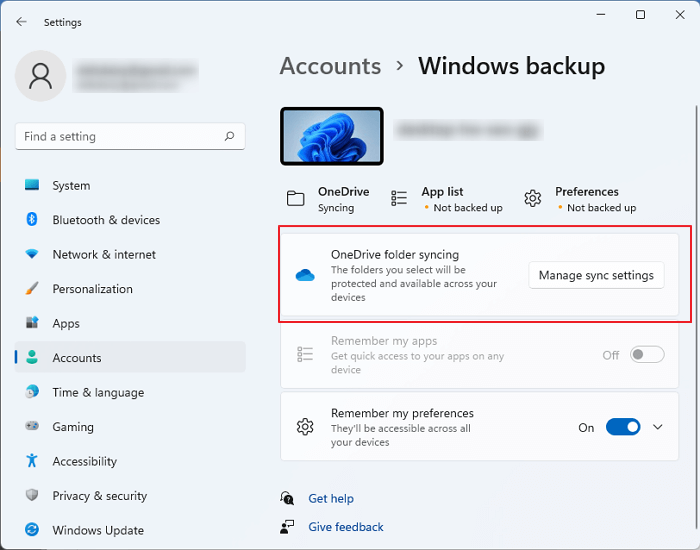
Two other items can be backed up:
remember my app
Windows 11 allows you to restore previously installed apps on a new device, making it easier to set up a new computer with the same software you had on your old one.
remember my preferences
You can also restore preferences such as passwords, languages, and other Windows settings.
To access OneDrive on your PC, you need to log in with your Microsoft account. If you don't have your Microsoft account or OneDrive associated with your PC, you must log in with your Microsoft account.
Windows 10 Backup Utility: File History and Backup and Restore (Windows 7)
Windows 10 has two built-in backup features: File History and Backup and Restore, which can back up personal data and files, but not the entire PC.
File History in Windows 10 and Windows 11 allows you to back up important files from your PC folders, including Desktop, Documents, Downloads, Music, Pictures, Videos, and parts of the AppData folder. You can customize which folders to back up and schedule backups to run at specific times. This feature provides a convenient way to protect your files from loss or corruption.
Backup and Restore (Windows 7) is a feature that allows users to create a system image on an external hard drive, first released in Windows 7.
Best Windows Backup Alternative - Qiling Backup
While Windows backup tools can be used at any time, they lack customization options and permissions. However, third-party software like Qiling Backup offers more power to customize backup plans and provides additional options for creating backups, giving users more control over their data.
Various options: When making a backup, various options are available, including a backup file, disk or partition, system, and Outlook email backup.
Backup schedule: You can customize when backups are created, including incremental, differential, scheduled, specific event, and more, giving you flexibility in your backup strategy.
All-in-one software: Qiling Backup is a comprehensive software that combines all typical backup features into one, running smoothly on both Windows 11 and Windows 10.
Step 1. To initiate a backup, click the File backup button to start the backup process.

Step 2. On the left, both local and network files will be displayed, allowing you to browse and select the desired backup files.

Step 3. Follow the on-screen instructions and choose a location to store the backup.

Step 4. To encrypt the backup with a password, click on "Options" in the "Backup Options" section. This will allow you to add an extra layer of security to your backup by requiring a password to access it. Additionally, you can make other customizations to the backup process to suit your needs.

In the Backup Scheme, specify the backup schedule by selecting the frequency and time of day for backups to occur. Additionally, choose whether to start the backup at a specific event, such as when the computer is idle or when a certain program is running.

Step 5. The backup can be stored on a local disk, Qiling's online service, or a Network-Attached Storage (NAS) device.

Step 6. Qiling Backup allows customers to back up data to both a third-party cloud drive and its own cloud drive, providing a convenient and secure way to store and protect their data.
To back up data to a cloud drive, select Local Drive, scroll down to add Cloud Device, and add your cloud account by logging in.
Step 7. Click Proceed to start the backup process. After completion, the backup job will be displayed as a card on the left side of the panel. You can then right-click on the backup job to perform further actions.

Windows 11 Backup vs. Windows 10 Backup vs. Qiling Backup
All in all, all the built-In Windows 10 and 11, tools like File History Backup and Windows Backup are useful for small backups, but they can't back up your entire PC. If you want a full backup, consider using third-party software like Qiling Backup, which can ensure all your files are safely backed up on your drive. For more information on Qiling Backup, visit our website.
Related Articles
- Top 10 Reasons to Download Qiling Backup
- [Solved] This Application Was Unable to Start Correctly (Error Code: 0xc000007b)
- [Download] Windows 10 Recovery Tool for 32 Bit and 64 Bit
- Qiling Backup Free vs Home: Am I Giving Too Much Away?
- SanDisk/Kingston/PNY Data Migration Software [Pros and Cons]
SanDisk, Kingston, and PNY are three brands that offer data storage devices. This article introduces the best SanDisk/Kingston/PNY Data Migration Software - Qiling Disk Master and lists its pros and cons. I hope you will know more about data migration after reading - TOP 2 SanDisk SSD Backup Software for Windows 11/10/8/7
Many SanDisk SSD users need to back up their data to prevent loss. Therefore, SanDisk offers software called SanDisk SSD Backup software to do backups. This page will give you a detailed explanation of SanDisk SSD Backup software and tell you how to use it. To offset its limits, there also recommend an alternative for you.