Windows Server 2016 Migration Step by Step Guide
What's The Easy Windows Server 2016 Migration?
Transferring Windows 7 to Windows 10 or moving Windows 10 to a new computer can be done using the Windows easy transfer tool. However, when it comes to migrating Windows Server 2016, the process is more complex and requires specialized software. While experienced Windows server administrators may be able to perform the migration manually using advanced management techniques, others may find it helpful to use a migration tool to simplify the process, which can involve transferring Active Directory, DHCP, Certificate Authorities, ADFS, and File Server configurations.
Manual server migration methods can be tedious and prone to errors, especially when dealing with large files. This can lead to wasted time and frequent failures. A more efficient approach would be to use a server migration software that can automatically transfer data between servers on a massive scale, minimizing the risk of errors and saving time.
Qiling Disk Master Technician
Your smart Windows Server file transfer software.
- Unlimited file transfer between Servers.
- Transfer programs, apps without reinstallation.
- Transfer account, settings to new Server computer.
- Data rescue, find product key for installed programs.
Qiling Disk Master: User-friendly Server 2016 Migration Software
Qiling Disk Master is the ultimate software for migrating to Windows Server 2016, allowing for seamless transfer of files, applications, settings, profiles, and shared data from any server to a new Server 2016. It supports migrations from Server 2003/2008 r2/2013 to Server 2016, as well as from Server 2016 to Server 2019, making the process remarkably easy and efficient.
Multi-mode of data transfer:
Direct-Data can be transferred from one server to another over a network, or indirectly via an image, allowing for the sharing and distribution of information across different servers.
Transfer to Server 2016:
Support is available for transferring servers from lower versions to higher versions, specifically from Server 2003/2008/2012/2016 to Server 2016.
Transfer from Server 2016:
The system needs to support the latest Server 2019, and the current Windows Server 2016 needs to be transferred to Server 2019.
Supported migration data:
Applications, files, shared data, profiles, databases, settings, etc.
How to Migrate Applications, Database, and Profiles from/to Windows Server 2016
Upgrading to Windows Server 2016 and Windows Server 2019 is recommended, as earlier versions such as Windows 2003 and Windows 2008/2008 R2 are outdated. By following the process of migrating to Windows Server 2016, you can successfully migrate your server without reinstalling applications or reconfiguring settings, making the transition smoother and more efficient.
Guide: How to migrate to Windows Server 2016 over the network
Step 1. Launch Qiling Disk Master on your source and target computers, and connect both PCs via the internet.
1. At the "Backup and recovery" section, click on "File sync" to proceed.

2. Select your target computer via its device name, then enter its account password or verification code and select the transfer direction, then click "Connect" to continue.
You can check the verification code on the right top of the "PC to PC" main screen on the target computer.

Step 2. To transfer data via the internet, select the categories of Applications, Files, and Accounts to transfer. This will allow you to move your chosen data to a new device or computer, or to a cloud storage service.
To transfer data selectively, click the "Edit" button under each category and select the specific items you want to transfer.

Step 3. To transfer apps, files, and accounts from one computer to another via the internet, click "Proceed" to initiate the process. This will allow you to seamlessly move your digital content to a new device, ensuring a smooth transition.
Guide: How to migrate to Windows Server 2016 via a Backup
Step 1. Create a backup file.
1. Connect your USB drive to your source computer, then open Qiling Disk Master and go to the "Backup & Restore" page, where you can click the "File backup" button.
2. To initiate a backup, hover over the desired column (Applications, Files, or Accounts) and select the specific data you want to back up. Then, click "Proceed" to generate a backup file.

Step 2. Recover via the created backup file.
1. To restore the backup, plug the USB drive containing the backup file into the target PC and open Qiling Disk Master. Then, navigate to the "Backup & Restore" page.

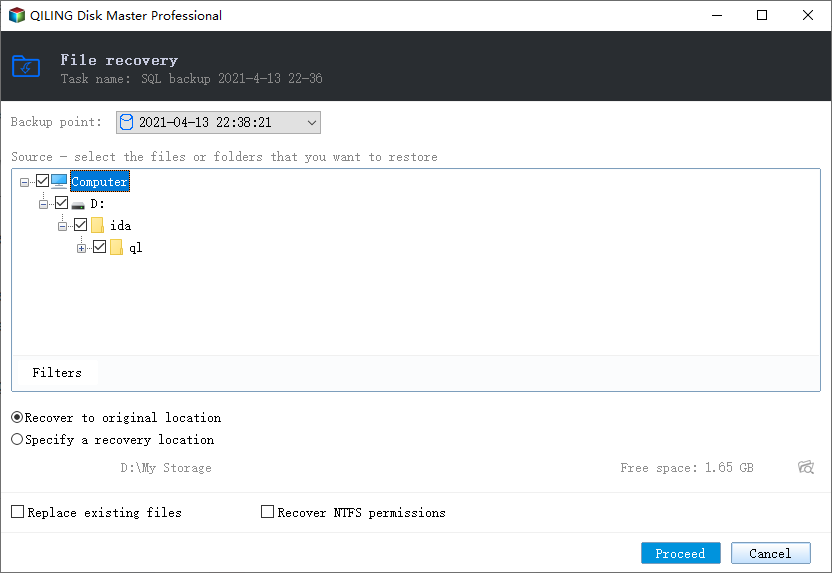
2. To restore your image, click "Browse" to select the image file, then choose the "Restore" option, and proceed with the next step.

3. Now, you can select Applications/Files/Accounts you want to restore.
To transfer data, go to Applications, Files, or Accounts and select the specific data you want to transfer. Click "Restore" to confirm and choose where to save the files, or click the browse icon to change the target path.
Related Articles
- Transfer MSXML 4.0 to Another Computer
- Can I Share Apps Between Two Laptops Using Nearby Share? Yes or No
- How to Transfer Minecraft Worlds from PC to PC
- Transferring Installed Programs from One Computer to Another Windows 11/10 - Here Is the Best Way
- How to Transfer Files from Dropbox to Google Photos [2022 New Guide]
Can transfer files from Dropbox to Google Photos? You can either download or sync files between Dropbox and Google Photos so to access more storage space. This article will outline the ways to transfer files from Dropbox to Google Photos and why. You'll also learn how to transfer programs between PCs using Qiling Disk Master. - How to Transfer Files from Flash Drive to Computer Windows 10
Transferring files between computers and smartphones is a breeze with USB devices, requiring only a simple drag and drop. However, as file sizes and numbers increase, this process can become more challenging. In such cases, using Qiling PCTrans software can provide a reliable solution for confidentially copying files without risking data loss.