Fix Mac Not Recognizing Gopro With Quick Solutions
Quick Guide:
- 1. Why is the GoPro Not Showing Up on Mac
- If you're having trouble getting your GoPro recognized by your Mac, don't worry - there are effective solutions! First, ensure that your GoPro is properly connected to your Mac via USB, and that the camera is turned on. Next, try restarting your Mac and GoPro to refresh the connection. If that doesn't work, try using the GoPro Studio software to transfer files, or update your Mac's operating system to the latest version.
- To ensure the security of GoPro's data, consider implementing additional security measures such as encryption, secure data storage, and access controls. This will help protect sensitive information from unauthorized access, theft, or loss. By taking these precautions, you can maintain the trust and confidence of users, customers, and stakeholders, while also complying with relevant data protection regulations.
Connecting your GoPro camera to your Mac can be a common issue, but resolving it is straightforward. The first step is to connect the GoPro SD card to your Mac, which will allow you to transfer footage from the camera, edit it, and share it with others.
The Mac not recognizing the GoPro can make it difficult to unload films and photographs, but fortunately, this issue can be resolved through various approaches. By following the steps outlined in this article, you can troubleshoot and fix the problem on your Mac, ensuring that you can easily access and transfer your GoPro footage and photos.
Why is the GoPro Not Showing Up on Mac
GoPro not connecting on Mac can occur when using the GoPro app on a Mac, and the camera may not be visible in the My Devices area, preventing it from connecting to the computer.
All GoPro cameras, including the HERO+, HERO Session, HERO4 Session, HERO 5, 6, 7, and 8 Black, as well as all HERO variants, are affected by this issue.
If you're using a micro SD card adapter to connect your GoPro to your Mac, it may appear as your computer's mass storage device, potentially causing other programs to not recognize the camera.
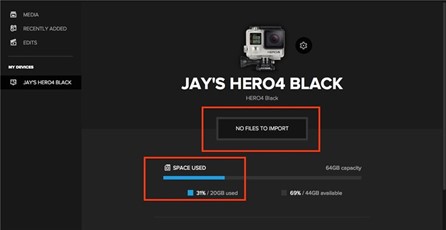
If a warning such as "No Files to Import" or "Space Used" appears on the GoPro, it may indicate that the micro SD card has data on it, but GoPro still won't connect to a Mac. The camera may be recognized, but the issue persists. In this case, the problem is likely not with the camera's recognition.
Fix Mac Not Reading SD Card Once for All
When inserting an SD card into your Mac, nothing shows up in Disk Utility or Finder. Argh! Your SD card not working on Mac.
How Do I Get GoPro Recognized by Mac
If you're experiencing issues with your GoPro not showing up on your Mac, there are likely solutions to resolve the problem. The GoPro not being visible on Mac is a common issue, but there are workarounds to fix it.
If GoPro software for Mac isn't showing up on your computer, you can try two solutions to fix the issue. Firstly, you can try reinstalling the GoPro software.
- Solution 1. Reactivate the hardware settings
- Solution 2. Reinstall the drivers for USB controllers
- Solution 3. Restart your Mac and Reconnect Again
- Solution 4. Connect the camera to a different USB port
- Solution 5. Formatted the GoPro SD card
Solution 1. Reactivate the hardware settings
To reactivate the different hardware settings, you can reset the USB port by following these steps:
Step 1. Go to the Apple menu and choose Shut Down from the list of options.
Step 2. The Control, Option, and Power buttons, along with the Shift button, are all located on the keyboard and can be pressed simultaneously.
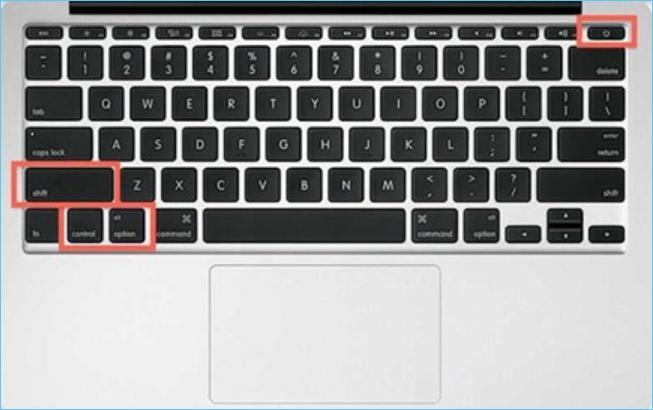
Step 3. To release all of the buttons at once, press and hold them for 5 seconds.
Step 4. The Mac can now be turned on.
To verify if GoPro is compatible with Mac, connect the camera to your Mac using a micro SD card adapter or a USB cable after resetting the USB ports on your Mac. Additionally, ensure that your "My Devices" settings are configured to display GoPro for desktop compatibility.
Solution 2. Reinstall the drivers for USB controllers
To reinstall the drivers for USB Controllers on a Mac, you can follow these steps:
Step 1. Device Manager can be accessed by pressing the Windows key and the X key on your keyboard at the same time.
Step 2. Find the entry that says USB Controllers, then expand it.
Step 3. Right-click on your device and choose Uninstall.
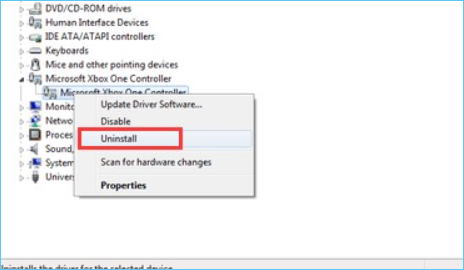
Step 4. Mark the checkbox labeled Delete the driver software for this device and click OK in the confirmation dialog box.

Step 5. Unplug the USB Controller and then restart your PC
Step 6. Simply reconnect the controller to the console, and Windows will automatically install the necessary driver.
Solution 3. Restart your Mac and Reconnect Again
To restart your Mac and reconnect your GoPro, simply shut down your Mac by going to Apple Menu > Shut Down, then wait for 10 seconds before turning it back on. Once your Mac is back up, try reconnecting your GoPro to your Mac using the GoPro app or by manually setting up the camera via Bluetooth.
Step 1. Select Apple menu > Restart from your Mac's menu bar.
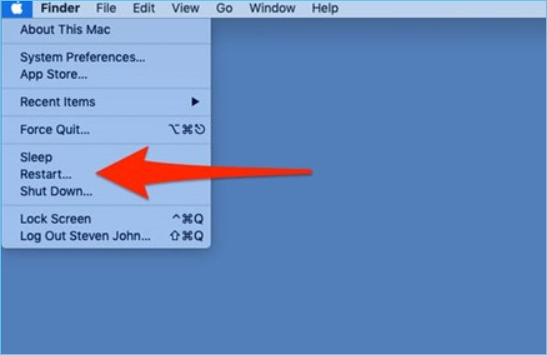
Step 2. If you don't want open program windows to reopen when your Mac restarts, disable the option "Reopen windows when logging back in".
Note: The Mac is shut down when the screen goes black, with no fan or drive noise and no active power light.
Step 3. Connect the USB-C cable to the GoPro's USB-C connector and then to a Mac's USB-C port.
Step 4. Turn on your GoPro.
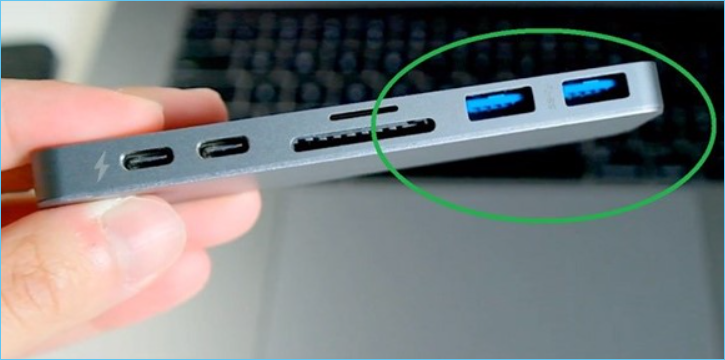
Solution 4. Connect the camera to a different USB port
To connect the camera to a different USB Port, see the instructions below:
Step 1. Insert the cord that comes with the camera into one of the available ports on your Mac.
Note: You can use the camera even if the connection it comes with doesn't match the port you wish to attach it to by buying an adapter.
Step 2. Once the camera is recognized, you'll see a notification saying that the camera is ready to use. Click on the notification to open the Camera app and start using it.
Solution 5. Formatted the GoPro SD card
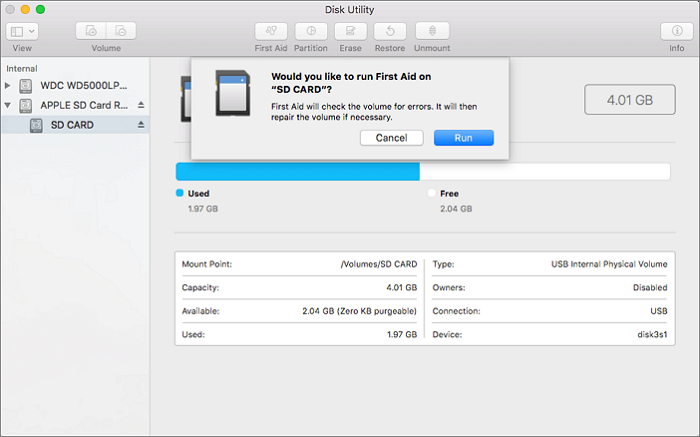
To format a GoPro SD card on a Mac, follow these easy steps. First, insert the SD card into your Mac using an SD card reader.
Step 1. The disk utility may be opened by clicking on the open button.
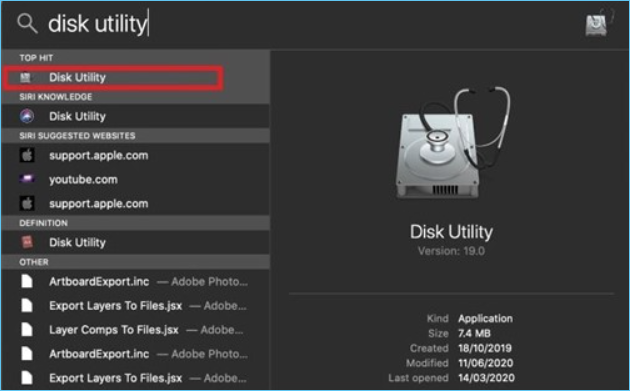
Step 2. To begin using your SD card, go to the External menu on the left panel and select your SD card.
Step 3For SD cards with 32GB or less, choose FAT, while cards with 64GB or larger should be formatted with ExFAT.
Step 4. Once you've selected the item you want to format, click "Erase" to remove it. The formatting process will then begin. Once you receive confirmation that the formatting was successful, you're finished.

Additional Tips: Ensure the Data Security of GoPros Data
Even if the problem is solved, users may still face data loss when Mac recognizes the GoPro, due to basic causes such as the camera being unmounted, file system corruption, or incorrect file permissions, leading to lost photos and videos.
Viruses and Malware: Phishing attacks, typically via email, can lead to a computer virus infection when an employee clicks on a tainted link. The virus or malware can then spread to the computer system, causing harm or stealing data.
Hard Drive DamageThe hard drive is the most common cause of data loss, with over half of all data losses attributed to it. Every week, approximately 140,000 hard drives fail, making them the most vulnerable component of computers.
Power Outages: If there's a sudden power interruption, software systems can shut down abruptly, resulting in the loss of unsaved data and potential file corruption due to faulty shutdown processes.
Human Error: Our mistakes can lead to accidental deletion of data files or text chunks without the owner's knowledge, potentially causing the loss of vital files or data.
Tips to Avoid Data Loss on Mac
Here are some tips that may be helpful to better ensure the data security of GoPros: Consider using a password to protect your camera, keep your GoPro's firmware up to date, use a secure connection to transfer files, and avoid storing sensitive information on the camera itself. Additionally, consider using a cloud storage service to store your files, and regularly back up your data to prevent loss in case of a malfunction or theft.
1. Regularly Backup Your Data
Regularly backing up data is crucial for data security, and using powerful data backup software can make the process much easier. While backing up data daily, weekly, or monthly may seem tedious, tools like Qiling Backup for Mac offer excellent performance and reliability, making them a highly recommended option.
2. Install Antivirus and Firewalls
A firewall and antivirus software are essential to prevent unwanted threats from accessing your private information.
3. Other Preventative Measures
Laptops and other data devices should be stored in a dry, dust-free environment to prevent overheating and damage from moisture.
4. Prepare Reliable Data Recovery Tool
If you've found a solution to get your Mac to recognize your GoPro, you may still face the issue of data loss. To avoid this, it's crucial to have a reliable Mac data recovery tool, such as Deep Data Recovery for Mac, which can help you recover lost data from different storage devices with a high success rate.
Follow the steps below to prevent data loss on Mac:
Step 1. Launch Deep Data Recovery, select the file types you want to recover, and click "Next" to begin the recovery process.

Step 2. Select the disk location where you lost data and click the "Scan" button.

Step 3. Deep Data Recovery for Mac will immediately scan your selected disk volume and display the scanning results on the left pane.

Step 4. In the scan results, select the file(s) and click the "Recover" button to have them back.
Related Articles
- How to Delete Files on Mac that Won't Delete: Methods Vary from Specific Errors
- Guide: Recover an Unsaved Keynote Presentation on Mac
- MacBook Pro/Air Won't Turn on? 10 Fixes + Bootable Recovery Tips
- How to Fix Excel File Open But Not Visible on Mac
- Sandisk Recovery Online | Sandisk Pen Drive Data Recovery Online
Get this SanDisk recovery online tool – conveniently restore deleted, formatted or lost data from SanDisk SD card, pen drive, and USB flash drive on Windows or Mac. - Best SD Card Recovery Software to Recover Files from SD Card
Want to SD card recovery or recover deleted files from SD card? The best SD card recovery software can effectively recover lost, deleted or formatted photos, video and more files from SD card on Windows or Mac.