Wipe a Lenovo Hard Drive or SSD Before Disposal
Before selling or recycling a Lenovo PC, decide whether you need a normal Windows reset, a manufacturer-supported secure wipe, or full drive sanitization. These methods are not interchangeable. A file deletion or quick format leaves more recoverable data than a verified drive-level erase.
Identify the Storage and Protect What You Need
Step 1. In Windows, open System Information and Disk Management to identify the internal disk model, capacity, and whether it is HDD or SSD. Note if there are multiple internal drives.
Step 2. Copy documents, browser data, recovery keys, and license information to separate storage. Verify that several copied files open. Sign out of accounts according to the organization's or vendor's handoff policy.
Step 3. If BitLocker is enabled, save its recovery key and note the encryption status. Encryption can support secure disposal only when key handling and policy are understood; it does not substitute for a verified backup.
For a business-owned Lenovo device, follow the organization's retention and disposal policy. A factory reset may leave vendor recovery content and may not meet a required sanitization standard. Record serial numbers and the chosen method before the device changes hands.
Use the Method That Matches the Goal
Windows Reset: Reset this PC > Remove everything is designed for reinstalling Windows and removing user data. The additional drive-cleaning option takes longer. Check the Windows recovery screen for the exact scope before confirming.
ThinkShield Secure Wipe: Supported ThinkPad models expose a firmware-level wipe intended for internal storage. Availability and menu path depend on the model and firmware, so consult Lenovo's support page for the exact machine.
Qiling Wipe data: Qiling Disk Master offers a software overwrite workflow for selected HDDs or partitions. SSDs require special caution because flash wear leveling can leave cells outside ordinary software overwrite reach; prefer manufacturer or firmware sanitization when that assurance is needed.
Prepare the Qiling Workflow Safely
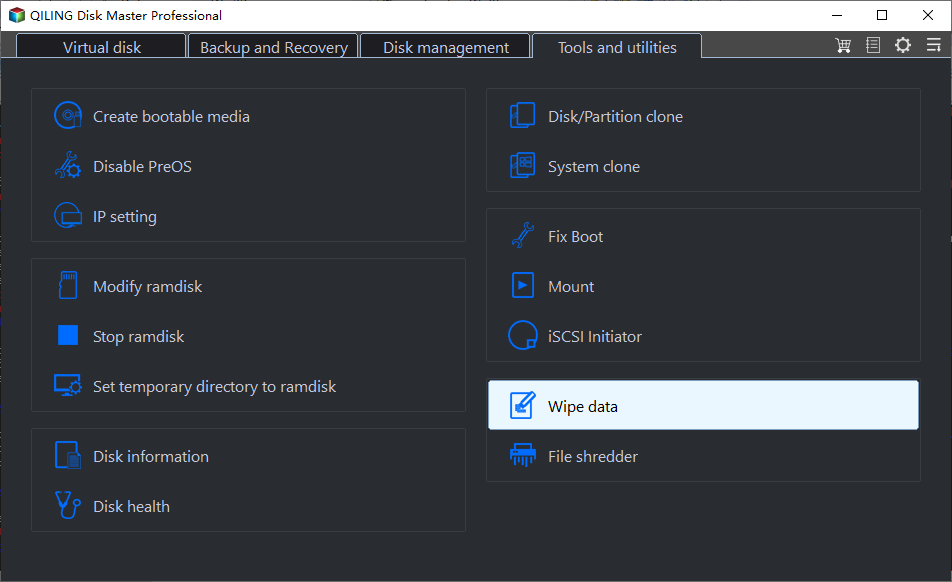
Step 1. Open Qiling Disk Master and choose Tools and utilities > Wipe data. This opens a disk-and-partition selector; no data is erased by merely opening it.
Step 2. Identify the intended drive by model, capacity, and partition layout. Check whether the selection is the disk header or one partition. The example image shows a partition selected, so do not treat it as a whole-disk selection example.
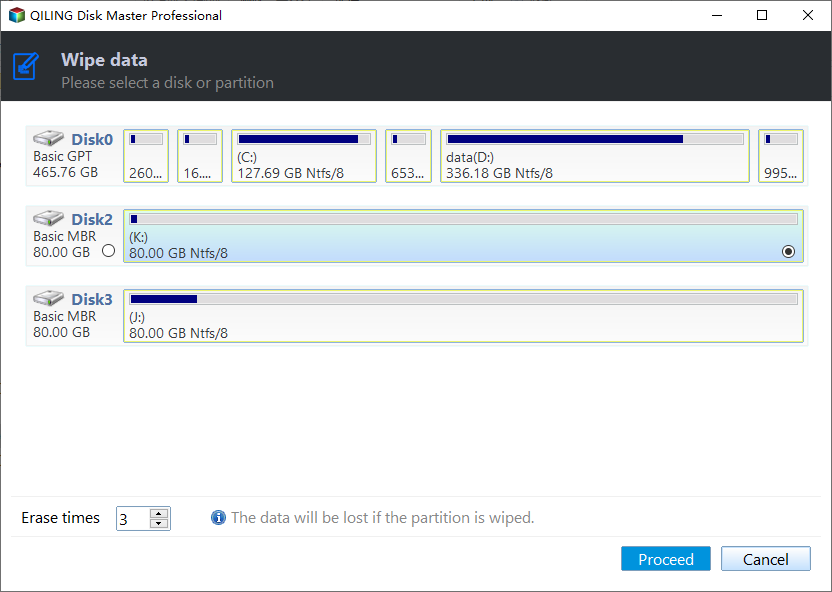
Step 3. Stop before execution until the backup, target identity, device type, and sanitization policy are confirmed. A wrong selection can destroy another drive's data.
A multi-pass software overwrite is not automatically stronger for a modern SSD; wear leveling can hide physical blocks from ordinary writes. On a supported Lenovo SSD, the official firmware secure-wipe route may be more appropriate. On an HDD, a verified overwrite method may be appropriate when policy allows it. Match the method to the actual drive and required assurance.
Verify the Handoff
After any approved erasure method, verify the intended drive no longer exposes prior files, record the method used, and reinstall Windows only if the recipient needs a working OS. A progress bar alone is not independent proof of secure sanitization.
Related Articles
- System Backup and Restore
Create and verify a Windows backup before major repairs. - Check Disk Health
Recognize storage warnings before changing a drive.
Products
Articles & Tutorials
- Data Recovery
- Data Backup
- File Recovery
- File Backup
- System Backup and Restore
- Disk and Partition Clone
- Technical articles
- Mobile articles
- Disk Master Help
- Windows Data Recovery Tutorials
- Windows Secure Delete Tutorials
- Windows Partition Management Tutorials
- Windows File Backup and Restore Tutorials
- Windows System Backup and Restore Tutorials
- Windows Disk Backup and Restore Tutorials
- Windows Clone Tutorials