How to Fix SSD Not Showing up in Windows 10/8/7
Quick Navigation:
- Possible Reasons why SSD is not Showing up in Windows 10/8/7
- SSD not showing up because the Drive Letter is missing or conflicting
- Step-by-step Guide to solve missing Drive Letter Caused SSD Not Showing up
- SSD is not initialized
- SSD System is not supported
- What is the Deep Data Recovery Software?
- Backup Data from Xbox One Hard Drive with QILING Disk Master
- Step-by-Step Guide to Recover Data from SSD after Not Showing Up
The Solid State Drive (SSD) is a more preferred data storage device because of its different benefits. These include low power consumption, sleek operation, and read-write speed. One issue that users experience when using this storage device is that sometimes, SSD is not showing up in Windows 10/7/8 when plugged in. If this happens, how can you fix it? Read on to learn more.
Possible Reasons why SSD is not Showing up in Windows 10/8/7
When the SSD storage device is not recognized by your computer, it becomes impossible to access anything on it. Different reasons may be responsible for this. In this section, we'll look at the various reasons that can cause Windows 8 SSD not showing up. We'll also explore the step-by-step guide on how to solve each issue. Let's get right into it!
SSD not showing up because the Drive Letter is missing or conflicting
You may have the SSD connected properly to the PC and showing in Device Manager but still have SSD not showing up in disk management or My Computer. If this happens, it means the drive letter is missing or conflicting on the SSD partition. You don't have to worry because there's a solution to it.
Step-by-step Guide to solve missing Drive Letter Caused SSD Not Showing up
- Step #1: Launch the Disk Management utility and right-click on "My Computer" or "This PC" in your Windows. Select "Manage" to open the storage menu. Here, you need to click on "Disk Management".
- Step #2: You'll see the different SSD partitions here. Select the partition with the missing drive letter and right-click on it. Next, select "Change Drive Letters and Paths".
- Step #3: Click on "Add" to bring up a list. Choose a drive letter and click the "OK" button to complete the change.
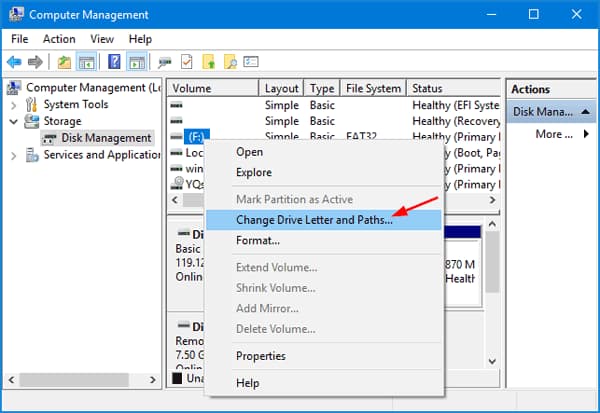
When you complete this process, the SSD will be visible in your Windows 10/8/7.
SSD is not initialized
When a new SSD is plugged into a PC before it's initialized, you'll have the issue of SSD not displaying. Resolving this issue is very easy. You first need to find the Disk Management in Windows 10/8/7 for the SSD initialization. After this, follow the simple steps below to fix the problem.
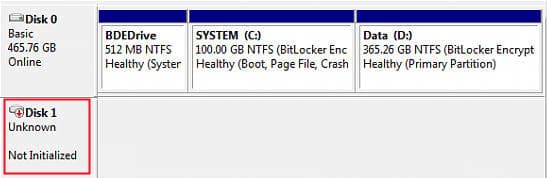
- Step #1: Click "Win + R" and type "compmgmt.msc" in the opened Run dialogue. This will open the required tool. You'll see a pop-up window with the message "you must initialize a disk before Logical Disk Manager can access it". This is your cue for the need to initialize your SSD storage device.
- Step #2: Depending on your motherboard, select "Master Boot Record (MBR) or GUID Partition Table (GPT)". Click "OK" to fix SSD not displaying. The initialization will begin.
- Step #3: After the initialization process is completed, create a fresh folder with Disk Management. With this, the new partition will show up in the Windows Explorer.
SSD System is not supported
Another reason why the SSD may not show in Windows 10/8/7 may because the SSD system is not compatible with Windows. If the system is not NTFS or FAT32, the SSD will not show up. To fix this issue, you need to delete the drive and create a new NTFS/FAT32 Partition. Follow the steps below to do this:
- Step #1: Right-click on the partition and select "Delete". Note that this will lead to data loss. Therefore, if you have important data in the partition, you will need a data recovery tool. We'll look into this shortly.
- Step #2: When the partition has been deleted, click "Create Partition" and select FAT32 or NTFS as the file system.
- Step #3: Complete the changes by clicking on the "Apply" button to fix SSD is not showing up.
These are three common reasons why your SSD may not show up in Windows 10/8/7 and the steps to fix the issues. Before fixing any of these issues, it's important to protect data from being lost. It can be fatal to lose important data on your system. One of the best tools that you can use to protect and recover data from your SSD storage device is Deep Data Recovery software. Let's look at this tool in detail.
What is the Deep Data Recovery Software?
When theres a damage or corruption to the hard drive, you can experience the Xbox One x green screen when watching videos error. To fix this error, you have to choose the right file system to format the hard disk. Note that when you do this, it will lead to the loss of data. To keep your data safe, you should back up the data.
The truth is that both factory reset, and formatting the hard drive of the Xbox One will lead to data loss. To prevent this, we'll share two different options you can use.
Backup Data from Xbox One Hard Drive with QILING Disk Master
Deep Data Recovery tool is a reputable tool designed to make the recovery tasks of any magnitude feel like a breeze. It is an effective and 100% safe data recovery software that will help you to recover data from an SSD storage device. With this tool, you don't have to worry about any issue that may arise from fixing problems on your SSD device. It will help you recover all.
Step-by-Step Guide to Recover Data from SSD after Not Showing Up
The first step to recovering data from SSD with this tool is to download and install Deep data recovery software on your PC.
You can click this download link to get Deep Data Recovery Software now.
Step #1: Launch Deep Data Recovery after the installation and select file types. The windows will display all file formats recoverable on the device. Browse through and select the file types that you want to recover. When you are done, click the "Next" button to start the data recovery process.

Step #2: Select the SSD Storage Device to scan. The undelete or unformat SSD software will display the different partitions and drives connected to the device. Select the specific location that has your important files, in this case, select the SSD storage device. Click "Scan" to start the SSD recovery process.

Step #3: Preview and recover the data from the SSD device. When the scan is over, the recovery window will display all recovered files. Browse through to confirm the files to recover. Click the files that you want and when done, click the "Recover" button to recover all selected SSD data. You should specify the location where you want to save the recovered data.

If you want to recover more data than what has been recovered, you should use the "Deep Scan" mode. This will scan more thoroughly and help you recover all lost files from an SSD device.
When you have the error, "Windows 8 SSD not showing up" you don't have to fret. There's always a solution for each issue. This post has shared three common reasons why you may experience this and the best way to resolve them. It also offers the best way to recover data in case you lose any data in the process.
Related Articles
- Recover Lost Data from HP USB Flash Drive
- How to Fix Xbox One Only Shows Green Screen
- Free Data Migration Software: Easily Migrate OS or App in Windows
Here comes free data migration software for Windows 10, 8.1, 8, 7, enabling you to transfer system, data, apps from one hard drive to another, from HDD to SSD. - 3 Reliable DBAN Alternatives to Completely Wipe Hard Drive
Are you looking for a DBAN alternative to wipe a hard drive completely? You could try Diskpart, Disk Management, or Qiling Disk Master Professional. - How to Deal With a Bitlocker Partition
if you need to resize the partition which has been encrypted by Bitlocker, you need deciphering first.