How to Set up and Activate iMessage on iPhone X/8/8 Plus
Quick Navigation:
- How to activate iMessage on iPhone X/8/8 Plus
- How to add email address to iMessage on iPhone X/8/8 Plus
- More Guide: How to back up iMessage on iPhone X/8/8 Plus
iMessage is one of the three message forms along with SMS and MMS that allows you to send and receive texts, photos, videos, voice memos, locations, and contact cards on iPhone, including the latest iPhone X/8/8 Plus. You can use the phone number and email address to send messages to other people with Apple devices like iPhone, iPad, and Mac. To use iMessage successfully on a new iPhone device, you need to set up and activate it, which is the focus of this blog, specifically on how to set up and activate iMessage on iPhone X, iPhone 8, and iPhone 8 Plus.
How to activate iMessage on iPhone X/8/8 Plus
To set up and use Apple Pay Cash in iMessage, you first need to set up the iMessage function on your iPhone X/8/8 Plus. This involves going to Settings, then Messages, and turning on the iMessage switch.
1. Go to "Settings" app on your new iPhone.
2. Scroll down and tap on "Messages".
3. Slide iMessage to On and wait for it to activate.
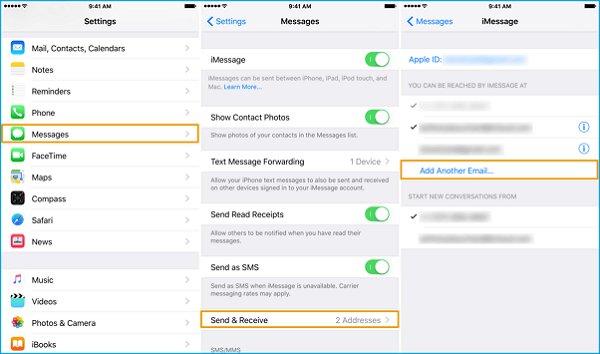
How to add email address to iMessage on iPhone X/8/8 Plus
Once iMessage is activated on your iPhone, you can send and receive texts with various effects. To add an email address to iMessage, follow these steps: activate iMessage, go to Settings, tap on Messages, and toggle on "Send & Receive". Then, tap on "Your Email Address" and enter the email address you want to add.
1. To access the Messages app settings on your iPhone, go to the "Settings" app, scroll down and tap on "Messages".
2. Tap "Send & Receive", and then tap "Add Another Email".
3. To set up an email account, simply type in the email address you'd like to use in the iCloud/Me/Mac, Gmail, Yahoo, or Hotmail account.
More Guide: How to back up iMessage on iPhone X/8/8 Plus
To keep your private conversations safe, it's essential to back up your iMessage data regularly. A free iPhone data transfer tool like Qiling MobiMover Free can help you transfer iMessages, SMS, and MMS from your iPhone to your computer with just one click, freeing up space on your device.
Step 1. To backup your iPhone, connect it to your PC, unlock your device, and trust the computer. Next, launch Qiling MobiMover, navigate to "Backup Manager," and select "Back up" to initiate the backup process.
Step 2. To back up your iPhone messages and attachments, go to Messages, then select it. You can customize the backup path by clicking "Select" and choosing a location. After that, click the "Customize Backup" button to start the backup process.
Step 3. Wait for the process to complete. If you need to restore the message backup to your iPhone in the future, go to Backup Manager > Restore and select the backup you just made.
Related Articles
- How to Turn on AirDrop on iPhone 8/8 Plus/X in iOS 11
- Best Way for Backing Up Windows 11 to External Hard Drive (2 Ways)
If you are still struggling to find the best way to backup Windows 11 to external hard drive, you can get the answer by reading this article. - Learn How to Backup Windows 7 before Reinstalling
This tutorial will show you how to backup Windows 7 computer before reinstalling Windows with free backup software Qiling Disk Master Standard. - Best Way to Backup Laptop to External Hard Drive
In this article, you are going to learn how to backup Dell, Lenovo, HP, Toshiba, Sony, Acer, Samsung, or ASUS laptop with the best way.