Can't Transfer Photos from iPhone to PC? Fix It
Quick Navigation:
- Part 1: How to transfer photos from iPhone to PC in Windows 10/8/7
- Part 2: Fixes to Can't Import Photos from iPhone to Windows 10/8/7
- Fix 1: Check your iPhone state
- Fix 2: Reconnect your iPhone
- Fix 3: Check for updates on your PC and iPhone
- Fix 4: Install Apple Mobile Device Support on your Windows PC
- Fix 5: Enable Apple Mobile Device Service (AMDS) on PC
This applies to iPhone devices running iOS 8 or later, as well as PCs running Windows 10, Windows 8, and Windows 7.
Transferring photos from an iPhone to a Windows PC can be done without third-party software, but it's not always a smooth process. When connecting an iPhone to a Windows 10/8/7 PC, users often encounter issues trying to import photos directly, with some experiencing problems that need to be addressed. iPhone Photos Not Showing Up on PC, iPhone Not Showing All Photo on Computer, iPhone Is Unreachable If you're tired of dealing with the hassle of transferring photos from your iPhone to your PC, there's a better way. Instead of relying on the tedious process of using a USB cable and iTunes, you can explore alternative methods to get your photos onto your Windows 10/8/7 PC. This article will guide you through a step-by-step process to transfer photos from iPhone to PC in a more efficient and convenient manner.Part 1 or learn how to fix the issue in Part 2.
Part 1: How to transfer photos from iPhone to PC in Windows 10/8/7
If you're having trouble transferring photos from your iPhone to your Windows computer, I recommend using the iOS data transfer tool Qiling MobiMover. This tool can help you import photos and transfer files between two iOS devices or between an iOS device and your computer, and is compatible with Windows 10, 8, and 7, as well as Mac. With MobiMover installed on your PC, you can easily transfer files between your devices.
- What can MobiMover transfer or manage for you:
-
Photos: Camera Roll, Photo Library, Photo Stream, Photo Videos
Videos: Movies, TV shows, Music Videos
Audios: Music, Ringtones, Voice Memos, Audiobooks, Playlists
Others: Contacts, Notes, Messages, Voice Mails, Books, and Safari Bookmarks
If you use the built-You can transfer all your iPhone photos, including those in Camera Roll, Photo Stream, and Photo Library, to your PC using Qiling MobiMover, and even sync them back to your new iPhone.
Notes: MobiMover is compatible with Windows 7 and later or Mac running macOS 10.12 (Sierra), 10.13 (High Sierra), Mac OS X 10.7 (Lion), 10.8 (Mountain Lion), 10.9 (Mavericks) and 10.11 (El Capitan).
Step 1. To transfer data from your iPhone to a PC running Windows 7 or later, connect your iPhone to the PC and run Qiling MobiMover. Choose the "Phone to PC" mode and click "Next" to start the transfer process in one click.
Step 2. MobiMover allows you to transfer various types of files, including audio, videos, pictures, books, contacts, and messages, from your iPhone to your PC. To transfer just your pictures, select that option and MobiMover will save them to your desktop by default, but you can also customize the save location as needed.
Step 3. To transfer photos from your iPhone to PC, click the "Transfer" button, and wait patiently as the transfer time depends on the file size.
Part 2: Fixes to Can't Import Photos from iPhone to Windows 10/8/7
The solutions below are arranged in an increasing order of difficulty.
Fix 1: Check your iPhone state
To import photos from iPhone to Windows 10/8/7, unlock your iPhone and click "Trust" when prompted, ensuring the PC is trusted by your iPhone. This allows for a successful transfer of photos from your iPhone to your computer.
Fix 2: Reconnect your iPhone
To resolve the issue of not being able to transfer photos from your iPhone to your PC, try disconnecting and reconnecting your iPhone to the PC. Alternatively, you can also try using a different USB port or USB cable if the issue persists. This simple troubleshooting step may resolve the issue and allow you to transfer your photos successfully.
Fix 3: Check for updates on your PC and iPhone
The incompatibility between software on your PC and iPhone may be the reason you can't import photos from iPhone to Windows 10/8/7, so it's necessary to check for software updates on your iPhone and PC.
- Update iTunes to its latest version.
- Update Photos App (in Windows 10) to its latest version.
- To update your iPhone's iOS operating system, go to Settings, then General, and finally Software Update.
Fix 4: Install Apple Mobile Device Support on your Windows PC
Apple Mobile Device Support is typically installed on your PC alongside iTunes, which is necessary for transferring iPhone photos to your computer. However, if you've customized your settings, it's possible that you didn't install it. To check, you can follow the steps below, and if it's not installed, you'll need to uninstall and reinstall iTunes.
Step 1: To access the Control Center, click the Search button in the taskbar and enter "Control Center".
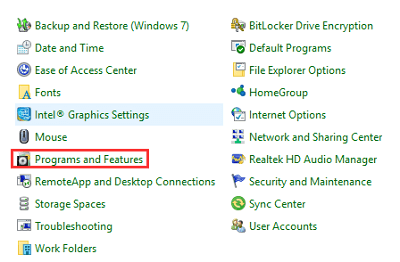
Step 2: Open Control Center and click Programs and Features.
Step 3: Check the list for Apple Mobile Device Support.
If Apple Mobile Device Support is not installed on your PC, you need to reinstall iTunes to get it installed, but if it's already installed, proceed with the next solution.
Fix 5: Enable Apple Mobile Device Service (AMDS) on PC
To help a Windows PC access iPhone data, ensure the Apple Mobile Device Service is enabled and restart it if necessary. Stop iTunes, disconnect the iPhone, and then proceed with the steps below, which can be particularly helpful when the iPhone is not connecting to iTunes.
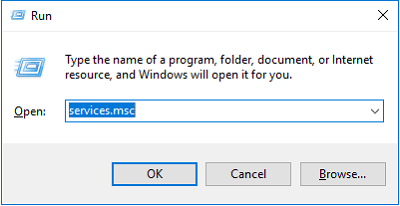
Step 1: Press Windows key + R to open the Run window.
Step 2: Enter services.msc and click OK.
Step 3: In the Services window, scroll down to find Apple Mobile Device Service and check its status. If it's running, right-click the option, click Stop and then start it again. If it's not running, right-click the option, choose Properties, set the Startup type to be Automatic and click Start > OK.
Step 4: Restart your PC and try to import photos from your iPhone to PC again.
Related Articles
- Best Smart PC Cleaner for Windows OS
Find the best smart PC cleaner for your Windows PC to help you maintain your devices easily and securely. This post will show you how to clean junk files with some methods. - Best SSD Cleanup Utility for Windows Users
Searching for an SSD cleanup utility to clean up SSD? Here, you'll get the best SSD cleanup utility and learn how to easily clean SSD in Windows7/8/10. - SSD Optimization Tool: Optimize SSD Drive Effectively in Windows PC
SSD runs slower and slower? Here comes the best SSD optimization tool to restore SSD drive peak performance with ease. - How to Perform SSD to SSD Migration in Windows 7/8/10?
Look for a way for SSD to SSD migration, like old to new SSD, or smaller to larger SSD migration? Try the reliable disk manager Qiling Disk Master.