How to Fix the "Can't Open HEIC Files on Windows" Issue
Quick Navigation:
- Part 1. How to Turn HEIC to JPG on Windows and Mac
- Part 2. How to Change HEIC to JPG or PNG on Mac
- Part 3. How to Stop Taking HEIC Photos
- The Bottom Line
HEIC is a new container format designed for iOS devices to store high-quality pictures that take up less storage space on iPhones and iPads. It's ideal for sharing and opening photos between different iOS devices, but may not be compatible with Windows or other platforms due to its limited adoption.
To view HEIC photos, you may need to use a third-party viewer or convert them to JPG or PNG, which can be viewed on most platforms, but this conversion would need to be done on the computer where the viewer is installed.
This guide will show you how to convert HEIC files to JPG or PNG, two widely recognized photo formats. We'll cover various methods to achieve this, allowing you to easily share and use your HEIC files in different contexts.
Part 1. How to Turn HEIC to JPG on Windows and Mac
To convert HEIC to JPG, you can use Qiling MobiMover, a user-friendly converter that makes the process easy on Windows and Mac. Simply drag and drop the photos you want to convert, click "Convert," and your images will be converted in no time.
This program not only converts files but also serves as a video downloader, video to MP3 converter, WhatsApp manager, and iPhone data transfer tool, allowing you to perform various tasks.
- Transfer files to or from iPhone/iPad
- Manage files on iPhone or iPad from a computer
- Manage WhatsApp messages by backing up
- Download videos from popular video-sharing websites
To convert HEIC to JPG with Qiling MobiMover, follow these steps:
Step 1. Launch Qiling MobiMover on your PC and click "HEIC to JPG" on the navigation panel.
Step 2. To add HEIC photos, click "Browse" to select one or multiple photos from your PC, or simply drag and drop them into the program.
Step 3. You can convert HEIC photos to JPG by clicking "Convert" or "Start All" and then view the converted JPG photo by clicking "View" once the conversion is complete.
Part 2. How to Change HEIC to JPG or PNG on Mac
For Mac users, you can convert HEIC to JPG or PNG using the Preview app, Photos app, or third-party software. The Preview app allows you to open and export HEIC files as JPG or PNG, while the Photos app can convert HEIC files to JPG or PNG during the import process. Alternatively, you can use third-party software like Adobe Photoshop or ImageMagick to convert HEIC files to JPG or PNG.
Convert HEIC to JPG Using Preview
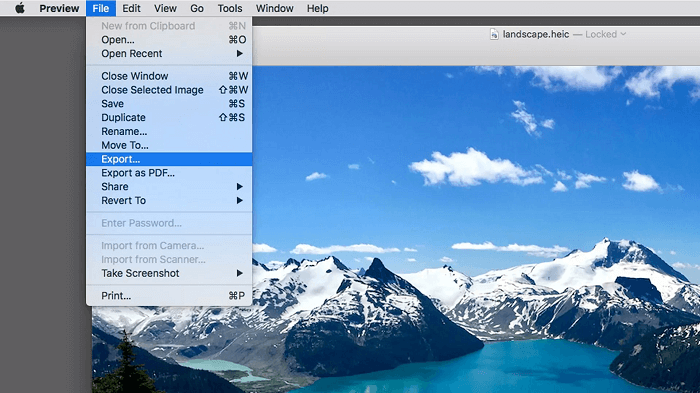
Step 1. Open the HEIC file with the Preview app.
Step 2. Click "File" and then "Export."
Step 3. Select the target format from the drop-down menu, which is either "JPG" or "PNG".
Step 4. Click "Save."
Change HEIC to JPG Using Photos
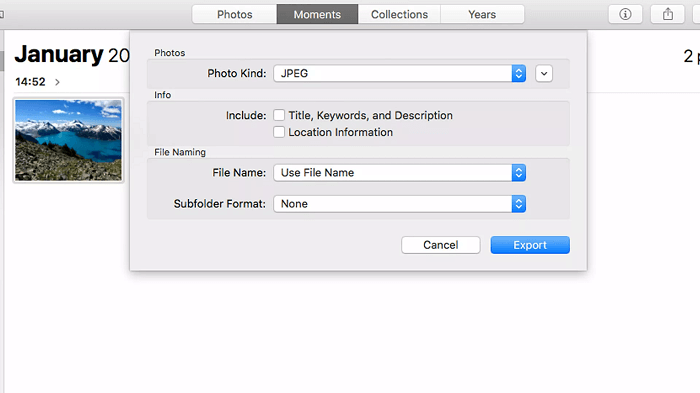
Step 1. To convert a picture to a different format on a Mac, start by opening the Photos app. From there, select the image you want to convert by clicking on it.
Step 2. Select the file and click "File" > "Export" > "Export Photo" to export the photo.
Step 3. Choose "JPEG" or "PNG" from the options.
Step 4. Click "Export."
Step 5. Choose a location to place your picture and click "Export."
Part 3. How to Stop Taking HEIC Photos
To avoid taking HEIC photos on your iPhone, you can change the camera settings to default JPEG format instead. This can be done by going to Settings > Camera, then tapping on 'Formats', and selecting 'Most Compatible'. This will ensure that your iPhone camera takes photos in the JPEG format, which is more widely compatible with other devices and platforms.
Step 1. Go to Settings on your iPhone.
Step 2. Tap "Camera," and then choose "Format."
Step 3. Select "Most Compatible."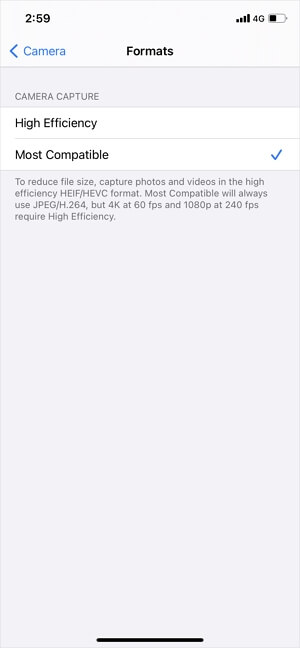
The Bottom Line
HEIC, or High-Efficiency Image Format, is a format ideal for storing image files, but it may not be compatible with all platforms, particularly non-iOS devices. To resolve this issue, you can use third-party converters like Qiling MobiMover to convert HEIC photos to more widely used formats like JPG and PNG.
HEIC files are a type of image file that can be opened on various devices, including Windows, macOS, and mobile devices. To open a HEIC file, you can use the Photos app on your device, which is pre-installed on most devices.
Related Articles
- 2 Simple Ways to Print Notes from iPhone
- How to Export WhatsApp Chat on iPhone
- How to Easily Recover iTunes Playlists Disappeared
- How to Use Samsung Data Migration on Windows 10 to Clone a Hard Drive
How to use Samsung Data Migration Windows 10 to clone a hard drive? You are going to learn the stepwise guide in this post and a better alternative to it.