How to Convert HEIC to JPG on iPhone
Quick Navigation:
- Part 1. How to Change HEIC to JPG on iPhone via the File App
- Part 2. How to Convert HEIC to JPG on iPhone via a HEIC to JPG Converter
- Part 3. How to Open HEIC File on iPhone via the Cloud Services
- Part 4. How to Set JPG or HEIC on iPhone 7/8/X/XS/XR
- The Bottom Line
The HEIC format offers several advantages over JPEG, including smaller file size, higher photo quality, and a wider color gamut. However, it also has some drawbacks, primarily due to compatibility issues.
The HEIC image format, although widely supported on iOS devices, has not been adopted for widespread use by other operating systems or software. As a result, if you need to view HEIC pictures on different operating systems or open HEIC images on different software, you may need to convert them to JPG first.
If you're looking for ways to get the job done, consider using the methods in this guide, which can help you achieve your goal. Additionally, if you want to set your device to take photos in JPEG/HEIC format as default, you can refer to the final method.
Part 1. How to Change HEIC to JPG on iPhone via the File App
The File app, introduced by iOS 11, is a convenient option to convert HEIC to JPG on iPhone. To use it, ensure your device has iOS 11 installed, and then follow these steps: open the File app, navigate to the HEIC file you want to convert, tap on it, select 'Share', choose 'Save to Files', and then select 'Photos' as the location. From there, you can choose the 'Quick Actions' option and select 'Convert to JPG' to convert the file. Alternatively, you can also use the 'Share' option and choose 'Photos' to convert the file.
Step 1. To open the Files app on your iPhone or iPad, simply locate the Files app icon on your home screen and tap it, or use Spotlight search by tapping the magnifying glass icon in the bottom right corner of the screen and typing "Files" in the search bar. This will open the Files app, where you can access and manage your files.
Step 2. To access iCloud Drive or On My iPhone, choose "Browser" at the bottom of the screen and select either "iCloud Drive" or "On My iPhone".
Step 3. To create a new folder, tap and hold on an empty area, give it a name, and then tap "Done".
Step 4. You can select an album that contains the HEIC photos by opening the Photos app on your device, then tapping on the "Albums" tab and selecting the specific album that contains the HEIC photos you want to convert.
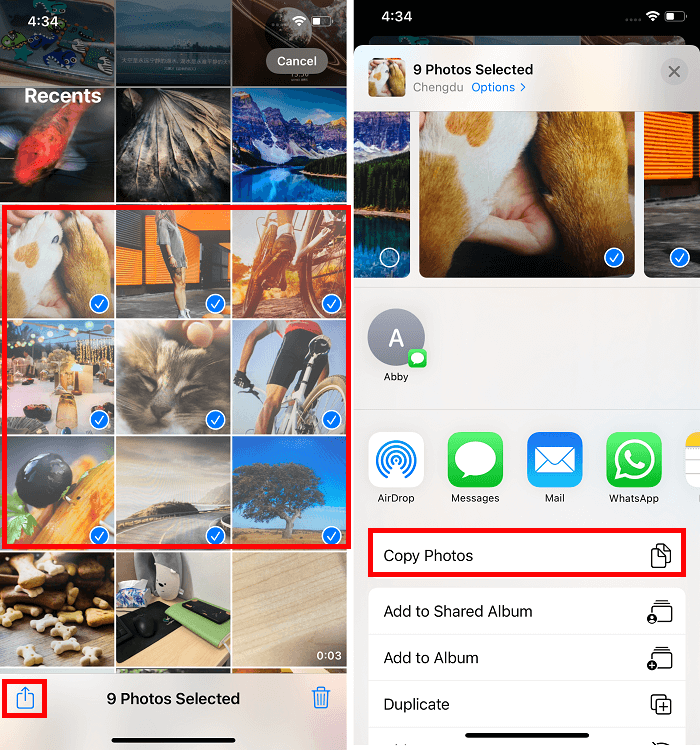
Step 5. To convert photos, tap the "Select" button in the upper right corner and select all the photos you want to convert.
Step 6. To share photos, tap the "Share" button located in the lower-left corner of the screen, then select the "Copy Photos" option.
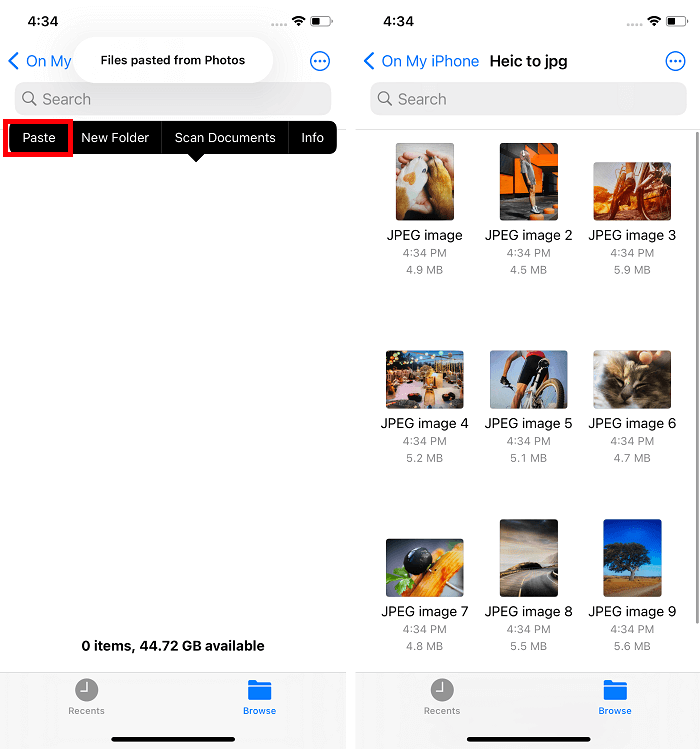
Step 7. To paste an item into a folder on the File app, open the folder you created, tap and hold down on any blank area, and then choose "Paste."
Step 8. Then, you'll see your HEIC photos appear here in JPG format.
Note: The Files app is a convenient tool for converting HEIC pictures, but it has its limitations, such as a time-consuming process. When copying pictures from the Photos app to the Files app, an additional download process is required, which can be lengthy if you have many pictures to download. To avoid this, you can use a professional HEIC to JPG converter like Qiling MobiMover to get the job done quickly.
Part 2. How to Convert HEIC to JPG on iPhone via a HEIC to JPG Converter
If you're looking for a convenient and stable way to convert HEIC to JPG, you can try the free iPhone data transfer tool and HEIC to JPG converter, Qiling MobiMover. This program allows you to either convert HEIC files to JPG during the process of transferring pictures or use its converter tool to change HEIC pictures to JPG.
Both methods allow you to transfer pictures from your iPhone to your computer. However, the main difference between the two options is that one method requires you to set the export settings to JPG format beforehand, whereas the other method uses a converter tool to directly transfer the pictures without needing to change the settings.
To convert HEIC to JPG with Qiling MobiMover, follow these steps: you can easily convert HEIC files to JPG format using the software Qiling MobiMover, which allows you to transfer and manage files between your devices. Simply select the HEIC files you want to convert, choose the JPG format as the output, and the software will take care of the rest.
Step 1. Connect your iPhone to your computer via a USB cable and launch Qiling MobiMover. From the left panel, select the "HEIC to JPG" option to proceed.
Step 2. To transfer HEIC files to Qiling MobiMover, you can either drag and drop the files from your computer to the software or click "Browse" to select and add the files.
Step 3. To convert HEIC photos to JPG, click "Convert" or "Start All" and wait for the process to complete. Once done, you can view the converted JPG photo on your computer by clicking the "View" button, or transfer it to your iPhone using the "PC to Phone" feature.
Part 3. How to Open HEIC File on iPhone via the Cloud Services
You can also open HEIC files using cloud services like Dropbox, Google Drive, or OneDrive, which allow you to upload and save photos in JPG format, but may require a paid upgrade for additional storage if your photo collection exceeds their free storage limits.
To use Dropbox for HEIC conversion on your iPhone, follow these steps:
Step 1. To access the Dropbox app on your iPhone, start by opening the app. Once the app is open, tap the person icon located at the bottom of the screen.
Step 2. Tap the gear icon and tap "Camera Uploads."
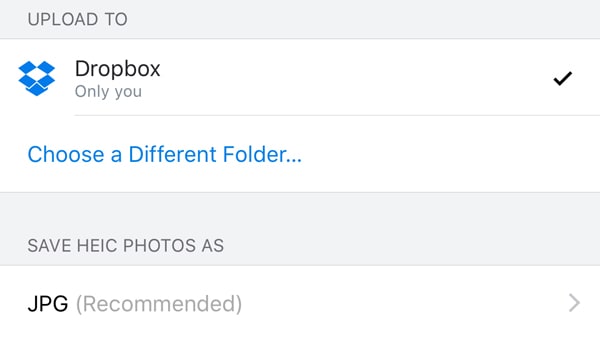
Step 3. Choose "Save HEIC Photos as."
Step 4. Choose JPG as your upload format.
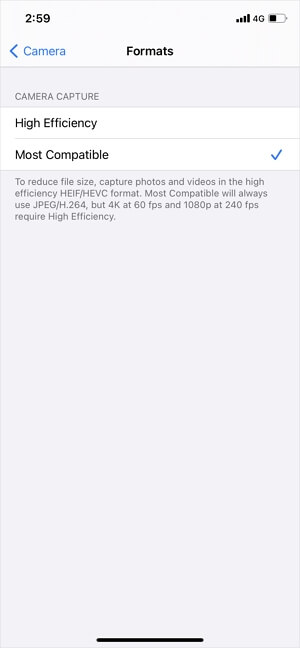
Part 4. How to Set JPG or HEIC on iPhone 7/8/X/XS/XR
To turn off or on HEIC on iPhone, check if your iPhone is running iOS 10 or earlier, in which case your camera only takes pictures in JPG format. If you have iOS 11 or later, go to Settings, then Camera, and toggle the "High Efficiency Image Format" switch on or off to set JPG/HEIC on your iPhone.
Step 1. On your iPhone, go to Settings, scroll down, and select the "Camera" option.
Step 2. From the Camera page, choose "Formats."
Step 3. Under the Camera Capture section, choose "Most Compatible."
The Bottom Line
Our guide on how to convert HEIC to JPG is now complete. We hope you've mastered the methods outlined above to convert your photos. While there are other apps that can also do a good job of converting photos, we recommend sticking with the ones listed above as they are free of ads and don't require payment.
Related Articles
- The Ultimate Guide to Back Up WhatsApp on iPhone & Android
- How to Save Videos on iPhone/iPad from the Internet
- How to Back Up iPhone Without iTunes in 3 Ways
- Auto Backup Windows 7 Computer or Files to External Hard Drive
This article helps you backup Windows 7 to external hard drive to protect it safely, whether you want to create full backup or file backup.