How to Back Up iPhone XR/XS/XS Max in 4 Ways
Backing up an iPhone is crucial to prevent data loss, as no one wants to lose precious files like photos, videos, contacts, and messages. To ensure this doesn't happen, regular backups are necessary, and can be done either to iCloud or a computer, wirelessly or using a USB cable, and can be a selective or all-in-one process.
- How to Back Up iPhone XR/XS/XS Max to iCloud
- How to Back Up iPhone XS/XS Max/XR to Computer with iTunes
- How to Back Up iPhone XR/XS/XS Max to Mac via Finder
- How to Back Up iPhone Selectively or All at Once
Method 1. How to Back Up iPhone XR/XS/XS Max to iCloud
If you prefer to back up your iPhone wirelessly over Wi-Fi, iCloud is the best option for you. By turning on iCloud backup, your iPhone content will be automatically synced to the iCloud storage under a network connection, backing up almost all data and settings, except for a few items.
- Content that has stored in iCloud
- Files saved in other cloud services
- Apple Pay information and settings
- Touch ID settings
To access your iPhone backup, you can only view the details by restoring your device from the backup, and not directly access the backup file. For a successful iCloud backup, ensure you have sufficient storage space and a stable Wi-Fi connection, as failure to do so may result in iPhone backup failure.
To back up iPhone XR/XS/XS Max to iCloud:
Step 1. Connect your iPhone to a Wi-Fi network.
Step 2. Go to "Settings" and select your name, then tap "iCloud". If you don't see your name, sign in to the device with your Apple ID.
Step 3. Scroll down to click "iCloud Backup".
Step 4. Enable iCloud Backup and select Back Up Now to start backing up your iPhone to iCloud.
Step 5. Wait patiently for the process to complete.

To manually back up your iPhone using iCloud, go to Settings, tap your name, select iCloud, and toggle on iCloud Backup. If you want to make an automatic iCloud back up, toggle on "iCloud Backup" only. Then, tap Back Up Now to start the manual back up.
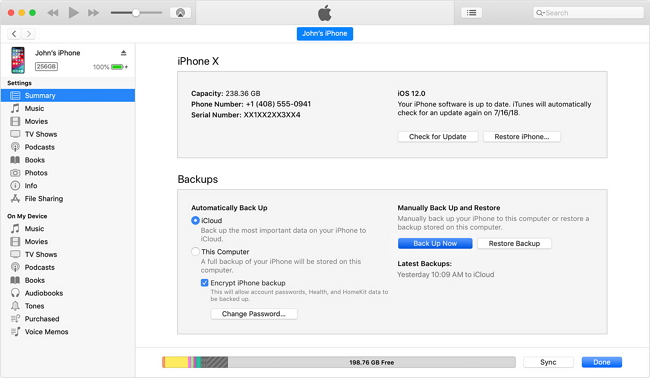
Method 2. How to Back Up iPhone XR/XS/XS Max to Computer Using iTunes
To back up an iPhone, you can use either iCloud or iTunes. While iCloud backs up your iPhone to the cloud, iTunes stores the backup on a computer, eliminating network or storage concerns. An iTunes backup is comprehensive, covering almost all data and settings on your device, except for a few items like iCloud data, iMessage, and Face ID/Touch ID settings.
- Content bought from iTunes and App Store
- Content synced from iTunes
- PDFs downloaded to Apple Books
Although you can access the iPhone backup location on a computer, you can't view the backup details and can only access the content by restoring the iPhone, which is similar to using iCloud.
To back up your iPhone XS/XS Max/XR to computer:
Step 1. Connect your iPhone XS, iPhone XS Max, or iPhone XR to your computer and open iTunes if it doesn't open automatically.
Step 2. To trust the computer, click "Trust" on your iPhone screen and enter your device password if prompted.
Step 3. Connect your iPhone to your computer and open iTunes. Select your iPhone by clicking the device icon in iTunes. If your iPhone is not showing up in iTunes, fix it by restarting your iPhone, computer, or both, and then continue.
Step 4. If you want to make a copy of your Health and Activity data on your iOS device, tick "Encrypt iPhone backup" and create a password. Don't forget the password.
Step 5. Click "Back Up Now" to initiate a backup of your iPhone to your computer using iTunes.
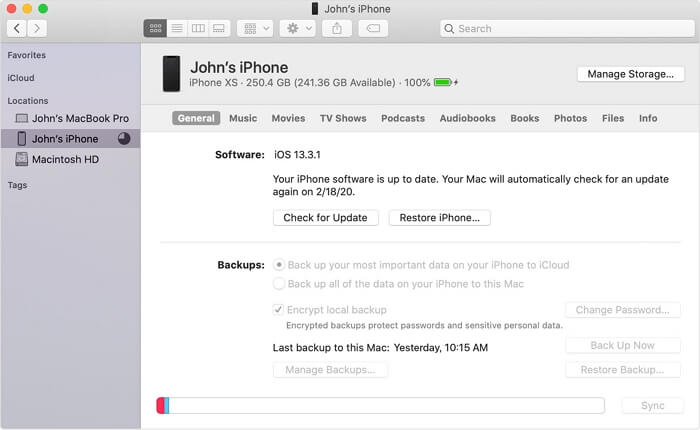
Method 3. How to Back Up iPhone to Mac via Finder
With the discontinuation of iTunes in macOS Catalina, Finder now takes its place for device backup and data syncing. If you're looking to back up your iPhone XR, XS, or XS Max to a Mac, you'll need to use Finder instead.
To back up iPhone with your Mac computer:
Step 1. Connect your iPhone/iPad to your computer and open Finder.
Step 2. On your iPhone/iPad, enter the password as required, trusting the computer.
Step 3. To back up your iPhone or iPad, select your device from the left sidebar and tap "Back Up Now" to initiate the backup process to your computer.
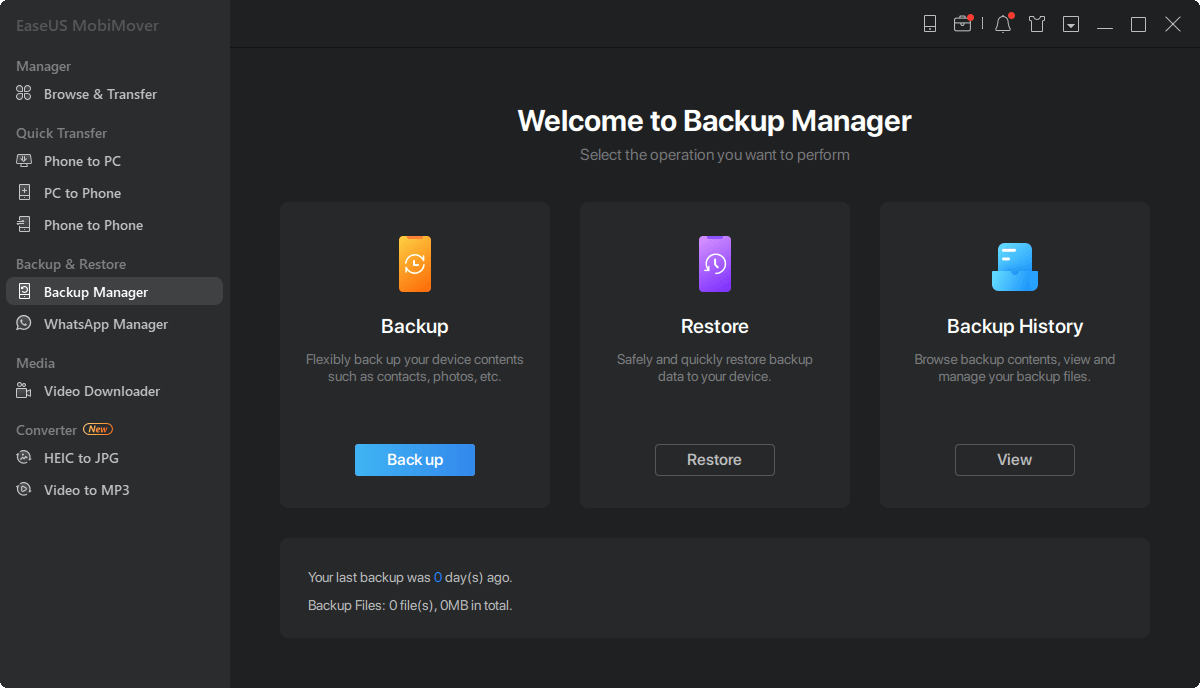
Method 4. How to Back Up iPhone Without iCloud or iTunes
If you want to back up all your iPhone content at once, you can use any of the three methods mentioned earlier. However, if you want to back up your iPhone selectively, you can use the iPhone transfer software Qiling MobiMover.
This tool enables iPhone users to back up various data types, including photos, videos, music, contacts, and messages, from their iPhone or iPad to a computer via a USB cable. Users have the flexibility to either sync all files or selectively copy specific items. The backed-up data can be restored to a new device when switching to a new iPhone or to the original device to retrieve lost data.
To back up iPhone to computer without iCloud or iTunes:
Step 1. To backup your iPhone or iPad to your PC, simply connect your device to your computer using a USB cable and click "Trust" on your device. Next, launch Qiling MobiMover and navigate to the "Backup Manager" section, then select "Back up" to initiate the backup process.
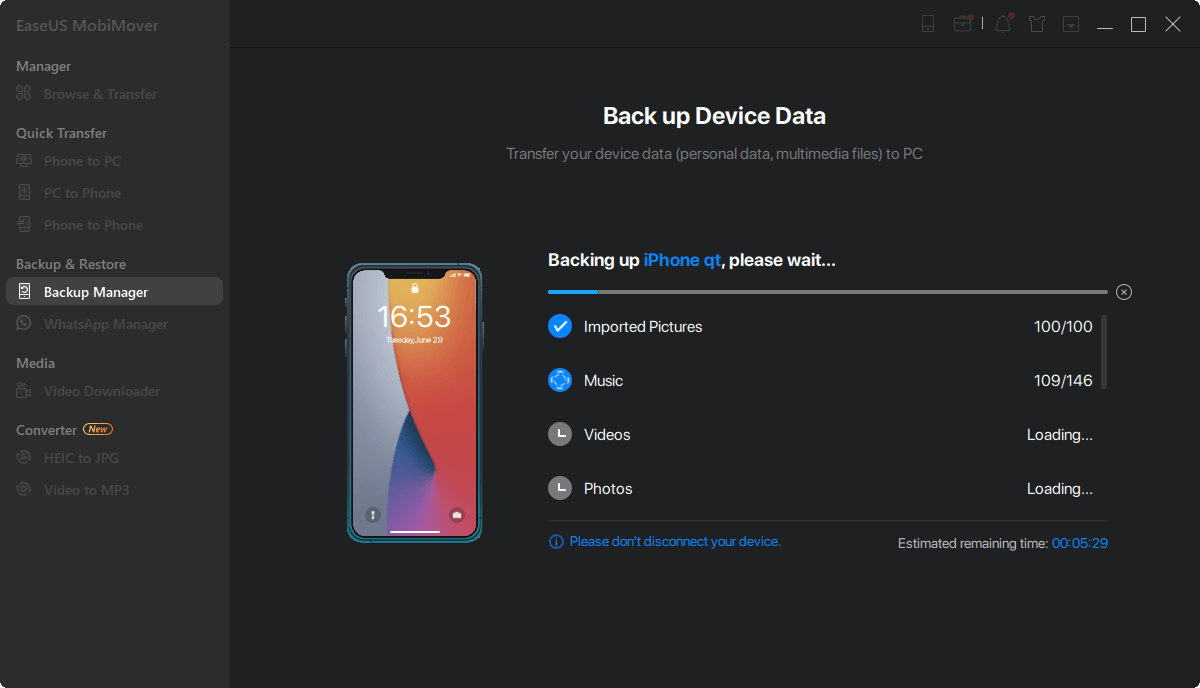
Step 2. To backup your iPhone or iPad, first check the types of files you need to backup. Once you've identified what needs to be backed up, click the backup button to initiate the process. This will start the backup process, ensuring your important data is safely stored.

Step 3. Depending on the size of the content, the time the backup will spend varies, so it's best to wait patiently for it to complete.
Qiling MobiMover supports not only iPhone backup but also data transfer between two iOS devices or between an iOS device and a computer, including Mac, PC, or laptop. Additionally, it offers useful functions like video download, which can be helpful for downloading YouTube videos to an iPhone or computer.
The Bottom Line
Here are the four common ways for you to make a backup of your iOS device: using iCloud, iTunes, Qiling MobiMover, or a third-party backup app. Each method is suitable for different situations, and Qiling MobiMover is highly recommended for managing iDevice data better. It allows you to backup your iPhone to computer, transfer data, manage files, and download videos, making it a versatile tool for iOS device management.
Related Articles
- Windows 7 Startup Issues Troubleshooting (7 Effective Ways)
How to do Windows 7 startup issues troubleshooting? Here are some ways prepared for you. You can try them one by one until your computer boot successfully. - Windows 7 WBAdmin Command Line and Its GUI Version
Windows 7 WBAdmin has less available features to backup your data. Now, we will show you the GUI version of WBAdmin to backup data easily. - Best Free Clone Software for Windows 8/8.1/10/11
Need the best free clone software for Windows 8/8.1/10/11? Thus, you can easily clone hard drive to another one or directly use a different type of disk. - How to Delete Backup Files in Windows 8 Automatically?
This article provides you with 2 practical ways to delete backup files in Windows 8 and one flexible way to manage disk space.