[7 Options] How to Download Pictures from iPhone to Mac
Quick Navigation:
- Option 1. 1-Click to Download Pictures from iPhone to Mac - Easiest Way
- Option 2. How to Download Photos from iPhone to Mac via Image Capture
- Option 3. Transfer iPhone Photos to Mac via the Photos App
- Option 4. Copy Photos from iPhone to Mac by Using AirDrop
- Option 5. Move Photos from iPhone to Mac Using iCloud
- iCloud Photo Stream
- iCloud Photo Library
- Option 6. Get Photos from iPhone to Mac via Email
- Option 7. How to Transfer Photos from iPhone to Computer via Cloud Storage
- Upload Photos to Dropbox on Your iPhone
- Move Photos from iPhone to Mac
- Bonus Tip. How to Transfer Photos from iPhone to Windows
- The Bottom Line
You can transfer all your iPhone photos to your MacBook Pro by using the Photos app on your Mac. To do this, open the Photos app on your Mac, then select "Import" from the top menu bar. Choose "From a USB device" and select your iPhone. This will allow you to import all your iPhone photos, not just the recent ones. Alternatively, you can use the "iCloud Photo Library" feature, which allows you to access and download all your iPhone photos to your Mac, as long as they are synced with your iCloud account. Simply enable iCloud Photo Library on both your iPhone and MacBook Pro, and all your iPhone photos will be synced to your Mac. You can also use third-party apps like Image Capture or iMazing to transfer your iPhone photos to your MacBook Pro.
-- A Question from Apple Community
If you're stuck in a loop trying to download pictures from your iPhone to your Mac, don't worry - this guide has got you covered. With seven options to choose from, you'll be able to import your photos to your computer in no time. Each method has its pros and cons, so read on to decide which one is best for you. Whether you're facing the same situation or need to transfer photos for another reason, this post will help you find the most suitable solution.
Option 1. 1-Click to Download Pictures from iPhone to Mac - Easiest Way
Qiling MobiMover is a highly capable tool for transferring photos and videos from an iPhone to a Mac or PC with ease. It's renowned for its impressive capabilities in iOS data transfer, management, screen unlock, and video download, making it a one-stop-shop for all your iOS data needs. However, like any tool, it also has its drawbacks, which we'll explore further.
Pros:
- It allows for the transfer of photos from an iPhone to a Mac or vice versa.
- It supports most photo formats, including JPG, PNG, GIF, and BMP.
- It has a high transfer speed.
- It won't cause data loss while transferring.
- It supports all Mac models.
- The iPhone case is compatible with all iPhone models, including the iPhone 11, XR, XS Max, XS, X, 8, and others.
- The app has additional features such as iOS data management and video download capabilities.
Cons:
- To install Qiling MobiMover on your Mac, you need to download and install it, which may take up some storage space on your computer.
After learning about Qiling MobiMover, you can now download it to easily import photos from your iPhone to your Mac by following the step-by-step instructions.
Step 1. Connect your iPhone X, iPhone 8, or iPhone 7 to your Mac, then run Qiling MobiMover, choose "Phone to Mac" and click "Next".
Step 2. To transfer photos from your iPhone X/8/7 to your Mac, ensure the "Pictures" option is selected. The exported files can then be saved anywhere on your computer or external hard drive. This process not only transfers photos but also allows you to transfer videos, audio, contacts, messages, and other files.
Step 3. Transferring files from your iPhone to Mac not only frees up space on your device but also keeps your data safe. To do this, click the "Transfer" button to start transferring photos from your iPhone X/8/7 to Mac. This process allows you to keep your photos organized and secure on your Mac, while also giving you more space on your iPhone.
Option 2. How to Download Photos from iPhone to Mac via Image Capture
Image Capture, a default Mac program, allows you to easily import photos from your iPhone to your Mac, making it a convenient tool for transferring multiple photos at once without needing additional software. Additionally, Image Capture enables you to selectively delete photos and videos from your iPhone, with options to sort by size or time.
Pros:
- It is simple to use.
- Supports original photos.
- The software works seamlessly with all iOS and Android devices, as well as digital cameras and scanners.
- High transfer speed.
- Has the ability to mass delete photos on your iPhone.
Cons:
- The app opens whenever you connect your device to your Mac, which can be annoying.
The Photos app also allows you to revert to the original photo if you are not satisfied with your edits. This feature is available in the Photos app on Mac, making it easy to undo any changes you've made.
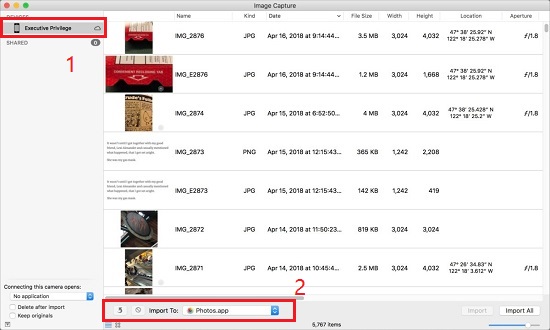
To transfer photos from iPhone to Mac via Image Capture:
Step 1. To connect your iPhone to your Mac, simply plug in your iPhone using its original USB cable, then launch the Image Capture app on your Mac.
Step 2. Wait for your iPhone to be detected > Select the location you want to house these photos on your Mac.
Step 3. To transfer photos, select the desired photos by tapping the "Import to" option at the right corner, then choose between "Import" to move selected photos or "Import All" to transfer all images.
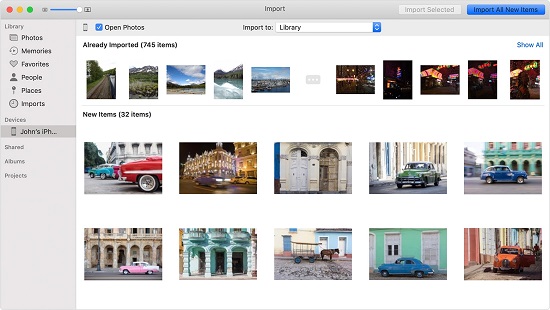
Option 3. Transfer iPhone Photos to Mac via the Photos App
To get photos from your iPhone to your Mac, you can also use the Photos app, a pre-installed app on Mac that helps manage photos. With this app, you can easily import your iPhone photos to your computer and then title, label, sort, delete, and organize them into groups.
Pros:
- Easy to Use.
- Supports the most common image file formats.
- Has the ability to sync your photos with iCloud.
Cons:
- The software requires you to install an iPhotos or Photos application on Mac in order to work.
- You may need to wait a while when transferring large files like high-resolution photos or long videos.
To download photos from your iPhone to your computer using iPhoto, start by connecting your iPhone to your computer using a USB cable. Open iPhoto on your computer, and it should automatically detect your iPhone.
Step 1. Connect your iPhone to your Mac via a USB cable.
Step 2. To sync your iPhone with iPhoto, start by running iPhoto on your Mac. Then, locate your iPhone in the left panel, which should display a list of all connected devices.
Step 3. To import photos, select the desired photos and click on the "Import" button located at the upper right corner of the screen.
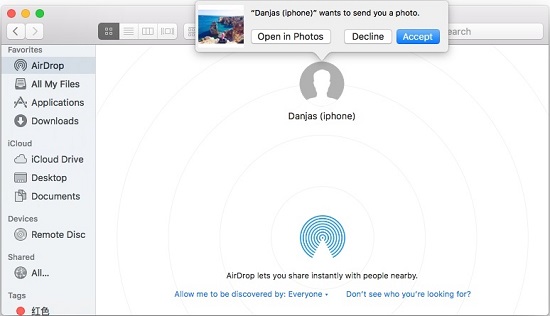
Option 4. Copy Photos from iPhone to Mac by Using AirDrop
To AirDrop photos from your iPhone to your Mac, ensure both devices are connected to the same Wi-Fi network and Bluetooth is turned on. This method requires a Mac running OS X Yosemite or later and an iPhone running iOS 8 or later. Place the devices close together and start the transfer.
Pros:
- No USB cable is required.
- High transfer speed.
Cons:
- The app only works on Macs running OS X Yosemite or later.
- It doesn't work without a Wi-Fi connection.
Now, follow the steps below to download photos from your iPhone to your Mac using AirDrop. Start by opening the Photos app on your iPhone and selecting the photos you want to transfer. Next, go to your Mac and click the AirDrop icon in the Finder sidebar, then select "Allow Others to See" and "Allow Others to Drop" files.
Step 1. Turn on AirDrop on both your iPhone and Mac.
how to activate AirDrop on your iPhone: To change your AirDrop settings, go to the Settings app, tap on "General", then tap on "AirDrop", and finally select either "Contacts Only" or "Everyone" depending on your preference.
how to activate AirDrop on your Mac: To use AirDrop on your Mac, open the Finder, click on "Go" in the top menu bar, select "AirDrop", and wait for it to open.
Step 2. Open the Photos app on your iPhone.
Step 3. To copy photos, select the desired photos by tapping the "Select" button in the top right corner, then tap the Share icon.
Step 4. In the AirDrop section, tap the name of your Mac.
Step 5. After transferring photos from iPhone to Mac, accept the photos on your Mac, and they will be saved in the Downloads folder.
Option 5. Move Photos from iPhone to Mac Using iCloud
Apple's iCloud offers two photo-related services: iCloud Photo Stream and iCloud Photo Library. The former allows users to store all photos and videos in iCloud, making them viewable on all connected iDevices, while the latter automatically uploads the latest photos to iCloud-connected devices, storing them for up to 30 days. Despite their differences, both services share similarities in terms of photo transfer, with more details available in the full post.
iCloud Photo Stream
If you have more than 5GB of photos on your iCloud and refuse to upgrade to a larger storage plan, you can still transfer your photos to a new device. First, ensure both devices are logged in with the same iCloud account. Then, you can proceed with the transfer process.
Pros:
- It doesn't count against your iCloud storage.
- It allows you to view your pictures before transferring.
- Supports JPEG, PNG, TIFF, and most RAW formats.
Cons:
- Uploads your latest photos (30 days) and up to 1000 photos.
- Videos are not supported for transfer.
Step 1. To enable My Photo Stream on your iPhone, go to Settings, then tap on "Photo", and finally toggle the switch next to "My Photo Stream" to the "On" position.
Step 2. To enable the "My Photo Stream" option on your Mac, follow these steps: Go to System Preferences > iCloud, then select the "Photos" tab. Make sure that "My Photo Stream" is enabled.
Step 3. Once you've enabled iCloud Photo Library, all your photos will be automatically synced to your Mac. You can view them by going to "Photos" > "Albums" > "My Photos Stream" on your computer.

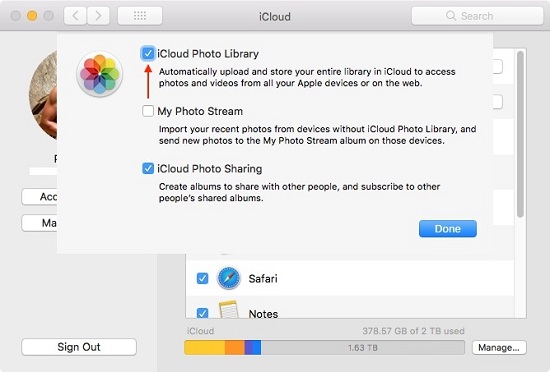
iCloud Photo Library
This plan is ideal for those who are willing to invest a significant amount each month to have seamless access to their photos and videos across all their devices, as well as the ability to view them from any device with a web browser at icloud.com.
Pros:
- Photos and videos that are formally backed up in iCloud will not be synced again, freeing up storage space on your iCloud.
- The amount of photos and videos that can be stored depends on the storage level purchased.
- The software supports various original formats, including HEIF, JPEG, RAW, PNG, GIF, TIFF, HEVC, and MP4.
- It supports the original format at full resolution.
- The app syncs your photos with other Apple devices, such as your iPad, Apple TV, and Apple Watch, allowing you to easily access and share your memories across all your devices.
Cons:
- iCloud Photos storage is limited, and additional space is required, which comes at an extra cost.
- You can't exclude certain photos from syncing.
Step 1. To enable iCloud Photo Library on your iPhone, go to Settings, tap your name, select Photos, and toggle on iCloud Photo Library, allowing your photos to be uploaded to iCloud.
Step 2. To enable iCloud Photo Library on your Mac, click on the "Options" button and select the option to enable iCloud Photo Library.
Step 3. Once you've synced your photos, they'll be stored on your computer, so you can access them from any device connected to your computer, and you'll be able to view them in the Photos app on your computer. This way, you'll have a backup of your photos and they'll be easily accessible.
Option 6. Get Photos from iPhone to Mac via Email
If none of the above methods work for you, you can use Email to download photos from your iPhone to your Mac. However, this method is quite straightforward and may result in a slight downgrade of image quality during the transfer process.
Pros:
- Easy to operate.
- It doesn't require any additional software.
Cons:
- It is useful only for a small number of photos.
- It takes a lot of time.
Step 1. To import photos from your iPhone to your computer, go to the Photos app on your iPhone, select the album that contains the photos you want to import, and proceed with the export process.
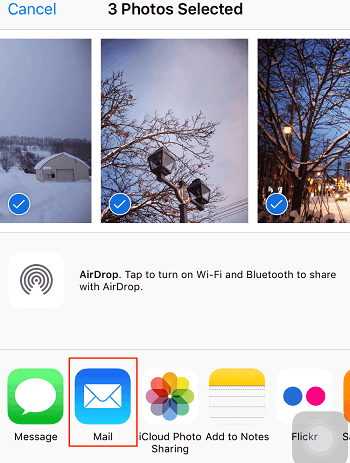
Step 2.To transfer photos from iPhone to computer, tap the "Edit" button, select the desired photos, and then tap the "Share" button, choosing the "Email" option.
Step 3. To send an email, select the mail option, type your email address and complete the email, and then tap on the "send" button.
Step 4. Sign in to your email account on your Mac, download the desired pictures, and save them to your Mac's storage.
Option 7. How to Transfer Photos from iPhone to Computer via Cloud Storage
You can also use cloud storage services like Dropbox, OneDrive, or Google Drive to get things done on your iPhone. If you choose to use a cloud storage service, make sure it offers an iOS app, which will make it easy to use. For example, Dropbox is a popular option that can be easily used on an iPhone.
To use Dropbox to import photos from iPhone to Mac, you can follow the instructions below. First, download and install Dropbox on your iPhone and Mac. Then, on your iPhone, go to the Dropbox app, select the photos you want to import, and tap the "Share" button.
Upload Photos to Dropbox on Your iPhone
Step 1. To set up Dropbox, simply install the app from the App Store and run it on your device.
Step 2. Select the "+" button and choose "Upload Photos" from the available menu options.
Step 3. To upload photos, select the desired photos, click "Next," and then choose the folder where the photos are stored to initiate the upload process.
Move Photos from iPhone to Mac
Step 1. To access your Dropbox account, go to dropbox.com on a new web browser and log in with your account credentials.
Step 2. To download selected photos, click on the "Download" option from the left panel on the screen.
Step 3. All photos will be saved to the "Downloads" folder on your Mac.
Bonus Tip. How to Transfer Photos from iPhone to Windows
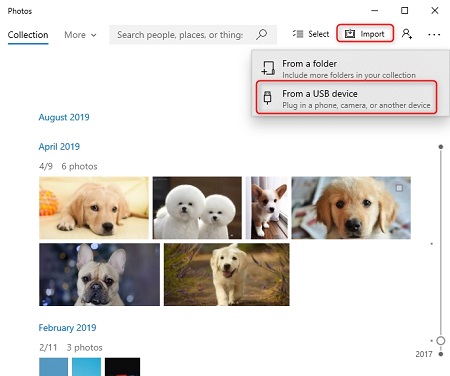
To transfer photos from your iPhone to your Windows computer, you can use the Windows default Photos app. Simply connect your iPhone to your computer, launch the Photos app, and follow the prompts to import your photos. This is a straightforward and easy way to get your iPhone photos onto your Windows device.
Step 1. Connect your iPhone to your computer via a USB cable.
Step 2. Launch your Photos application.
Step 3. To import data from a USB device, click the "Import" icon at the upper right-hand corner of the screen, then select the "From a USB device" option.
Step 4. You can select the photos you want to transfer to your Windows device from your Android device.
The Bottom Line
You have several options to download pictures from your iPhone to your PC, and this post aims to give you a better understanding of them. The most flexible option is to use option 1, which allows you to move photos from your device to your Mac, but it requires installing an additional application on your Mac. If you don't want to install an app, you can explore the other six options to transfer iPhone photos to your Mac.
Related Articles
- [With Steps] How to Download MP4 File to iPhone Directly
- Free Dailymotion Video Downloader
- Free iPhone Transfer Software: Transfer iPhone Data Without iTunes
- How to Transfer Music from iPhone to Computer for Free