How to Erase iPhone X/iPhone 8/iPhone 8 Plus Safely and Quickly
Quick Navigation:
- Part 1: Back up iPhone to computer before erasing iPhone X/8/8 Plus
- Part 2: How to erase iPhone X/iPhone 8/iPhone 8 Plus
- Tip 1: How to wipe an iPhone X/iPhone 8 from Settings on iPhone
- Tip 2: How to erase iPhone X/iPhone 8 from computer
To protect your private data, it's recommended to erase your iPhone before giving or selling it to others. This process is straightforward, but first, you need to back up your iPhone to a computer. If you've already transferred all data to a new iPhone, you can proceed with erasing the old one directly. However, if you haven't transferred the data, it's best to back up the iPhone to the computer first and then follow the steps to erase it.
Part 1: Back up iPhone to computer before erasing iPhone X/8/8 Plus
To back up your iPhone to a computer safely and without any cost or limitation, you can use the free iOS data transfer software Qiling MobiMover Free. This software allows you to export contents from your iPhone or iPad (in iOS 8 or later) to your PC, add files from your computer to your iPhone or iPad, and sync data from one iPhone to another all for free. You can transfer files such as photos, music, contacts, messages, and more to or out of your iPhone or iPad, and MobiMover can also serve as a free iPhone content manager to help you delete, edit, or add items from your computer. With MobiMover, you can learn how to back up your iPhone and then erase your iPhone X, iPhone 8, or iPhone 8 Plus without worrying about losing important files.
Step 1. Connect your iPhone X or iPhone 8 to your computer with a USB cable, tap "Trust This Computer" on your iPhone screen if prompted, then run Qiling MobiMover and select the "Backup Manager" mode to start backing up your iPhone to your Windows PC.
Step 2. With MobiMover, you can easily backup all your files with just one click. Before starting, you can change the default backup location by selecting a new location at the bottom of the screen. Once you've set your backup location, simply tick the box next to "Select All" to initiate the backup process.
Step 3. During the backup process, keep your iPhone connected to the computer to ensure a seamless and uninterrupted transfer of data. Disconnecting your iPhone during this process may require you to restart it and begin the backup process from the beginning.
Note: If you want to restore your iPhone from a backup, be aware that it will erase all content, settings, and preferences on your device and replace them with what's in the backup. Alternatively, you can use the "Phone to PC" mode to transfer specific data to your PC for safekeeping.
Part 2: How to erase iPhone X/iPhone 8/iPhone 8 Plus
To set up your iPhone as new, you have two options: either erase all content and settings directly from your iPhone, or reset it to factory settings using iTunes. Choose the method that suits you best to apply to your device.
Tip 1: How to wipe an iPhone X/iPhone 8 from Settings on iPhone
To erase your iPhone without a passcode, you can follow these steps. First, connect your iPhone to your computer and open iTunes.
Step 1: To access the Settings app on your iPhone 8, iPhone 8 Plus, or iPhone X, simply tap on the Settings icon, which is typically represented by a grey icon with gears or a cogwheel design. This icon is usually located on the home screen of your device.
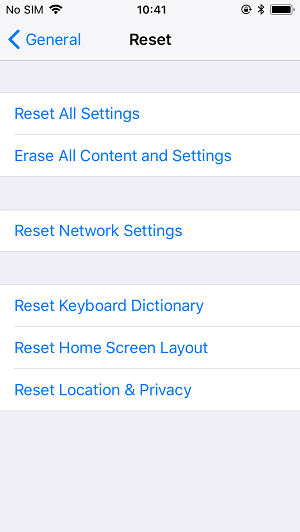
Step 2: Go to General > Reset.
Step 3: To erase all content and settings on your iPhone, tap on "Erase All Content and Settings" and then choose "Erase Now" to confirm. This will completely wipe your device, deleting all data, apps, and settings.
Tip 2: How to erase iPhone X/iPhone 8 from computer
Step 1: Connect your iPhone to your computer with a USB cable and launch iTunes. Click "Trust" on your iPhone to allow the computer to access your device.
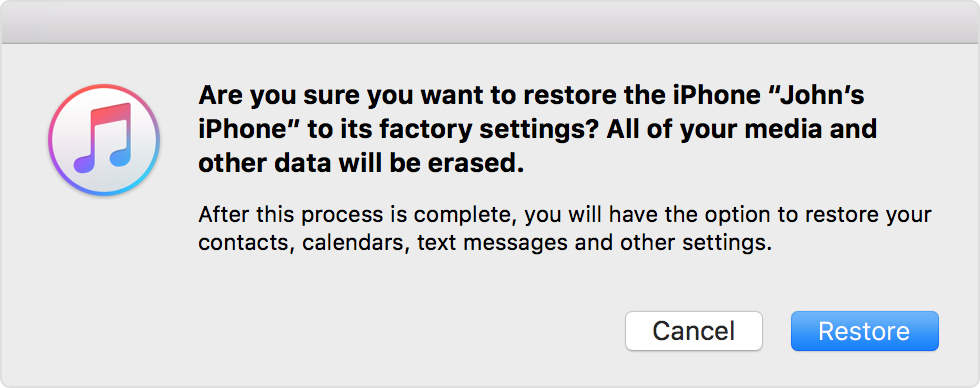
Step 2: Tap on the Device button in iTunes and choose Summary.
Step 3: To reset your iPhone to its factory settings, go to Settings > General > Reset > Erase All Content and Settings. Alternatively, you can use iTunes to restore your iPhone by connecting it to your computer, opening iTunes, and clicking on the iPhone icon.
Related Articles
- How to Change Text/Email/Notes Font Size on iPhone 8/8 Plus/X
- 3 Ways | Fix a Corrupted External Hard Drive without Formatting
This tutorial offers three solutions to fix a corrupted external hard drive without formatting. You are also suggested to backup your hard disk for easy restoration. - How to Quickly Format an SSD in Windows 7/8/10/11 for Free (3 Ways)?
Here come 3 free ways to format an SSD disk to NTFS/FAT32/exFAT in Windows 10/8/7. Format SSD from BIOS, secure erase SSD, clean SSD drive, etc. are involved. - Best Free Bootable Backup Software Disc
Learn how to create backup with the best free bootable backup software. You can also create a recovery USB to start a faulty computer and perform system recovery in WinPE.