How to Save Photos from iPhone
Quick Navigation:
- Method 1. How to Save Photos from iPhone to Computer All At Once
- Method 2. How to Save Photos from iPhone to PC via the Photos App
- Method 3. How to Transfer Photos from iPhone to PC via File Explorer
- Method 4. How to Save Photos from iPhone to iCloud
- Method 5. How to Save Photos from iPhone to Mac Using AirDrop
- The Bottom Line
Five easy ways for you to save photos from iPhone to PC, Mac, or iCloud.
Transferring photos from your iPhone to another device is a simple process that can help free up space or back up your photos. You can use reliable iPhone transfer software or built-in utilities on your devices to transfer photos to a computer, cloud storage, or another iDevice. This makes it easy to save your photos and keep them organized, whether you're looking to declutter your iPhone or create a backup of your memories.
Here I will show you five proven ways that will help to save photos from iPhone. Whether you want to transfer photos from iPhone to PC/Mac or upload photos from iPhone to iCloud, you will find a way to do it.
Method 1. How to Save Photos from iPhone to Computer All At Once
If you want to transfer your iPhone photos to a PC or Mac all at once, you'll like the iPhone transfer software - Qiling MobiMover. This tool allows you to easily transfer your photos, and more, from your iPhone to your computer.
- View and access iDevice content from a computer
- Transfer files between an iPhone/iPad/iPod and computer (Mac or PC)
- Transfer data from one iPhone/iPad/iPod to another
This tool allows you to transfer various types of data, including pictures, music, and contacts, between your iPhone and computer, making it a convenient solution for saving and sharing content.
With its additional video downloader function, you cannot only use this tool to download online videos but also save them directly to your computer or iPhone/iPad/iPod for offline viewing, eliminating buffering issues.
To save photos from iPhone to computer:
Step 1. Connect your iPhone to your PC with a USB cable and run Qiling MobiMover. Choose "Phone to PC" under "Data Transfer" to transfer photos from your iPhone to your PC, then click "Next" to proceed.
Step 2. To transfer photos from your iPhone to PC, ensure that the "Pictures" option is selected. You can then choose to move all supported files from your iPhone to the computer at once, or customize the storage path for the exported data as needed.
Step 3. To transfer photos from your iPhone to a PC, click the "Transfer" button on MobiMover, starting the file transfer process. Additionally, MobiMover allows you to import data from a PC to your iPhone using the "PC to Phone" mode.
Method 2. How to Save Photos from iPhone to PC via the Photos App
Supports: Photos and videos
In Windows 8 and later, you can use the Photos app to import photos from your iPhone to your PC, making it a convenient option for transferring photos.
Notes: Mac users can also utilize the Photos app on their computer to import photos from their iPhone.
To save photos from iPhone to PC:
Step 1. To connect your iOS device to your PC, you can use a USB cable. Simply insert one end of the cable into the charging port on your iOS device and the other end into a free USB port on your PC.
Step 2. Unlock the iPhone and trust the computer.
Step 3. Click the "Start" menu and choose "Photos".
Step 4. In the Photos app, click "Import" in the top-right corner of the window, and select "From a USB device" to import photos from a USB drive.
Step 5. Then Photos will look for a device to import from. When it has done, it will show you the new photos and videos it found.
Step 6. To avoid transferring unwanted photos, uncheck the ones you don't want to import to your PC.
Step 7. To transfer photos from your iPhone to your Windows 10 PC, click the "Continue" button on your iPhone to start the process.

Method 3. How to Transfer Photos from iPhone to PC via File Explorer
Supports: Photos and videos
The easiest way to copy photos from iPhone to PC is by using File Explorer, which allows you to import photos and videos from your iPhone to a PC using a USB cable, without the need for third-party software.
Unfortunately, the convenience of transferring photos and videos from your iPhone to a computer comes with a limitation - it only works for those file types. If you need to transfer other types of content or copy files from your computer to your iPhone, this method won't be helpful.
To save photos from iPhone to PC via File Explorer:
Step 1. Connect your iOS device to your computer using a USB cable.
Step 2. Unlock your iDevice and trust the computer.
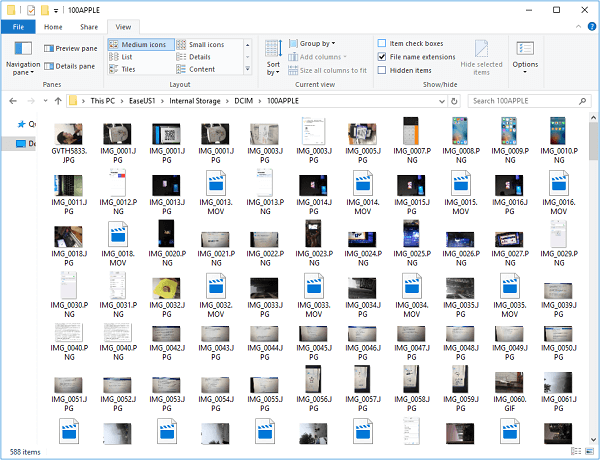
Step 3. You can either choose "Open device to view files" on your PC or go to "This PC", and then open "Internal Storage" > "DCIM" > "100APPLE" to access the files.
Step 4. Now you can see all the photos and videos on your iPhone. Manually copy the items you want to save from your iPhone to the computer.
Method 4. How to Save Photos from iPhone to iCloud
Supports: Photos, videos, contacts, notes, and more
When saving photos from an iPhone, you can also transfer them to cloud storage like iCloud, in addition to saving them to a computer, for a wireless solution.
To prepare for backing up your photos, ensure you have sufficient iCloud storage space available. If you're running low, you can purchase additional storage to accommodate your photo library. This will ensure a smooth backup process.
To save pictures from iPhone to iCloud:
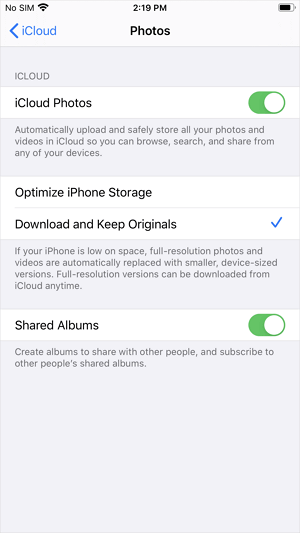
Step 1. Open the "Settings" app and tap your name.
Step 2. Click "iCloud" > "Photos".
Step 3. Turn on "iCloud Photos" or "iCloud Photo Library", depending on the iOS version you are using.
With the help of iCloud, you can also transfer photos from your iPhone to PC by downloading iCloud photos to PC. Additionally, cloud-based services like Google Photos, Dropbox, and OneDrive can assist in transferring photos from iPhone to cloud storage or to another device.
Method 5. How to Save Photos from iPhone to Mac Using AirDrop
Supports: Photos, videos, contacts, documents, locations, and more
Transferring photos from an iPhone to a Mac can be done through various methods, including using the Photos or Image Capture apps. However, a more exclusive and convenient solution is to use AirDrop, which allows for seamless file sharing between Apple devices.
AirDrop allows you to share various files, including photos, videos, and contacts, between two AirDrop-supported devices, such as iPhone, iPad, iPod, and Mac. This makes it a convenient option for importing photos from an iPhone to a Mac.
To save photos from iPhone to Mac via AirDrop:
Step 1. Turn on AirDrop on your iPhone and Mac.
Step 2. Open the "Photos" app on your iPhone.
Step 3. Select the photos you want to copy and tap the "Share" button.
Step 4. Choose "AirDrop" and select your Mac.
Step 5. On your Mac, tap "Accept" to receive the pictures from your iPhone.

The Bottom Line
Here are the ways to save photos from iPhone in one paragraph:
- Qiling MobiMover allows you to transfer photos between your iPhone and PC, or between two iPhones, making it easy to share and manage your photos.
- Photos and File Explorer only allow you to copy photos from iPhone to computer, not the other way around.
- iCloud syncs all photos and videos from your iPhone to iCloud at once, allowing for seamless and efficient syncing of your media.
- AirDrop allows you to share files, photos, and other items wirelessly between Apple devices, such as iPhones, iPads, and Macs, but it is not available on non-Apple devices.
If you only want to save a small number of photos, using an email is also a workable option.
You can save photos from your iPhone with ease by using the built-in Photos app or third-party apps like Google Photos. To save photos using the Photos app, simply open the app, select the photos you want to save, and tap the "Share" icon to share them with yourself via email or by saving them to the "Saved Photos" album.
Related Articles
- How to Delete All Contacts on iPhone 13/12/11
- How to Transfer Photos from iPhone to SD Card With/Without Computer
- SSD Optimization Tool: Optimize SSD Drive Effectively in Windows PC
SSD runs slower and slower? Here comes the best SSD optimization tool to restore SSD drive peak performance with ease. - How to Perform SSD to SSD Migration in Windows 7/8/10?
Look for a way for SSD to SSD migration, like old to new SSD, or smaller to larger SSD migration? Try the reliable disk manager Qiling Disk Master.