How to Transfer Photos from iPhone to Mac in All Possible Ways
Quick Navigation:
- How to Transfer Photos from iPhone to Mac via Photos
- How to Import Photos from iPhone to Mac via Image Capture
- How to Move Photos from iPhone to Mac via Qiling MobiMover
- How to Sync Photos from iPhone to Mac via iCloud
- How to Transfer Photos from iPhone to Mac Using AirDrop
- The Bottom Line
Five easy and proven ways for you to transfer photos from iPhone to Mac.
To free up space on your iPhone or make a copy of your photos, you can transfer photos from your iPhone to your Mac. This will allow you to remove the photos from your iPhone, freeing up storage space, or keep a copy of your photos on your Mac.
If you want to transfer photos from your iPhone to your Mac, there are several methods you can use. Regardless of the reason, you can follow one of these methods to successfully get your photos from your iPhone to your Mac.
How to Transfer Photos from iPhone to Mac via Photos
Since both iPhone and Mac are Apple products, the Photos app on your Mac can easily transfer photos from your iPhone to your computer. The Photos app allows you to organize and edit photos on your Mac, and also imports photos from external devices, making it a convenient tool for downloading photos from your iPhone to your Mac.
To import photos from iPhone to Mac:
Step 1. To connect the iPhone to the Mac and unlock the iOS device, start by plugging the iPhone into the Mac using a USB cable. Then, on the iPhone, go to Settings > General > Device Management, and tap on the name of the Mac.
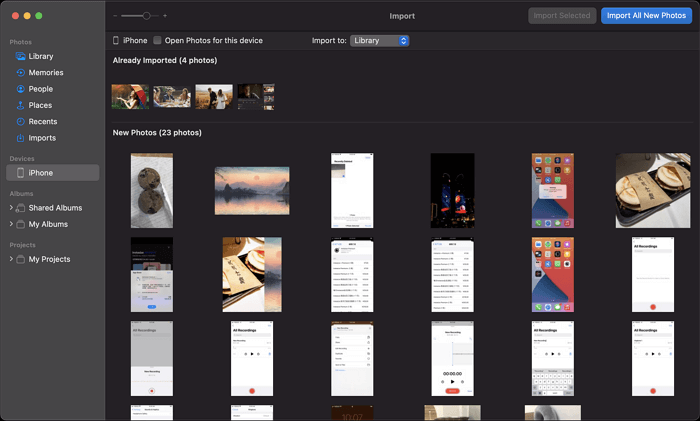
Step 2. To access your iPhone photos on your Mac, start by launching Photos on the Mac. Once Photos is open, click on your iPhone under the "Devices" section, which should be located on the left-hand side of the screen. This will allow you to view and access your iPhone's photos directly from your Mac.
Step 3. To trust a device on your iPhone, you need to click on the "Trust" button and then enter the passcode that is required to verify your identity.
Step 4. Now you can see all photos on your iPhone. Click "Import All New Photos" to transfer all new photos, or select the photos you want to transfer and click "Import [number] Selected" to transfer the selected photos from iPhone to Mac.
You can customize the storage path by clicking "Import to."
How to Import Photos from iPhone to Mac via Image Capture
Another built-in tool, Image Capture is a program on Mac that allows you to move photos from your iPhone, as well as cameras or other devices with a camera, to your Mac. Unlike Photos, which is more of a photo management app, Image Capture is specifically designed for transferring photos and videos. It's a useful tool for getting your photos off your iPhone and onto your Mac.
To download photos from iPhone to Mac:
Step 1. Connect your iPhone to the Mac via a USB cable.
Step 2. Make sure your iPhone is unlocked and allowed to trust the computer.
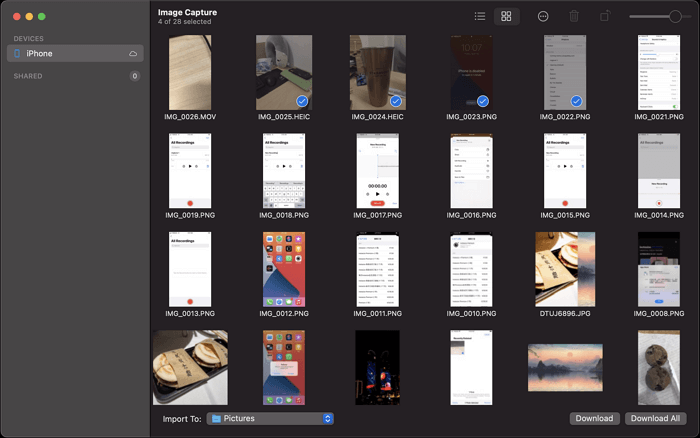
Step 3. Launch Image Capture and select your iPhone from the left panel.
Step 4. To save the photos, click on "Import to" and select the folder where you want to save them.
Step 5. To import photos from your iPhone to a Mac, select the desired photos and click the "Download" button or choose "Download All" to download them all.
How to Move Photos from iPhone to Mac via Qiling MobiMover
Both Photos and Image Capture on Mac show all iPhone photos and videos, rather than organizing them by album. Additionally, they only allow transferring photos from iPhone to Mac, but not the other way around. If you need to transfer photos from Mac to iPhone or organize them by album, you can use a third-party software like Qiling MobiMover.
As an iOS content manager, Qiling MobiMover helps transfer various types of files, including photos, videos, music, ringtones, and books, between an iPhone/iPad/iPod and a Mac, or between two iDevices, making it a useful tool for managing and sharing content between devices.
To transfer photos from iPhone to Mac:
Step 1. Connect your iPhone to your Mac using a USB cable, then open Qiling MobiMover and select the "Phone to Mac" option. Click "Next" to proceed.
Step 2. Check the desired category/categories, select other supported files if needed, and customize the storage path for the exported photos.
Step 3. Click the "Transfer" button on MobiMover to export files from your iPhone to Mac without iTunes, ensuring a safe backup and preventing unexpected data loss.
You can use this tool to download online videos to your Mac or iPhone/iPad, allowing you to watch them offline. For instance, you can download YouTube videos to your Mac for offline viewing.
How to Sync Photos from iPhone to Mac via iCloud
If you want to upload photos from your iPhone to your Mac without using a USB cable, using iCloud Photos is a good option. By enabling iCloud Photos, you can sync your photos from your iPhone to your Mac over a network connection, eliminating the need for a physical cable. This allows for wireless photo transfer between devices.
To upload photos from your iPhone to your Mac, make sure you have enough storage space in iCloud and that you're using the same Apple ID account on both devices. Then, follow these steps to transfer your photos:
To sync iPhone photos to Mac:
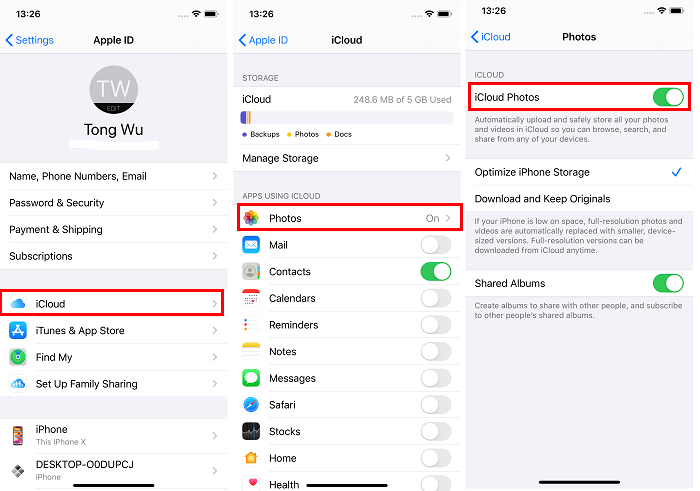
Step 1. To enable iCloud Photos on your iPhone, go to the "Settings" app, select your name from the top of the screen, tap "iCloud", and then toggle the switch next to "Photos" to the right.
Step 2. To enable iCloud Photos on a Mac, go to the Apple Menu, select System Preferences, then Apple ID, followed by iCloud, and ensure the "Photos" option is checked.
Step 3. After syncing your iPhone to your Mac, you can view your iPhone photos on your Mac using the Photos app.
On an earlier version of macOS, go to System Preferences > iCloud, click Options next to Photos, and select iCloud Photos.
How to Transfer Photos from iPhone to Mac Using AirDrop
When transferring a large number of photos, the methods mentioned earlier are suitable, but for a small number of photos, using AirDrop is the optimal choice. AirDrop is a file-sharing service on almost all Apple devices that allows users to transfer photos, videos, contacts, websites, and more between two AirDrop-supported devices.
Transferring pictures from iPhone to Mac is a straightforward process that can be completed with a few simple steps. By using the Photos app on your Mac, you can easily import and view your iPhone photos.
To transfer photos from iPhone to Mac:
Step 1. To enable AirDrop on your iPhone, go to the Control Center.
Step 2. On the Mac, open Finder and go to "Go" > "AirDrop".
Step 3. If you need to enable AirDrop, make sure your devices are connected to Wi-Fi and set to be discovered by either "Contacts Only" or "Everyone".
Step 4. To transfer photos from your iPhone to a computer, select the pictures you want to transfer, and tap the "Share" button in the Photos app. This will give you options to share the photos via email, messaging apps, or other methods, but you can also select the "Save to Files" option to save the photos to your iPhone's storage.
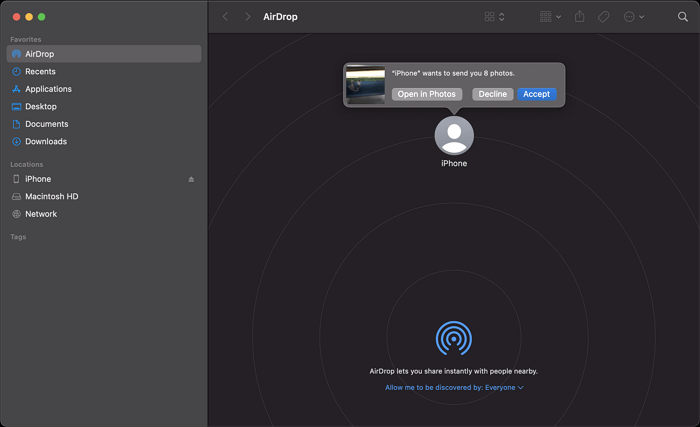
Step 5. Choose "AirDrop" and tap the name of the Mac.
Step 6. To receive photos from your iPhone via AirDrop on your Mac, click "Accept" in the AirDrop window, and then access the downloaded photos in your Mac's "Downloads" folder.
The Bottom Line
For you to make a better choice:
- Photos and Image Capture on Mac can import photos and videos from an iPhone to the computer using a USB cable.
- Qiling MobiMover is a third-party tool but could help in more data transfer situations.
- iCloud is a wireless solution that allows you to sync all your iPhone photos to your Mac at once.
- AirDrop is a convenient wireless solution for transferring a small number of pictures.
To transfer iPhone photos to Mac, specify your needs and choose the method that suits you best. You can use Photos, Image Capture, or other methods such as using a cloud service like iCloud or Google Photos, or using a USB cable to transfer photos directly from your iPhone to your Mac. All of these methods can also be used to transfer photos from Mac to iPhone.
Related Articles
- How to Convert Videos to MP4/MP3 with VLC
- How to Transfer Music from Mac to iPhone With or Without iTunes
- iTunes Alternative to Transfer Videos from iPad to Laptop
- Best 2 Ways to Fix "Virtual Disk Service Error Clean Is Not Allowed"
Get the virtual disk service error clean is not allowed while using diskpart command to clean a HDD/SSD? we give you the best two ways to fix the problem.