How to Lock Notes on iPhone 8/8 Plus/X in iOS 11 with Simple Steps
Quick Navigation:
- How to lock notes on iPhone 8/iPhone 8 Plus/iPhone X in iOS 11
- Tip 1: Lock notes on iPhone in iOS 11 selectively
- Tip 2: Remove lock for notes on iPhone 8/8 Plus/X
- Tip 3: Change the password for notes
- Tip 4: Back up notes on iPhone
To lock notes on your iPhone 8, iPhone 8 Plus or iPhone X in iOS 11, go to Settings > Notes > Password, then tap Turn On Password, and set a password to lock your notes. You can also change the password by tapping Change Password, and back up your notes by tapping Back Up. If you want to remove the lock for notes, go to Settings > Notes > Password, then tap Turn Off Password. If you forget your password, you can reset it by tapping Forgot Password. To back up your notes, go to Settings > Notes > Back Up, and select a location to save your notes. You can also restore your notes from a backup by going to Settings > Notes > Restore.
How to lock notes on iPhone 8/iPhone 8 Plus/iPhone X in iOS 11
Tip 1: Lock notes on iPhone in iOS 11 selectively
To lock a specific note on your iPhone, go to the Notes app, select the note you want to lock, tap the three dots at the bottom right corner, and choose "Lock with Touch ID" or "Lock with Face ID" depending on your iPhone's security feature. This will require your fingerprint or face to unlock the note.
Step 1: Open Notes App on your iPhone 8/8 Plus/X.
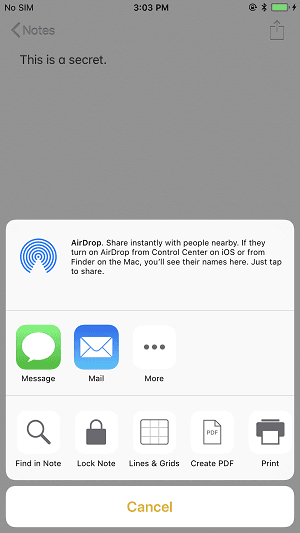
Step 2: To lock a note, click on the note you want to lock and tap on the Share button.
Step 3: To set a password for a Lock Note, tap on the Lock Note and select the password option, then set the password and click Done.
Tip 2: Remove lock for notes on iPhone 8/8 Plus/X
To unlock a locked note, you can try the following: If you know the password, simply enter it in the password field and click on the 'Unlock' button. If you don't know the password, you can try to guess it.
Step 1: Go to the Notes App on your iPhone and find the note you want to remove lock for.
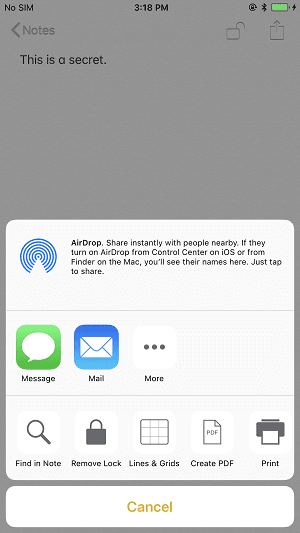
Step 2: To view a note, click on the note, tap on "View Note" and then enter the password you have set to view its details.
Step 3: Tap on the Share button and choose Remove Lock.
Tip 3: Change the password for notes
To set a new password for your locked notes, you can follow these steps: Go to your notes app, select the note you want to lock, click on the three dots at the top right corner, and select "Lock with password". Then, you will be prompted to enter a new password.
Step 1: To change the password for your locked notes on your iPhone, open the Settings app.
Step 2: Scroll down to chose Notes.
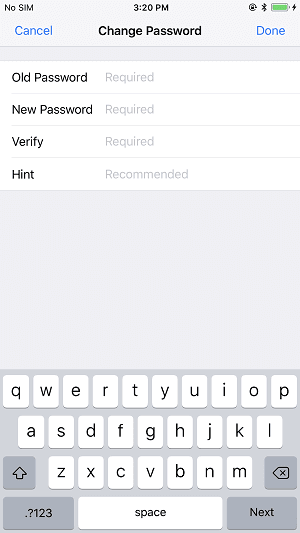
Step 3: Go to Password and click Change Password.
Step 4: To change your notes password, you need to enter your old password and the new one in the password fields and submit the form. This will update the password for your notes.
Tip 4: Back up notes on iPhone
To prevent complete data loss of your iPhone data, backing up your notes to the computer is a good idea. A completely free tool you can use is MobiMover Free, a free iOS data transfer and file management tool that allows you to back up iPhone/iPad contents to the computer, sync files from computer to iPhone/iPad, share files between two iOS devices, and manage iPhone/iPad data from the computer. You can transfer notes, contacts, messages, photos, videos, audios, and more using the tool, and it supports iPhone or iPad devices running iOS 10 or earlier versions.
Step 1. Connect your iPhone/iPad to your computer, launch Qiling MobiMover, unlock your iDevice, click "Trust", then choose "Phone to PC" and select "Next".
Step 2. Select the desired categories of notes from your iPhone/iPad to transfer to your computer, then choose a default path or set a custom storage path for the transferred notes. Finally, click the "Transfer" button to initiate the transfer process.
Step 3. After transferring notes, you can access and manage them on your computer with ease.
With MobiMover installed on your PC, you can easily transfer iOS data and manage files, making it a convenient tool to have on your computer.
Related Articles
- How to Move Files to Google Drive with Ease
You will learn 8 practical ways and how to move files to Google Drive easily, even in different situations. - Quickly Move My Documents to Another Drive in Windows 10
This tutorial demonstrates how to move My Documents to another drive in Windows 10 with two easy ways, both Windows inbuilt feature and Qiling Disk Master. - 10 Way to Fix OneDrive Not Syncing in Windows 10 or 11
This article introduces reasons and 10 solutions to OneDrive not syncing in Windows 7, 8, 10, and 11. So you can easily fix it and sync files! - How to Create QNAP to Dropbox Sync | 2 Free Tools
This tutorial provides two easy ways to perform QNAP to Dropbox sync. You can pick QNAP Cloud Drive Sync or free Qiling Disk Master to help you.