How to Transfer Data from iPhone to iPad
Quick Navigation:
- Why Do You Need to Transfer Data from iPhone to iPad
- Method 1. How to Transfer Data from iPhone to iPad Without iCloud
- Method 2. How to Transfer Files from iPhone to iPad via AirDrop
- Method 3. How to Sync Data from iPhone to iPad Using iCloud
- Option 1. Transfer Files Between iPhone and iPad via Apps Using iCloud
- Option 2. Transfer Files from iPhone to iPad via iCloud Drive
- Option 3. Transfer All Data and Settings from iPhone to iPad via iCloud Backup
- The Bottom Line
Transferring data from your iPhone to iPad is a straightforward process, whether you want to copy all your data and settings or just selectively transfer some files. This guide will walk you through the steps to transfer photos, videos, contacts, music, ringtones, documents, and more from your iPhone to your iPad (or vice versa).
Why Do You Need to Transfer Data from iPhone to iPad
Transferring data between two iDevices, such as iPhones, iPads, or iPod Touches, is often necessary to share files, switch devices, or sync data and settings. Whether you're looking to transfer specific files from one device to another, or sync all data and settings across devices, this process allows for easy sharing and synchronization of content.
To help you get things done, here I'll detail three ways on how to transfer data from iPhone to iPad. Keep reading and apply one of them to transfer files from your iPhone to iPad with ease.
Method 1. How to Transfer Data from iPhone to iPad Without iCloud
Supports: Photos, videos, music, ringtones, audiobooks, contacts, books, and more
If you're looking to transfer files between your iPhone and iPad without using iCloud, you'll like the free iPhone data transfer software - Qiling MobiMover. This tool, installed on your Mac or PC, allows you to transfer various types of files, such as photos, music, and contacts, between your devices.
- Transfer files from computer to iPhone/iPad/iPod Touch or vice versa
- Sync data from one iPhone/iPad/iPod Touch to another
- Manage iDevice content from computer
Qiling MobiMover can also be used as a free video & audio downloader, allowing users to download videos from various sites such as YouTube, Twitter, Facebook, and Dailymotion, as well as music from SoundCloud and MySpace.
To transfer data from iPhone to iPad for free:
Step 1. To transfer data from your iPhone to your iPad, connect both devices to your computer using compatible USB cables and tap "Trust This Computer" on both devices. Then, open Qiling MobiMover and navigate to the "Phone to Phone" mode, selecting the correct direction to transfer data from your iPhone to your iPad, and click "Next" to proceed.
Step 2. Here, MobiMover allows you to transfer all types of data, including audio files, pictures, videos, messages, contacts, and more, by selecting the desired categories and clicking "Transfer" to initiate the process.
Step 3. Wait some time to let MobiMover finish transferring all the selected files. After that, go to the related apps to view the synced files on your iPad.
With Qiling MobiMover, you can transfer files between your iPhone and iPad without erasing your device or signing in to the same Apple ID, and you can select specific items to share.
Method 2. How to Transfer Files from iPhone to iPad via AirDrop
Supports: Photos, videos, contacts, websites, locations, and more
You can transfer data from your iPhone to your iPad, or vice versa, using the AirDrop feature, which allows you to share files between devices over Wi-Fi and Bluetooth connections. This is a convenient alternative to using a USB cable.
To share data from iPhone to iPad:
Step 1. Make sure your devices are within the Wi-Fi and Bluetooth range. Wi-Fi and Bluetooth are wireless technologies that allow devices to communicate with each other.
Step 2. Turn on AirDrop on your iPhone and iPad.
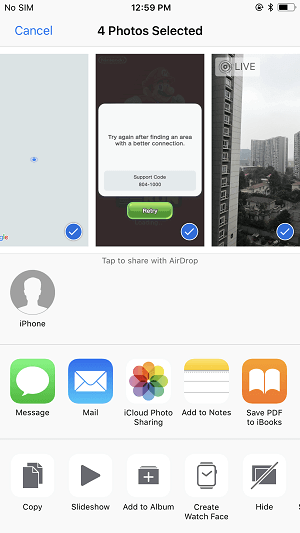
Step 3. To transfer files from an iPhone to an iPad, go to the app containing the items you want to copy, select them, tap the "Share" button, choose AirDrop, and select your iPad's device name.
Step 4. To receive items from your iPad, tap on the "Accept" button on your device. This will sync your iPad with your computer and transfer the items you want to receive.
Method 3. How to Sync Data from iPhone to iPad Using iCloud
iCloud is a cloud storage service that provides users with 5GB of free storage space, which can be upgraded for a fee, and allows them to store and sync various types of data, including photos, videos, and documents, across all their Apple devices, such as iPhones, iPads, and Macs, using the same Apple ID. However, if you need to transfer files between iPhone and iPad without using iCloud, you can use a third-party tool like Qiling MobiMover, which enables you to transfer data between devices without erasing existing data.
- Transfer photos, videos, contacts... via iCloud Photos/Contacts
- Sync documents via iCloud Drive
- Transfer all data and settings via iCloud backup
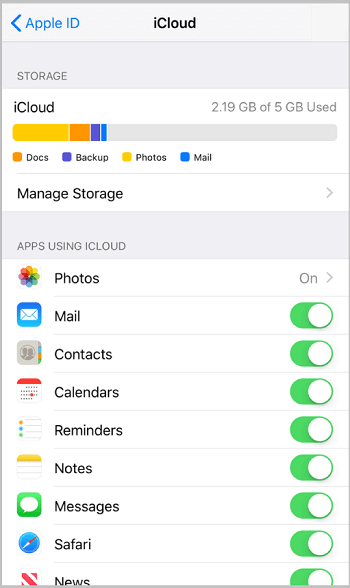
To sync files across your iOS devices, you need to ensure you're using the same Apple ID account on all devices and have sufficient iCloud storage. This will allow you to access and copy files across devices.
To transfer data from your iPhone to your iPad wirelessly, start by making sure both devices are running the latest version of iOS. Next, open the Settings app on your iPhone and tap on your name at the top, then select "iCloud" and make sure the toggle for "iCloud Backup" is turned on.
Option 1. Transfer Files Between iPhone and iPad via Apps Using iCloud
Supports: Photos, videos, contacts, notes, etc.
Syncing data from an iPhone to an iPad is a straightforward process, especially when using apps that leverage the service. For instance, you can easily transfer photos and videos from your iPhone to your iPad by turning on iCloud Photos, or sync contacts between the devices by enabling iCloud Contacts.
To share your Apple devices, simply sign in to each device with the same Apple ID, and then enable the corresponding sharing option via the Settings app.
Option 2. Transfer Files from iPhone to iPad via iCloud Drive
Supports: Word, Excel, PPT, and other types of content
iCloud Drive allows you to store any type of content as long as the file is under 50GB and within your iCloud storage limit. With this feature enabled, you can sync files across all your devices, including iPhone, iPad, iPod Touch, Mac, and PC.
To transfer files from iPhone to iPad via iCloud Drive:
Step 1. On your source iOS device, go to the "Settings" app, select your name, and then choose "iCloud".
Step 2. Scroll down to enable "iCloud Drive".
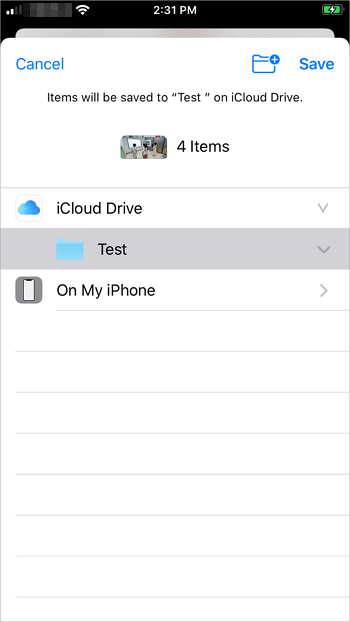
Step 3. To copy files to your iPad, open the "Files" app and select "Browse" > "iCloud Drive". Search for the files you want to copy and upload them to iCloud Drive. Alternatively, you can select the files to transfer, click the "Share" icon, and save them to iCloud Drive.
Step 4. To check if a file is synced to your iPhone, go to the Files app on your iPad, tap "Browse", then select "iCloud Drive". If the file is synced, you should see it in your iPhone's storage. If not, you can hold and tap the file to move it to your iPhone's storage.
Option 3. Transfer All Data and Settings from iPhone to iPad via iCloud Backup
Supports: Almost all data and settings on the iOS device
An iCloud backup includes almost all data and settings from an old iOS device, excluding data already stored in iCloud, making it a suitable choice for switching to a new iPhone, iPad, or iPod.
If you restore an iPhone backup to an iPad that's already set up, you'll need to erase the iPad and set it up again, as the "Restore from iCloud Backup" option is only available during setup. For more details, refer to the guide on transferring data from one iPhone to another.
Other than iCloud, other cloud-Storage services will also help to transfer data between iPhone and iPad. This is particularly useful for users who want to access their files, photos, and other data across multiple devices.
The Bottom Line
Whether you're switching from an old iOS device to a new one or sharing files between two iOS devices, you can easily transfer data from your iPhone to your iPad by choosing the method that suits your needs and following the simple steps involved.
Related Articles
- How to Transfer Windows 11 to New SSD Step by Step [2 Ways]
Want to transfer Windows 11 from one SSD or another? This article covers the preparations you need to do, and the steps to migrate OS or disk with secure boot. - Upgrade to Windows 11: What You Need to Know?
Can Windows 10 be updated to Windows 11? How to upgrade to Windows 11? Should I upgrade to Windows 11? Refer to the post for answers to those questions. - Best Free Windows 11 Migration Tool
You will know the best Windows 11 migration tool and learn how to migrate the operating system, files or data to a new drive easily using this tool. - Windows 11 NVMe Not Detected? Top Ways to Fix It Now!
What if you encounter Windows 11 NVMe not detected due to various situations? You can refer to this post for effective help.