How to Transfer Data from iPhone 6 to iPhone 8 in 3 Easy Ways
Getting a new iPhone is exciting, but transferring data from your old one can be a hassle. Fortunately, Apple provides the option to restore data from iTunes or iCloud, but first, make sure you've backed up your old iPhone to either. If you haven't, your current data will be erased. Alternatively, you can transfer data without erasing it, or explore other options listed in the table below.
|
Options |
Benefits |
Drawbacks |
Ease of Use |
|---|---|---|---|
|
|
Difficult |
|
|
|
Medium |
|
|
|
Easy |
Part 1. How to transfer data from iPhone 6 to iPhone with iTunes
To transfer files from an iPhone 6 to an iPhone 8 via iTunes, you first need to back up your old iPhone to the iTunes library, and then sync the backup file to the new iPhone 8. This process allows you to restore the new iPhone from the iTunes backup.
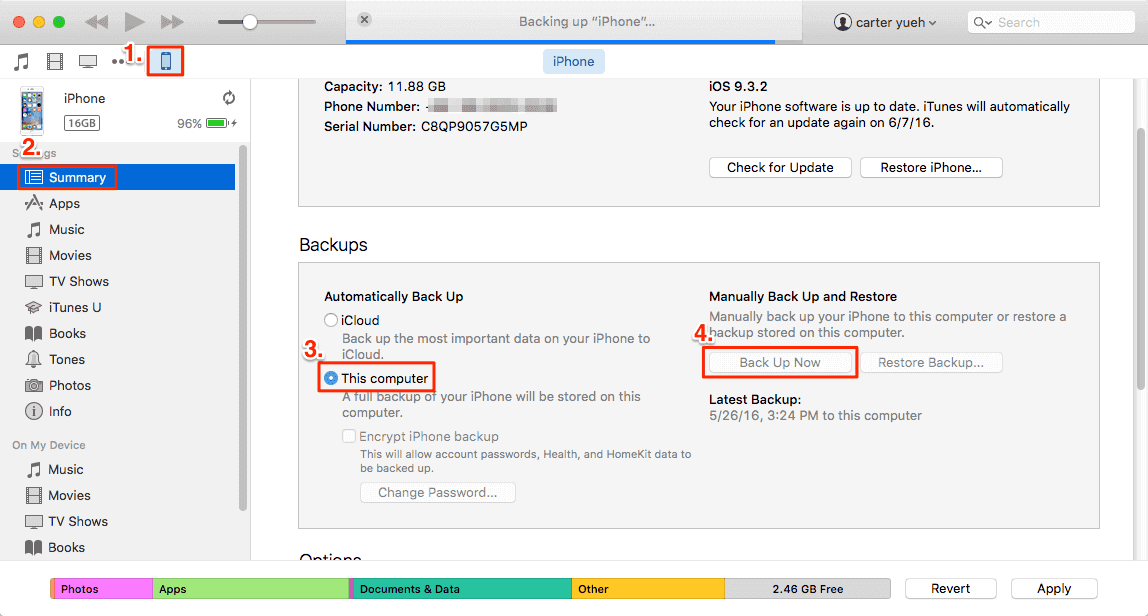
Back up iPhone 6 with iTunes
Step 1. Install the latest iTunes on your computer.
Step 2. Connect your iPhone 6 to your computer with a compatible USB cable.
Step 3. To connect your iPhone to your computer, open iTunes, click the device icon in the upper-left corner of the iTunes window, and select your iPhone from the list of devices. Then, click "Sync" to start the syncing process.
Step 4. Choose "Summary" below the device button.
Step 5. Click "This computer," then click on "Back Up Now."
Step 6. To back up all the files on an iPhone 6 to a computer using iTunes, click the "Apply" button to initiate the backup process. This will ensure that all data, including contacts, photos, and other files, are safely stored on the computer.
Step 7. Wait patiently until the process finished.
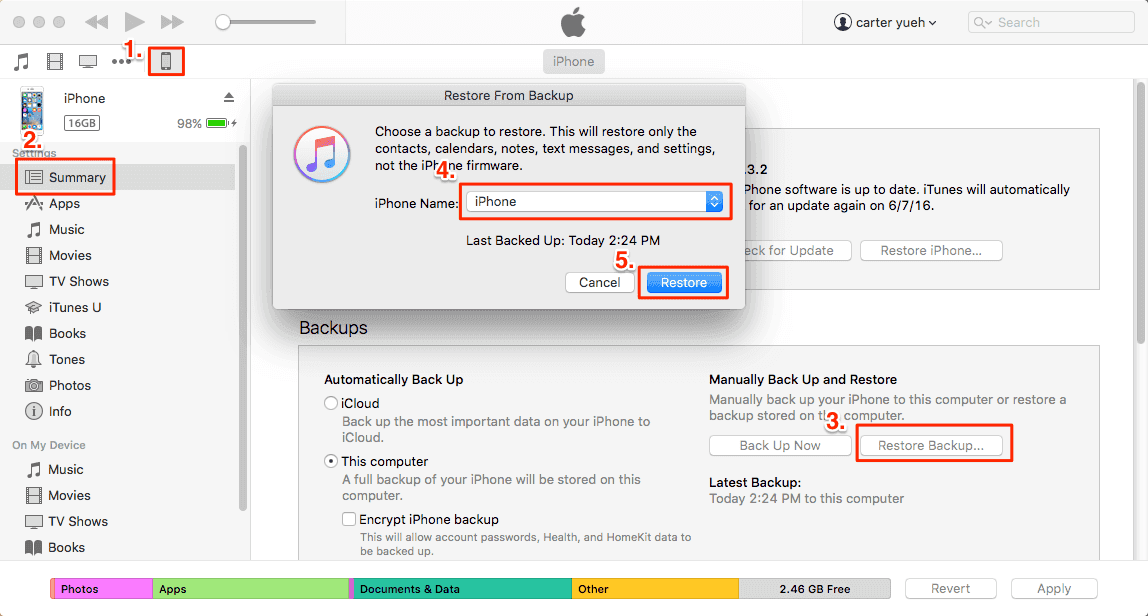
Sync iPhone 6 backup to new iPhone 8 with iTunes
Step 1. Connect your new iPhone 8 to the computer via a compatible USB cable, then learn how to troubleshoot if it doesn't show up on Windows 10.
Step 2. Run iTunes, and click on the device button.
Step 3. Click "Summary."
Step 4. Select "This computer."
Step 5. Click on "Restore Backup."
Step 6. To sync the backup files of iPhone 6 created just now to your iPhone 8, click "Apply" to get started.
Part 2. How to transfer data from iPhone 6 to iPhone with iCloud
The most straightforward way to transfer data between iOS devices is through iCloud, which allows for a seamless transfer without the need for a computer or third-party software, but comes with a 5GB free storage limit, requiring additional purchase for larger file transfers.
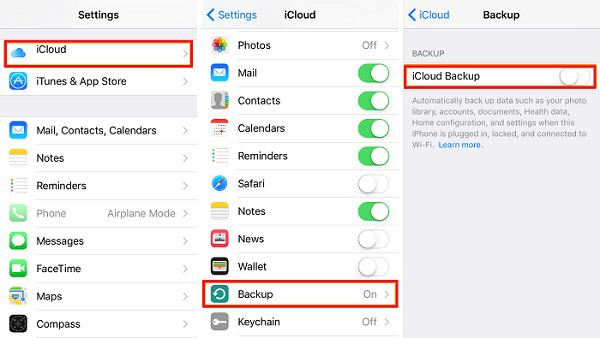
Back up iPhone 6 with iCloud
Step 1. To access iCloud on your iPhone 6, go to Settings, then click on the iCloud option.
Step 2. To back up your data, scroll down to find the "Backup" option, and then turn it on.
You can either choose to back up all of your iPhone's data to iCloud or select specific data, such as contacts, calendars, and reminders, to backup. To do this, go to Settings, tap on your name, tap on "iCloud", and then tap on "iCloud Backup".
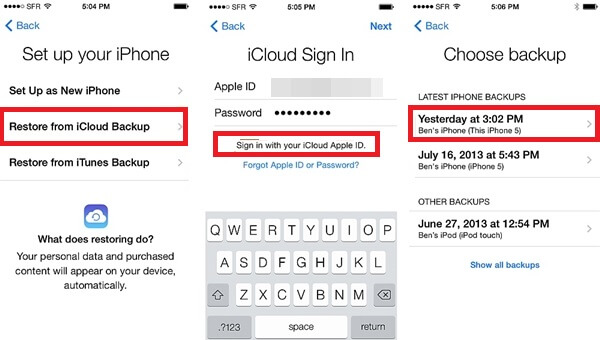
Restore iCloud backup to new iPhone 8
Step 1. If you have set up your iPhone 8, then you need to erase all content and settings on it. This will restore the iPhone to its factory settings, removing all personal data, apps, and settings.
Step 2. To reset your iPhone 8, go to the Settings app, then tap on "General" and select "Reset".
Step 3. Erase All Content and Settings > Erase iPhone.
Step 4. To set up your iPhone 8, iPhone X, iPhone XS, or iPhone XR, follow these steps: 1) Turn on your device by pressing and holding the Sleep/Wake button until the Apple logo appears. 2) Wait for the setup process to complete, which may take a few minutes.
Step 5. To restore your iPhone from an iCloud backup, select the "Restore from iCloud Backup" option and sign-in to your iCloud account. This will allow you to choose which backup to restore from and begin the restore process.
Step 6. Select the backup you want to restore.
Part 3. The quickest way to transfer data from iPhone 6 to iPhone
Although iTunes allows you to back up all kinds of iPhone data to your computer, it has its limitations, as it won't permit you to view the exported data. Additionally, the syncing process can be time-consuming, and you're unable to use your iPhone while it's syncing.
If you want to avoid problems, you are highly recommended to use Qiling MobiMover, one of the best and reliable iTunes alternatives to transfer various data from one iPhone to another with just one click.
You can now download and install Qiling MobiMover on your computer with Windows 10/8/7 and start transferring data from your iPhone 6 to your iPhone 8.
Step 1. Connect your two iPhones to your Mac with compatible USB cables and tap on "Trust This Computer" if prompted. Run Qiling MobiMover for Mac, select the "Phone to Phone" mode on the main screen, and click "Next".
Step 2. Choose the desired data types, such as photos, audios, videos, contacts, messages, books, podcasts, voice memos, and more, then click "Transfer" to start the transfer process from iPhone to iPhone X/8 on Mac at a fast speed.
Step 3. After MobiMover finishes transferring the contents, you can view and edit the transferred contents as you like.
The Bottom Line
Our guide on how to transfer data from iPhone 6 to iPhone 8 is now complete. If you've found your desired method, great! If not, don't worry, you can also try the other 3 methods we've offered to easily transfer data from one iPhone to another.