Everything You Need to Know about WhatsApp iCloud Backup
iCloud allows WhatsApp users to easily save conversations on their iPhones by backing up chats, including photos and media files, in just a few steps. This backup can be accessed and restored to the device when needed, providing a simple and convenient way to preserve and retrieve important conversations.
This tutorial covers everything you need to know about WhatsApp iCloud backup, including a bonus tip on how to back up and restore WhatsApp without using iCloud to prevent issues like "can't back up or restore an iCloud backup".
Part 1. How to Back Up WhatsApp to iCloud
iCloud offers two options to back up WhatsApp messages: an iCloud backup of the entire iPhone/iPad, which includes WhatsApp data, or enabling in-app chat backup directly in WhatsApp. While they may seem similar, there are differences between them.
iCloud backup of the entire device: Back up the whole device, including WhatsApp data, and then restore the backup to a new phone to transfer your WhatsApp data.
WhatsApp iCloud backup: To backup only WhatsApp data, go to Settings > Chats > Chat Backup. Tap on "Back up" to create a backup of your WhatsApp messages. When you restore your data to a new phone, it will only restore WhatsApp messages, keeping your other data intact.
If you have both backup options enabled on your device, your iCloud will make a double backup of your WhatsApp, taking up double the space of your iCloud space. We advise keeping the built-in WhatsApp backup enabled and unticking it from the iPhone backup, but if you prefer to make an iCloud backup of your device, you can do that too.
Option 1. How to backup only WhatsApp to iCloud
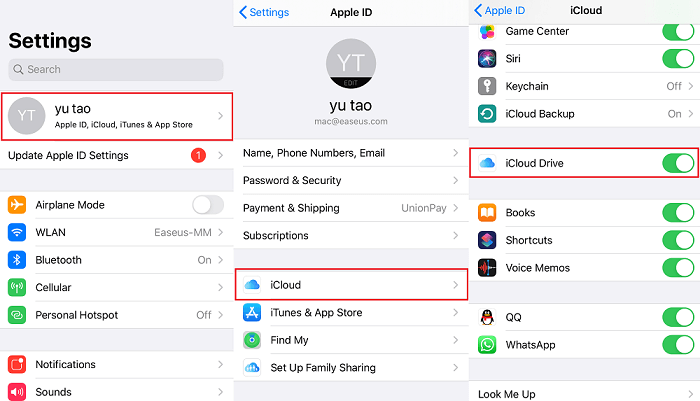
To use this method, you'll need to enable iCloud Drive first.
Step 1. To access iCloud settings on your iPhone, go to the Settings app, select your name, and then choose iCloud.
Step 2.The user should scroll down and ensure that "iCloud Drive" is turned on.
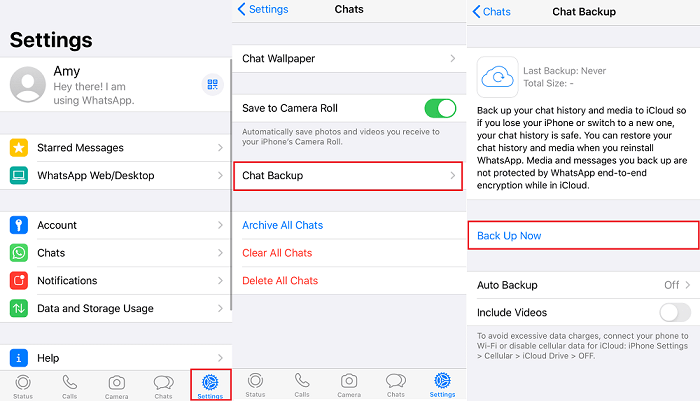
Step 3. To back up your WhatsApp chats, go to WhatsApp > Settings > Chat, then tap on "Chat Backup."
Step 4. From the Chat Backup page, you can manually back up your conversations by tapping "Back Up Now" or set up automatic backups by tapping "Auto Backup" and selecting a frequency, also deciding whether to include or exclude videos in the process.
Option 2. How to backup the whole device to iCloud
To enable iCloud Backup, you must back up all your iPhone data, including photos, messages, contacts, and videos, which may consume your limited 5GB free iCloud storage space. You may need to purchase additional storage space. Additionally, this method won't allow you to selectively restore WhatsApp messages.
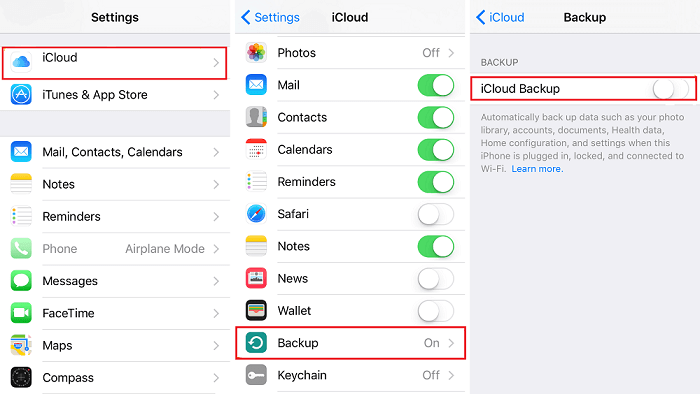
Step 1. To access iCloud settings, go to the Settings app on your device, tap on your name, and then tap on "iCloud."
Step 2. Tap "Backup" > Turn on "iCloud Backup."
Note: If you don't want to back up WhatsApp to iCloud, you can also back up WhatsApp without iCloud.
Part 2. How to Restore WhatsApp from iCloud
Once you've backed up your WhatsApp messages to iCloud, you can restore them whenever you want. To do this, follow these steps:
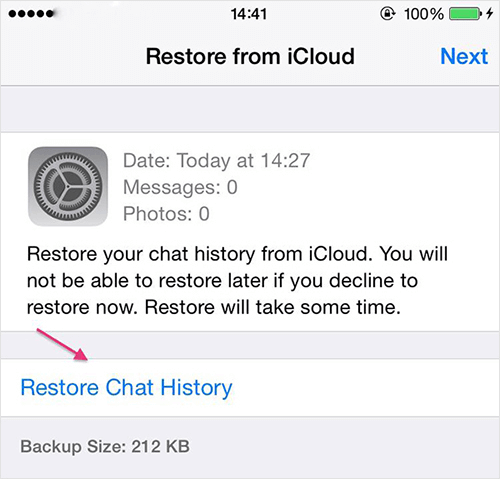
Step 1. Delete and reinstall WhatsApp on your iPhone or iPad.
Step 2. To make a successful WhatsApp backup, log in to WhatsApp with the same account you use to make a backup, and ensure that the device logs in the same iCloud account.
Step 3. WhatsApp will automatically detect the existing backup and show you an available backup, then simply tap "Restore Chat History" to get it back.
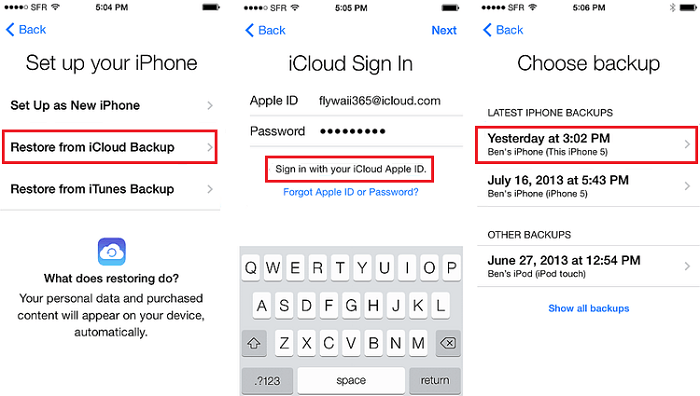
If you want to restore your whole device from an iCloud backup, you can follow the steps listed below.
Step 1. Here's how to factory reset your iPhone or iPad: Go to Settings, then General, then Reset. Tap on "Erase All Content and Settings", then enter your passcode and confirm that you want to erase your device.
Step 2. Set up your iPhone from scratch.
Step 3. When you arrive at the Set up your iPhone page, select "Restore from iCloud Backup."
Step 4. Enter your Apple ID and password.
Step 5. Select the relevant backup to restore.
Part 3. How to Find My WhatsApp Backup in iCloud
To access your iCloud backup on a Mac, you can follow a feasible method. This process only works for Mac users, allowing them to view the contents they have backed up to iCloud.
Step 1. Launch Terminal (in /Applications/Utilities folder) on your Macbook and type the following commands:
cd ~/Library/Mobile\ Documents/
find *whatsapp*
Step 2. After backing up your WhatsApp data, you'll see a list of files related to your backup. These files include separate archives for documents, images, and videos, which are stored unencrypted. The archives are named Documents.tar, GIF.tar, Media.tar, Picture.tar, and Video.tar.
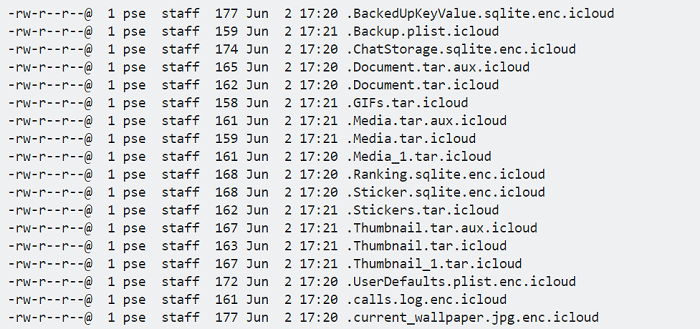
Note: If you don't see anything, ensure that iCloud Drive has been enabled. If you only see *.icloud files, turn off "optimize mac storage" in the iCloud system preferences.
Step 3.You can copy files to your desktop via the terminal command `cp -r /path/to/your/file /path/to/your/desktop`. Replace `/path/to/your/file` with the actual path to the file you want to copy, and `/path/to/your/desktop` with the actual path to your desktop.
cp *whatsapp*/Accounts/*/backup/*.tar ~/Desktop
Step 4. After exporting, double-click on the .tar files to extract a folder structure that contains the files organized by conversation.
Part 4. Fixes to "Can't Back Up or Restore a WhatsApp iCloud Backup" Issue
The "can't back up or restore a WhatsApp iCloud backup" issue may be caused by several reasons, including running out of iCloud storage, network connectivity problems, or other system issues.
Regardless of the reasons, you can use the WhatsApp manager, Qiling MobiMover, to back up and restore your WhatsApp data. With this program, you can.
- Transfer WhatsApp messages from one iPhone to another
- Back up WhatsApp from iPhone to PC
- Restore WhatsApp chat from the backup (Supports previewing before restoring)
- Print WhatsApp media files from computer
To back up your WhatsApp data, you can use a program that allows you to save your chats, media, and other information. This process can be initiated from the app itself, and you can also restore your data if needed. For more detailed instructions on restoring WhatsApp from a backup, you can refer to a separate guide.
Step 1. Launch Qiling MobiMover on your computer, connect your iPhone to the computer, and click "Trust" to allow the computer to access your device. Then, click "WhatsApp Manager" on the main interface of the program.
Step 2. To back up WhatsApp data, you can back up your entire device or select individual items such as messages, photos, videos, contacts, and other files. Simply click the "Backup" button to begin the process.
Step 3. After the backup process is complete, you can view the backup file on your computer. It will be displayed in the "Backup & Restore" section of Qiling MobiMover, where you can also restore your WhatsApp data to your iPhone.
The Bottom Line
Thank you for reading our post about WhatsApp iCloud backup. If you have any other ideas related to this topic, feel free to share them with us. We hope this guide is helpful to you and your friends who may be facing the same problem.
Related Articles
- How to Transfer Text Messages from iPhone to Computer for Free
- Free iPhone Video Transfer: Transfer Videos from PC to iPhone Free
- How to Transfer Apps from iPhone to iPhone in 5 Ways
- 3 Ways to Transfer Music from PC to iPhone