Fix "You Don't Currently Have Permission to Access This Folder in Windows"
Quick Navigation:
- What does it mean when it says "you don't have permission to access this folder"?
- Fix #1. Regain Ownership of the Folder
- Fix #2. Give Permissions to All Users
- Fix #3. Cancel the "Read-only" Option for the Folder
- Fix #4. Using Command Prompt to Fix It
- Fix #5. Rescue Files Trapped in the Inaccessible Folder
Are you encountering the error "You don't currently have permission to access this folder" in Windows 10, Windows 8.1, or Windows 7? Don't worry, we've got solutions for you. Try the steps below to resolve the issue. If none of these solutions work, consider using Deep Data Recovery to recover files from the inaccessible folder and prevent data loss.
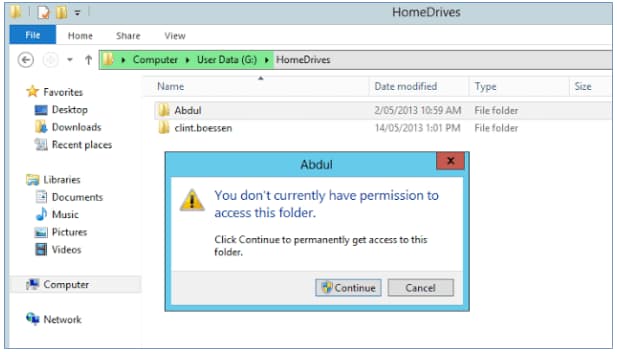
Here are the steps to fix the "You don't currently have permission to access this folder" error in Windows 10:
It happens suddenly: you have a hard drive with your most important files on it, and after upgrading from Windows 7 to Windows 10, you are told that you don't currently have permission to access this folder. This is a problem that many people have encountered. After this, you can't access the folder to delete or rename files, or even put files into the folder at all, even if you're the administrator.
What does it mean when it says "you don't have permission to access this folder"?
As the warning says, "You don't have permission to access this folder," you've likely lost ownership of the folder. Why does it happen? The error is triggered by changes that take place while upgrading to Windows 10. Once you reassign the ownership of the folder, you can fix the issue. Here are the working methods to resolve the "You don't currently have permission to access this folder" error. Try them to work it out.
Fix #1. Regain Ownership of the Folder
The very first method should be gaining ownership of the folder. It does not mean that you don't own the folder, but something changed while upgrading from Windows 7 to Windows 10. You need to fix it.
- 1. Right-click on the inaccessible folder and select Properties.
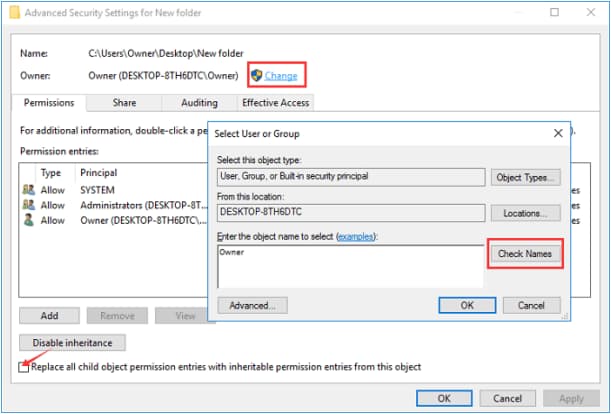
- 2. In the Security tab, go to the group or username area. Click on Advanced and then click Change.
- 3. Type in your user account name, generally the administrator account name, click on Check Names and then apply it by clicking OK. In this step, you can even click the Find Now button to get the list of accounts. After that, you can choose your account from the list.
- 4. Tick the option Replace owner on sub containers and objects and then OK.
Fix #2. Give Permissions to All Users
If you give permission to everyone, then there should be no "you don't currently have permission to access this folder" error. Here are the steps to give the folder access permission to everyone.
- 1. Right-click on the inaccessible folder and click Properties.
- 2. Click the Edit button in the Security tab.
- 3. Select Add and type in everyone. Click Check Names and then OK.
- 4. In the new window, select Everyone and then tick the checkbox for Full Control. Apply it.
Fix #3. Cancel the "Read-only" Option for the Folder
Though it might not be the reason for the "You don't currently have permission to access this folder" error, it costs you nothing to try it. After all, sometimes it really works.
- 1. Right-click on the inaccessible folder and select Properties.
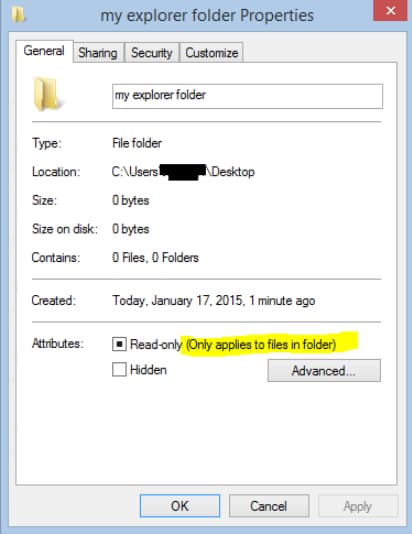
- 2. In the pop-up window, deselect the Read-Only option.
- 3. Click OK and Apply the change.
- 4. Click OK and Apply the change. Granting permission to everyone is a simple and effective solution that has worked well for many users, especially when dealing with Microsoft Office files like Word, Excel, or PowerPoint. Whenever you encounter the "You don't currently have permission to access this folder" error, try granting permission to everyone as your go-to solution.
Fix #4. Using Command Prompt to Fix It
If you have more than one folder of "you don't currently have permission to access this folder" to fix, I suggest you try the command line to take ownership of the Windows root folder by following the steps below.
- 1. Press the Windows and R keys on the keyboard.
- 2. Type in cmd in the search box and click Enter. From the command window, you can see your user account. If it is your administrator account, then go on. If not, please log in to your computer as an administrator first.
- 3.Type in takeown /F "full path of folder or drive" /A /R /D Y and click Enter.
- 4. Restart your computer. That's it.
Fix #5. Rescue Files Trapped in the Inaccessible Folder
If all the above methods don't work, the last resort is recovering files from the inaccessible folder. After all, that's the most important thing. You can try Deep Data Recovery to recover files from a specific drive and folder in Windows 10/8.1/7. Here are the steps.
Step 1: To proceed with the file recovery process, launch the Deep Data Recovery software. In the filter window, you'll be prompted to select the file types you want to recover. For a comprehensive recovery, I recommend selecting the default option, which includes all supported file types. This approach ensures that no file types are inadvertently excluded from the recovery process.
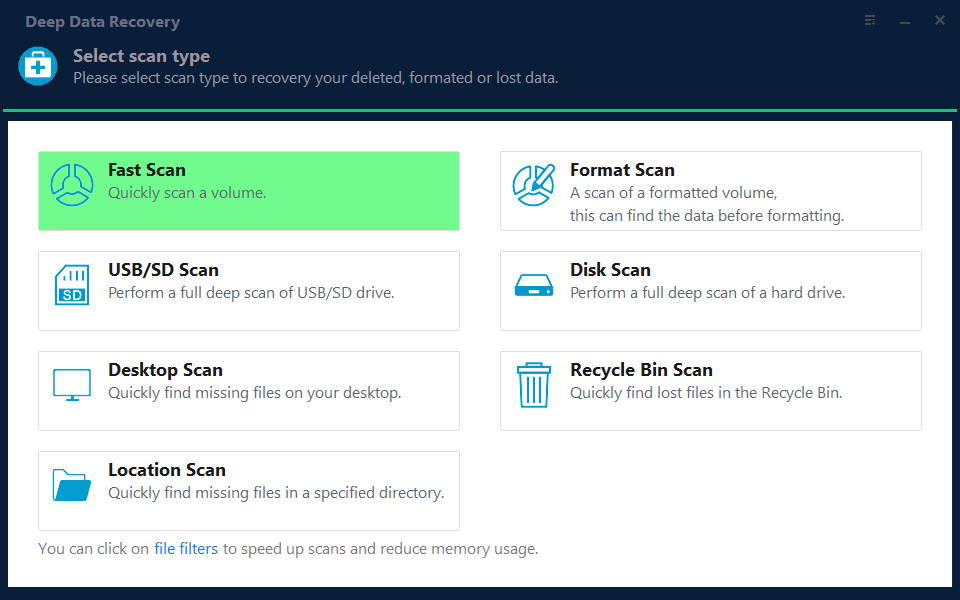
Note: You can choose different search modes based on where and why the data was lost.
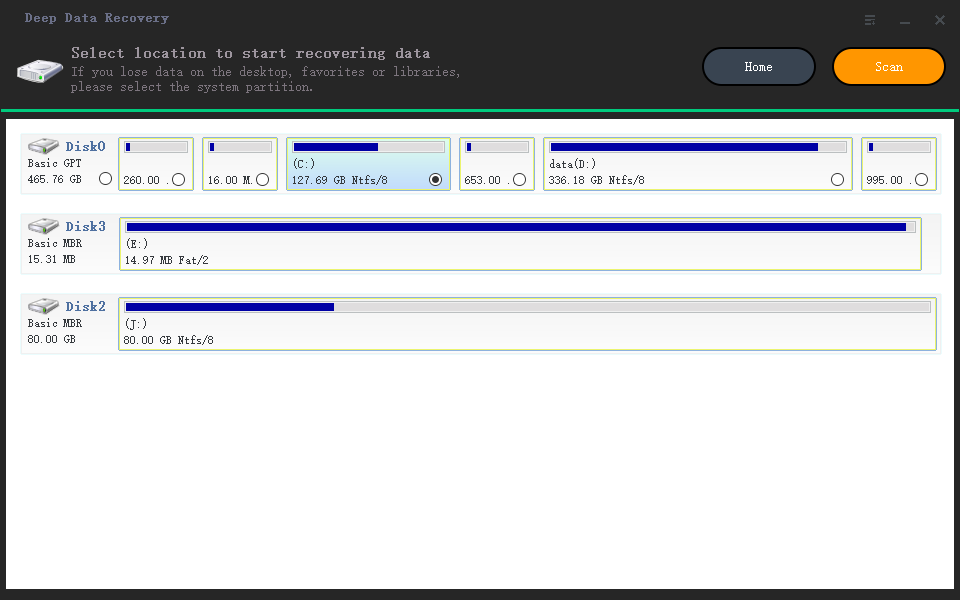
Step 2: To proceed with the recovery process, you'll need to select the drive where the inaccessible folder is located. If the folder is situated on your desktop, favorites, documents, images, or other commonly used areas, it's likely stored on drive C. In this case, select drive C and click "Scan" to initiate the recovery process.
Step 3: Once the scanning process is complete, you can review the results and preview the files. When you find the target files, select them, and click "Recover" to save them to a new folder on your computer.
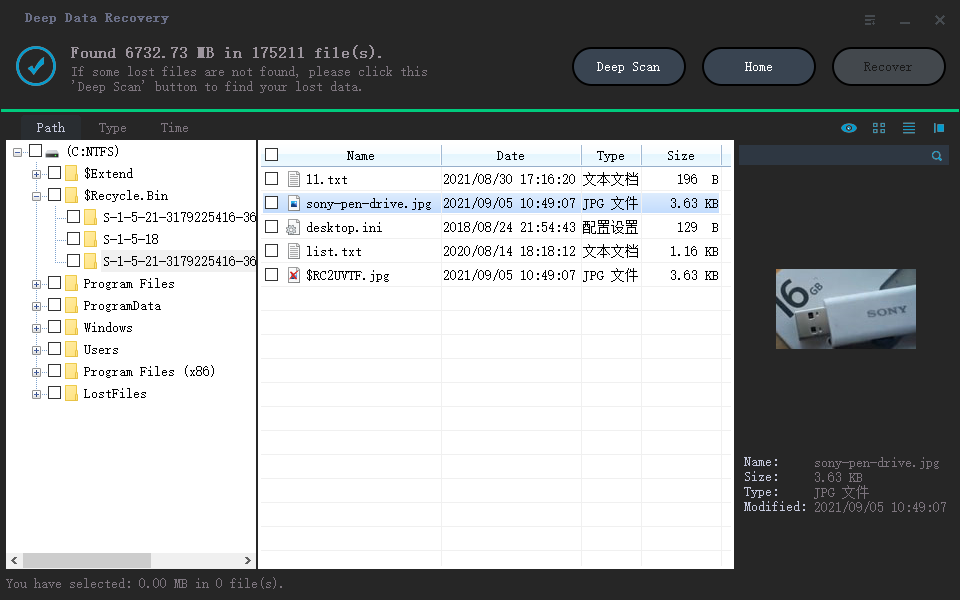
The initial scan is a Quick Scan, which is not as comprehensive as the Deep Scan. If the Quick Scan doesn't yield the desired results, you can opt for the Deep Scan on the result page to re-scan the inaccessible folder. This will likely uncover more files that can be recovered.
Related Articles
- How to Fix "Get Windows ready don't turn off your Computer" 2021
- 2 Ways to Fix Recycle Bin Corrupted in Windows 10/8/7
- How to Fix the Sony PlayStation 4 (PS4) Error Code
- Solved Windows 10 Do not Show Hidden Files and Folders 2021
- How to add gmail mailbox for email backup in Qiling Disk Master
This article will explain how to add Gmail mailboxes into Qiling Disk Master. - Choose 3rd Party Burning Software
Choose a suitable free burning software to make a bootable CD/DVD or USB flash drive. - How to Fix 'Photos Disappeared from Camera SD Card' Efficiently
If your photos have disappeared from your camera's SD card, following this guid, you can recover them.
Products
Articles & Tutorials
- Data Recovery
- Data Backup
- File Recovery
- File Backup
- System Backup and Restore
- Disk and Partition Clone
- Technical articles
- Mobile articles
- Disk Master Help
- Windows Data Recovery Tutorials
- Windows Secure Delete Tutorials
- Windows Partition Management Tutorials
- Windows File Backup and Restore Tutorials
- Windows System Backup and Restore Tutorials
- Windows Disk Backup and Restore Tutorials
- Windows Clone Tutorials