Qiling Deep Data Recovery: Where to Start on Windows
Quick Navigation:
- What the Software Can and Cannot Do
- Before You Scan
- How to Scan and Recover Files
- What to Do if a Scan Finds Nothing
- Frequently Asked Questions
A missing file is not always a deleted file. Check the original folder, Recycle Bin, and any backup first. If the file is still absent, stop using the source drive and choose a recovery scan that matches what happened.
What the Software Can and Cannot Do
Deep Data Recovery scans storage that Windows can read at the device level, including internal disks, external drives, USB flash drives, and SD cards. It can list file candidates after deletion, formatting, or a file-system problem. Finding a filename does not prove that the file content is intact.
The software is not a substitute for a backup and cannot repair a physically failed drive. If a disk clicks, repeatedly disconnects, or is not detected in Disk Management, avoid repeated scans and seek hardware-focused help.
Before You Scan
Identify the source drive by capacity and label. If you deleted data from the Windows system drive, minimize activity on that PC; installing recovery software or saving results there may overwrite the missing data.
Prepare a second drive with enough free space for recovered files. Look for an existing File History, cloud, or other backup first because restoring a backup is usually simpler than scanning deleted space.
How to Scan and Recover Files
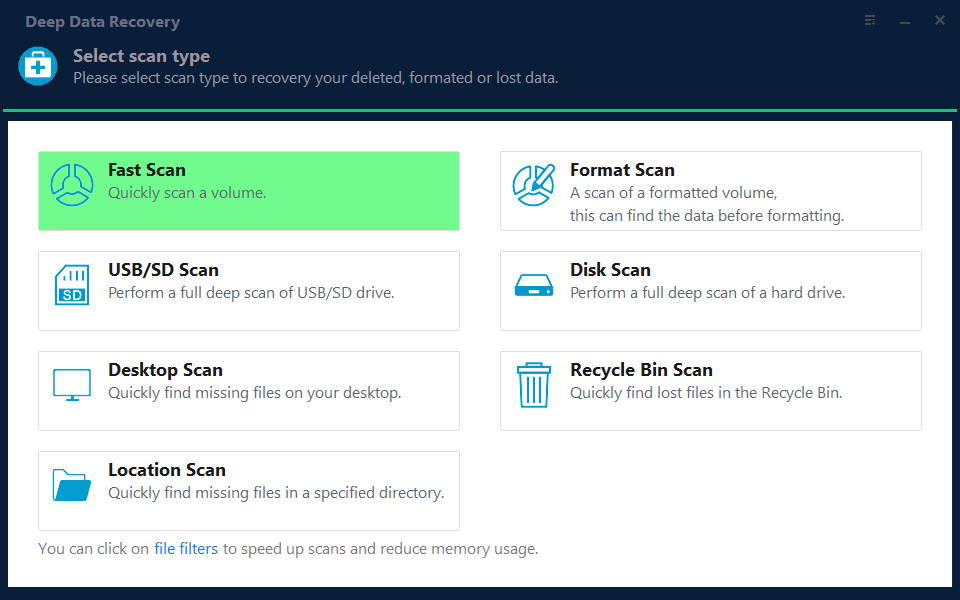
Qiling Deep Data Recovery provides the scan modes shown below. The mode in Step 2 is chosen for this specific loss scenario; it does not change the need for a separate recovery destination.
Step 1. Prepare a Safe Destination
Connect a separate external drive for the recovered copies. Download and install Deep Data Recovery on a drive other than the one containing the missing files whenever possible, then open it.
Step 2. Match the Scan Mode to the Loss
Choose Fast Scan for a recently deleted local file, Recycle Bin Scan after the bin was emptied, Format Scan for a formatted volume, or USB/SD Scan for removable media. Select Disk Scan when the whole disk needs a broader search.
Step 3. Select the Source
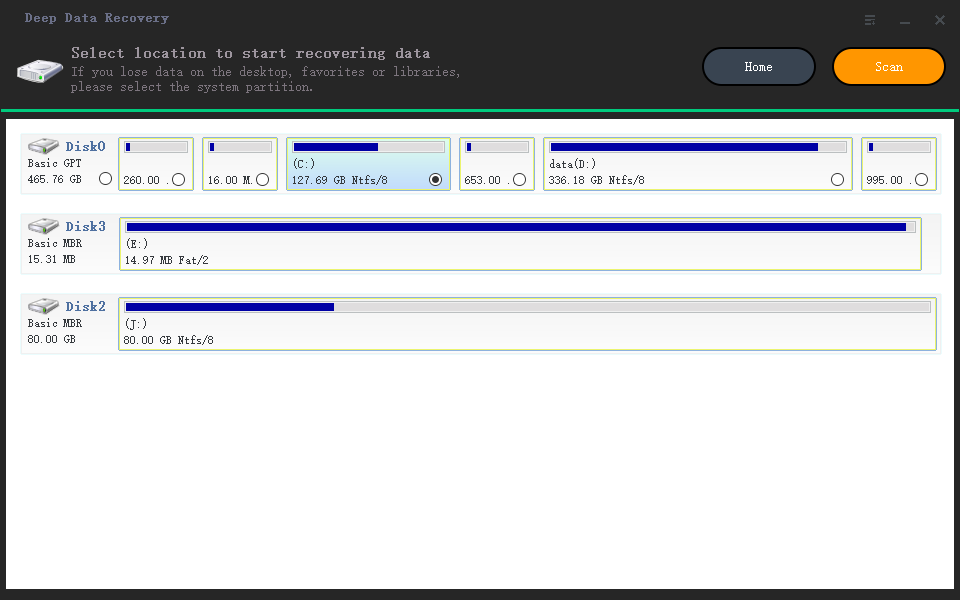
On the location screen, choose the disk or volume that held the file, using its size and drive letter to avoid scanning the backup destination. Click Scan.
Step 4. Review the Results
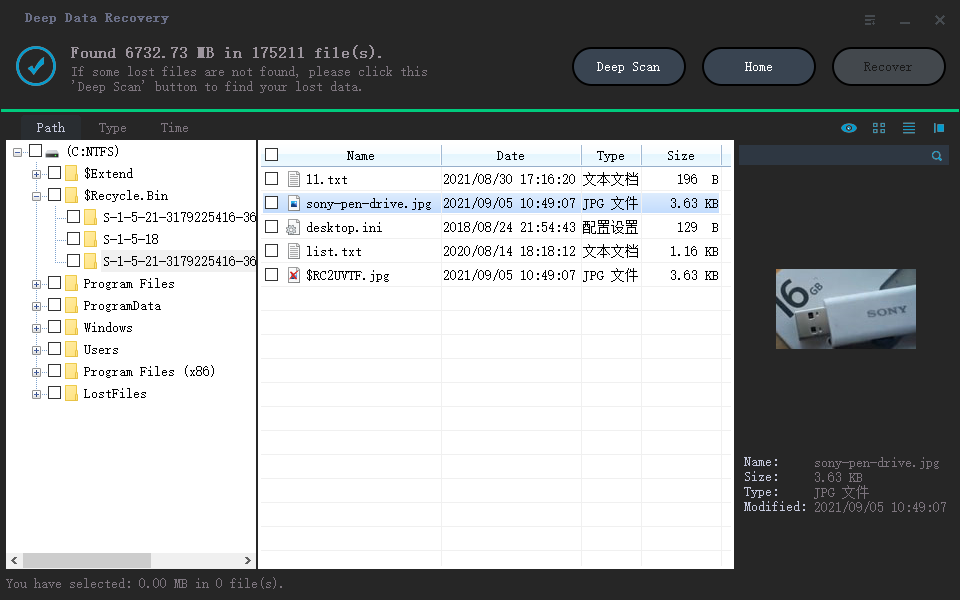
Filter by file type or folder and preview a few important files. If they are missing, use Deep Scan where available; a longer scan may find more candidates but cannot guarantee a usable file.
Step 5. Recover to Another Drive
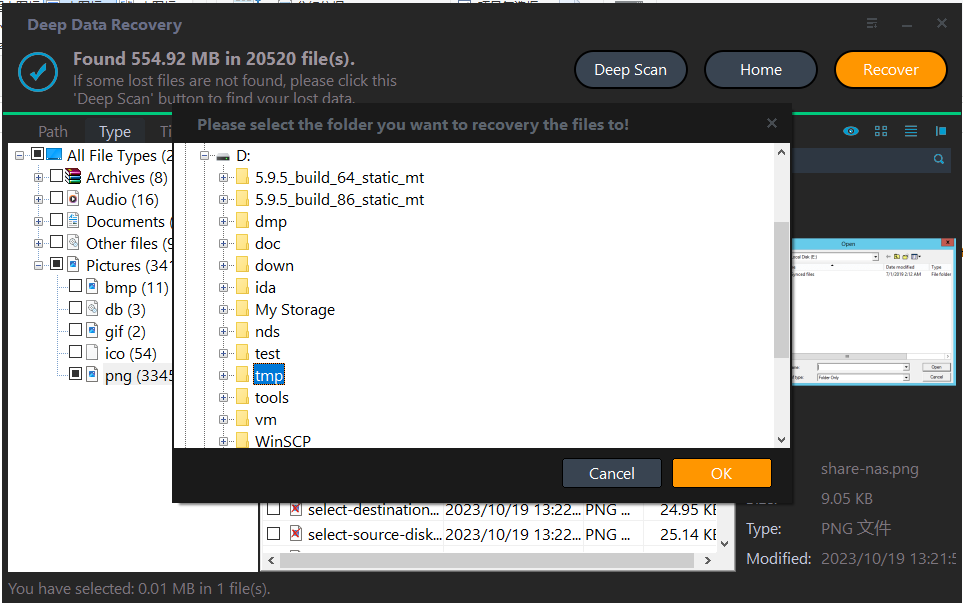
Select only the files you need, click Recover, and choose the separate destination prepared earlier. Open several restored files to confirm they work before changing the source drive.
What to Do if a Scan Finds Nothing
Confirm that you scanned the correct physical device. A changed drive letter or disconnected card reader can make the wrong volume look plausible. Try the more thorough scan only after checking the source.
If the data was overwritten, securely erased, or discarded by SSD TRIM, software may not be able to reconstruct it. Do not keep writing to the source in the hope that another scan will help.
Frequently Asked Questions
Does a scan change the source files?
Scanning is intended to read the source. The larger risk is installing software or saving recovered data onto that same drive.
Should I format a RAW drive before scanning?
No. If the data matters, scan or image the drive first; formatting changes its file-system metadata.
Related Articles
- How to Recover Deleted Files
- Windows 11 Data Recovery Software
- Recover an NTFS Partition
Recover files before rebuilding a damaged or missing NTFS partition.
Products
Articles & Tutorials
- Data Recovery
- Data Backup
- File Recovery
- File Backup
- System Backup and Restore
- Disk and Partition Clone
- Technical articles
- Mobile articles
- Disk Master Help
- Windows Data Recovery Tutorials
- Windows Secure Delete Tutorials
- Windows Partition Management Tutorials
- Windows File Backup and Restore Tutorials
- Windows System Backup and Restore Tutorials
- Windows Disk Backup and Restore Tutorials
- Windows Clone Tutorials