What Is Deep Data Recovery, and When Is Deep Scan Useful?
Quick Navigation:
- How Deep Scan Differs From a Quick Scan
- Before You Scan
- How to Run a Deeper Recovery Scan
- Limits of a Deep Scan
- Frequently Asked Questions
A quick scan may find files using information still present in the file system. A deeper scan reads more of the device and can take much longer. The right choice depends on whether the file was deleted, the volume was formatted, or the file system was damaged.
How Deep Scan Differs From a Quick Scan
Fast Scan is a useful first pass for a recently deleted file on a healthy volume. Deep Scan searches more broadly for recoverable data patterns and remnants when a quick pass misses files. It can return more results, but folder names and filenames may be incomplete.
Deep Scan does not reverse overwriting. A file whose original storage has been reused may appear as a candidate but fail to open. Previewing representative files matters more than counting all found entries.
Before You Scan
Stop using the source disk and check Recycle Bin and available backups. If a drive is physically unstable, a prolonged deep scan can increase stress; consider professional imaging instead of repeatedly rescanning.
Decide what you need most: specific photos, a document folder, or an entire volume. Knowing file types and approximate location makes the result list easier to review.
How to Run a Deeper Recovery Scan
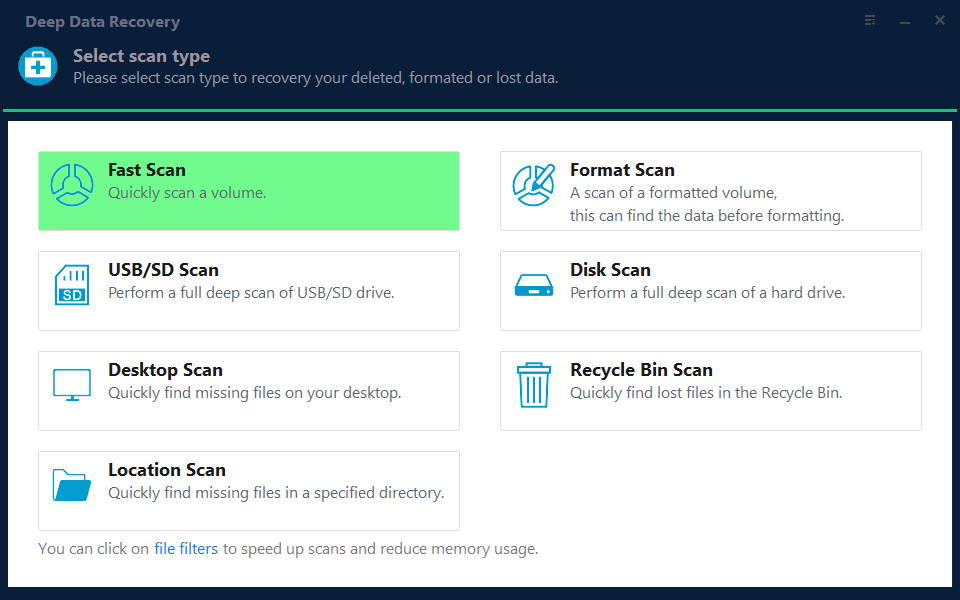
Qiling Deep Data Recovery provides the scan modes shown below. The mode in Step 2 is chosen for this specific loss scenario; it does not change the need for a separate recovery destination.
Step 1. Install Away From the Source
Prepare a separate drive for the output, then install and start Deep Data Recovery without writing to the device that lost the files.
Step 2. Choose the Initial Scan Type
For a healthy Windows volume with recent deletion, start with Fast Scan. For a formatted volume choose Format Scan; for a USB or SD device use USB/SD Scan. The mode screen shows these choices before the source selection.
Step 3. Select the Correct Device
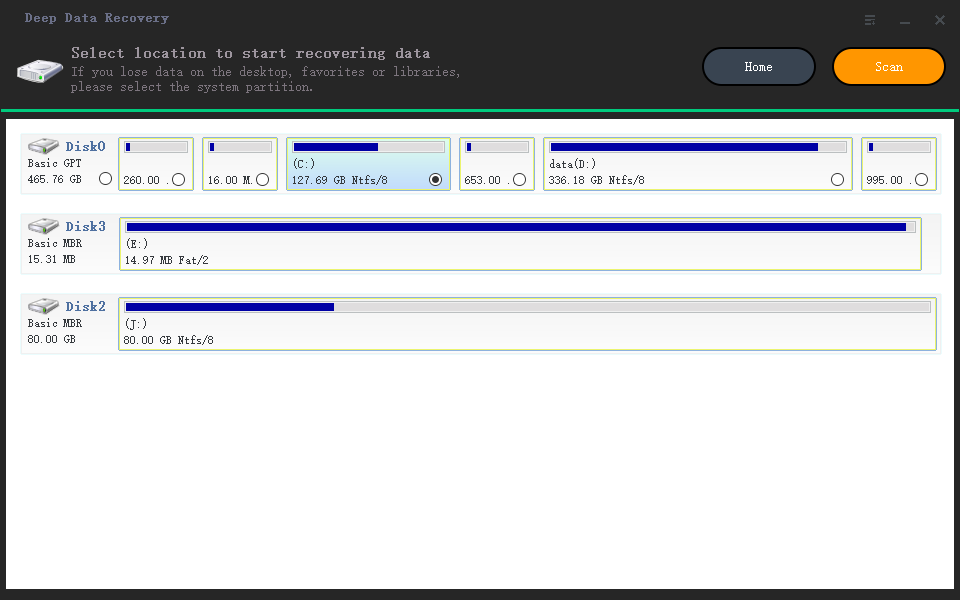
Choose the original disk or partition by its capacity and label, not just its current drive letter. Start Scan and let the first pass finish.
Step 4. Use Deep Scan if Needed
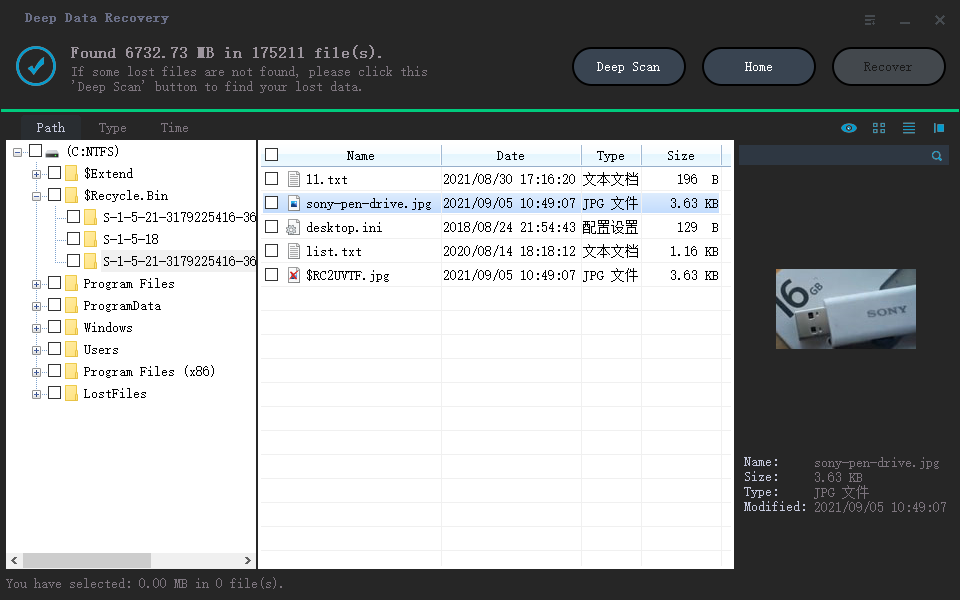
Check the first results and preview important files. If the files are absent, click Deep Scan in the results view and allow enough time for it to finish without using the source drive.
Step 5. Save Verified Candidates
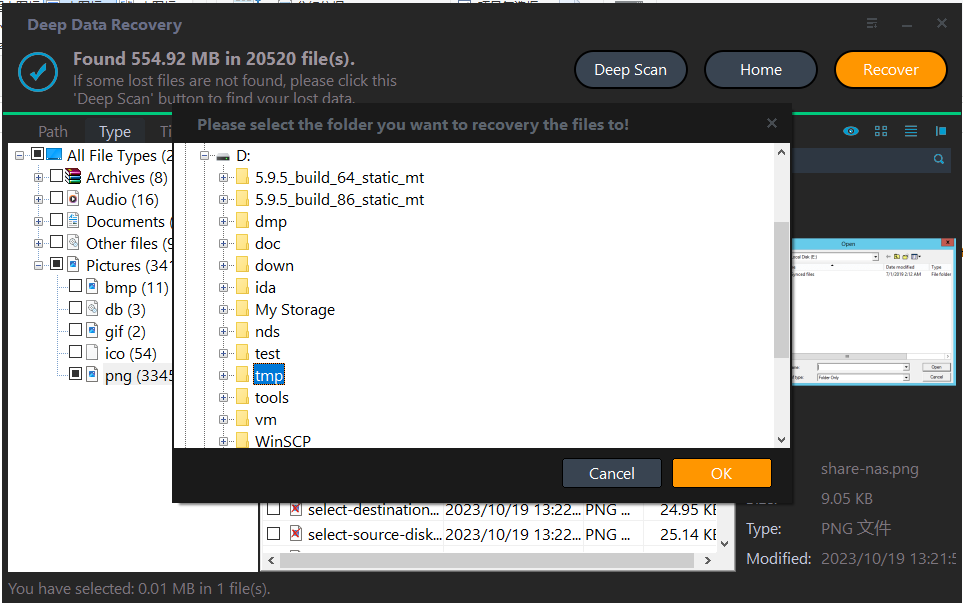
Select the files that preview correctly, click Recover, and save them to the other physical drive. Check their contents after recovery before deleting any scan results.
Limits of a Deep Scan
Longer scans can produce duplicate or unnamed candidates. Sort by type and size, then sample several files rather than assuming every match is intact. A complete scan does not guarantee complete recovery.
On SSDs, TRIM and later writes may remove deleted data quickly. If the disk makes abnormal noises or disconnects, stop scanning and seek a hardware recovery assessment.
Frequently Asked Questions
Is Deep Scan always better than Fast Scan?
No. Fast Scan can be quicker and preserve more useful names for recent deletion. Use a deeper pass when the first results are incomplete.
Can a deep scan recover an overwritten file?
No software can reconstruct content that has been fully overwritten by new data.
Related Articles
- Deep Scan Recovery Software
- Recover Deleted Files
- Recover Deleted Files on an SSD
SSD deletion has different recovery limits because of TRIM and later writes.
Products
Articles & Tutorials
- Data Recovery
- Data Backup
- File Recovery
- File Backup
- System Backup and Restore
- Disk and Partition Clone
- Technical articles
- Mobile articles
- Disk Master Help
- Windows Data Recovery Tutorials
- Windows Secure Delete Tutorials
- Windows Partition Management Tutorials
- Windows File Backup and Restore Tutorials
- Windows System Backup and Restore Tutorials
- Windows Disk Backup and Restore Tutorials
- Windows Clone Tutorials