How to Fix External Hard Drive Not Showing Up on Windows 10
You connected a Toshiba 1TB external hard drive to your PC, but it's not showing up. Initially, Windows showed a "USB not recognized" balloon, but later it stopped showing up altogether. The device only appears in the "Devices and Printers" page in the Control Panel, but nowhere else, including the external hard drive section.
Possible Reasons for an External Hard Drive Not Showing Up
Connecting a new or old external hard drive to your computer can sometimes result in the error where it doesn't show up, even if it's visible in the device list. This issue, where the external hard drive appears in devices but not in This PC, is a common problem that many people encounter. To troubleshoot the issue, it's essential to identify the possible causes behind it.
- Insufficient power supply/broken USB port
- Partition problems
- Lack of drive letter
- File system issues
- Outdated drivers
How to Fix External Hard Drive Not Showing Up (6 Ways)
When an external hard drive is not recognized by a computer, there are several steps you can take to troubleshoot the issue. First, ensure the hard drive is properly connected to the computer, either via USB or other interface. If it's still not recognized, try using a different USB port or cable to rule out any issues with the connection.
- 1. Open Disk Management to Check
- 2. Troubleshoot Broken USB Ports
- 3. Initialize a New External Drive
- 4. Assign a Drive Letter
- 5. Change the File System
- 6. Update the Driver
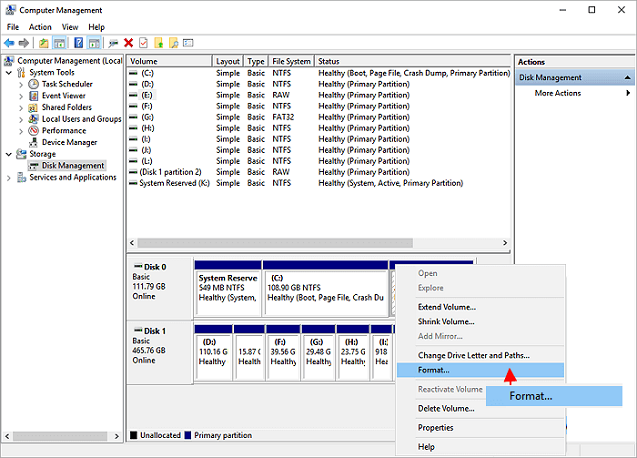
Method 1. Open Disk Management to Check the Device
To start, open Disk Management to check the external hard drive.
Step 1. Right-click the start (win logo)
Step 2. Select "Disk Management".
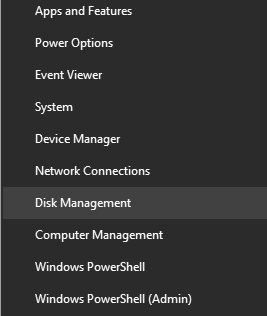
Step 3. Browse the drive list to look for your external disk.
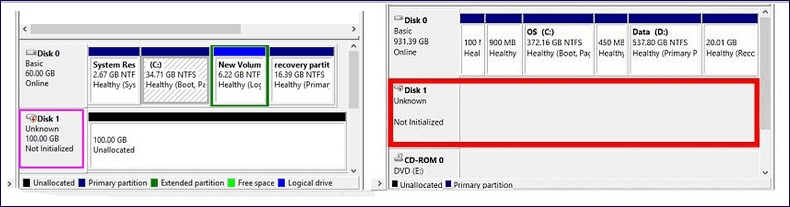
If an external hard drive is detected in Disk Management but not showing in This PC, it's likely due to the drive being unallocated, not initialized, or offline. In this case, fixing the issue can be as simple as initializing the drive, which can be done using Disk Management, resolving the external hard drive not showing problem.
Method 2. Troubleshoot Broken USB Ports
If your external hard drive isn't showing up when connected via a USB 2.0 port, try using a USB 3.0 port instead. Alternatively, plug the drive directly into your computer to see if it's detected.
Method 3. Initialize a New External Drive
If your external hard drive is brand new, you'll need to initialize it first, followed by creating a new partition, which will make it visible on your Windows 10/8/7 system.
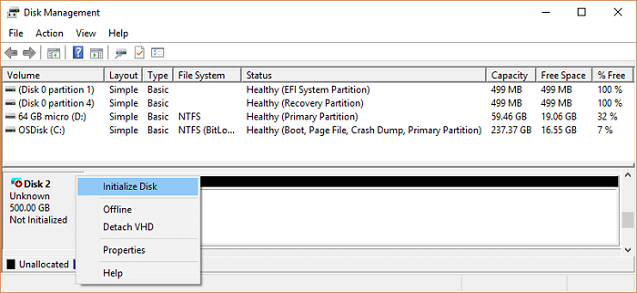
Step 1. Right-click "This PC" (in Windows 10) and choose "Manage".
Step 2. To initialize your new hard disk, go to Disk Management, right-click on the new hard disk, and select "Initialize Disk".
Step 3. Select the disk and choose MBR or GPT as its partition style, click OK to start.
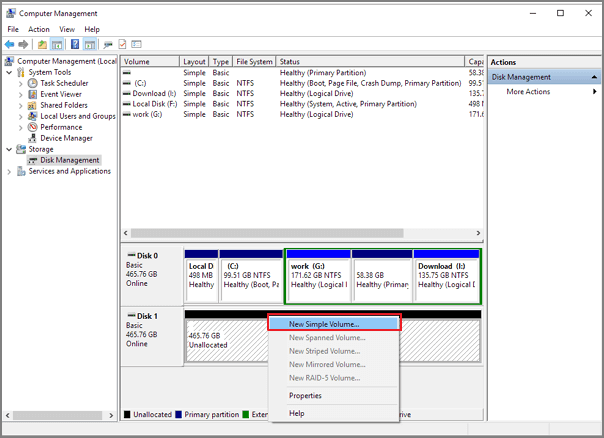
Step 4. Right-click on the unallocated space on your new drive and select "New Simple Volume..." to create a new partition and make the space usable.
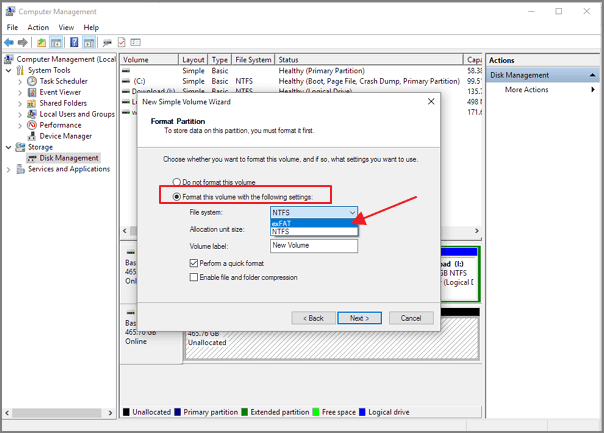
Step 5. To configure the new hard drive, set its volume size to a specific amount, assign a drive letter to it, and format it with the NTFS file system. This will make the drive accessible and usable for storing files and data.
Step 6. Click "Finish" when the process completes.
The external hard drive shows up on This PC, allowing you to access and transfer files.
Method 4. Assign a Drive Letter
Your external drive may not appear in This PC if it doesn't have a drive letter assigned to it. To resolve this issue, you can assign a drive letter to the external drive, making it visible in This PC.
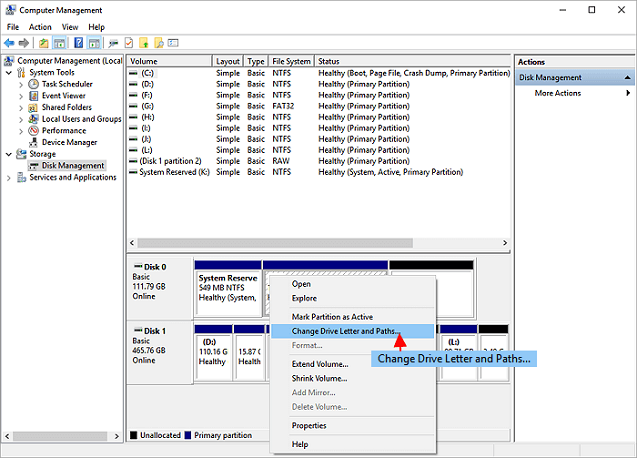
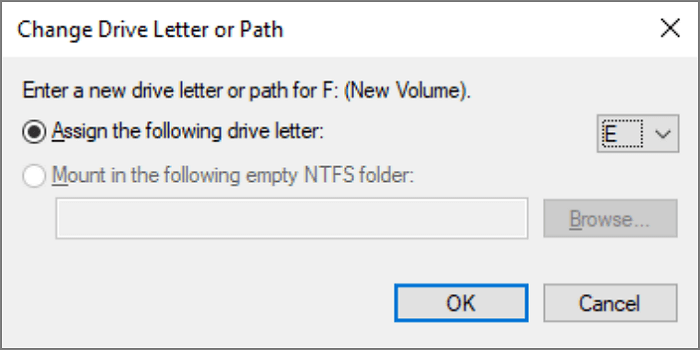
Step 1. To assign a drive letter to a disk partition, go to Disk Management, right-click the partition without a drive letter, and select "Change Drive Letter and Paths".
Step 2. Choose "Change Drive Letter and Paths" from the context menu.
Step 3. Click the "Add" button in the pop-up window.
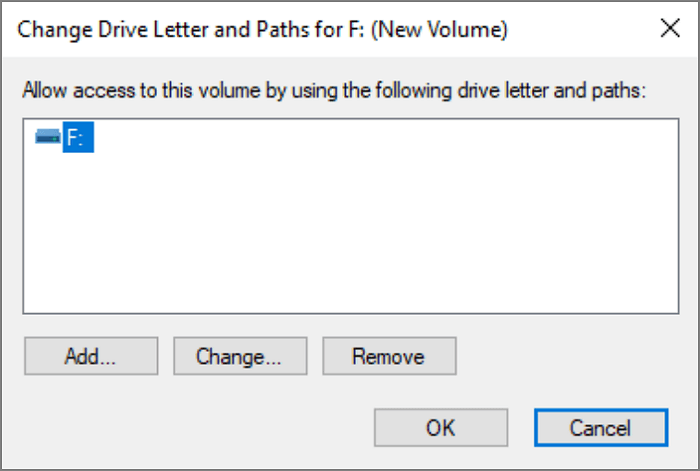
Step 4. Assign a drive letter to the partition and confirm by clicking "OK".
Most people can find their external hard drive in Disk Management after assigning a drive letter.
Method 5. Change the File System to Make It Recognizable
Your external hard drive might not show up in This PC if the file system is not compatible with Windows, and changing the file system could fix the issue.
Step 1. Keep the external hard drive connected to the PC.
Step 2. In Open Disk Management, right-click the external hard drive with the RAW or unknown file system and select "Initialize" to convert it to a usable file system such as NTFS. This will erase all data on the drive.
Step 3. Select "Format" and set "NTFS" or "exFAT" for the external hard drive.
Step 4. Select "OK" to finish the formatting.
Method 6. Update the Driver
If an external hard drive works with one computer but not another, updating the external hard drive driver may resolve the issue.
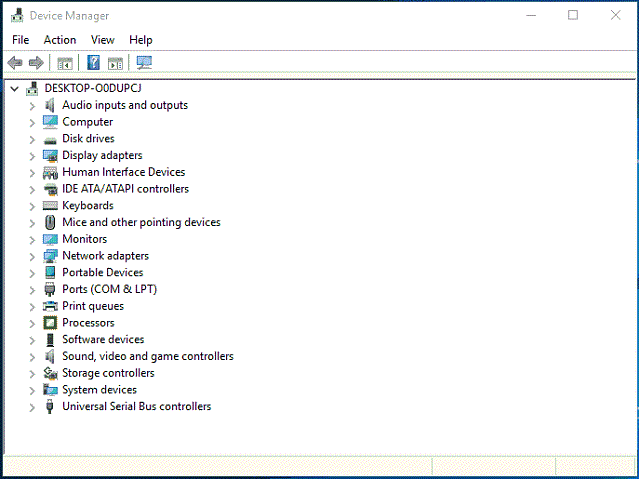
Step 1. Right-click "This PC" and choose "Manage".
Step 2. Click "Device Manager" then expand "Universal Serial Bus Controllers".
Step 3. Right-click the device and select "Update driver".
Step 4. Click on the "Start" button, then click on "Device Manager". In the Device Manager window, find the device that needs a driver update, right-click on it, and select "Update driver".
If you're having trouble getting your external hard drive to show up in Disk Management, try using the built-in Disk Management tool to initialize the drive. If that doesn't work, you can try using a third-party software like Hiren's BootCD or Qiling Partition Master to initialize the drive. If all else fails, contact the seller for a refund and exchange.
Bonus Tip - How to Recover Data from External Hard Drive
You will lose data if you have run the format operation in Method 5, but you can restore external hard drive data after formatting using Deep Data Recovery software, which can recover lost photos, files, documents, videos, and more after deleting, formatting, partition loss, OS crash, virus attack, and other data loss scenarios.
Step 1. Select file types and click "Next" to start.
- To recover lost data, download and install Qiling Data Recovery on your computer or laptop.
- Connect the external hard drive to your computer.
- Launch Deep Data Recovery. Select file types and click "Next" to start.

Step 2. Choose and scan the external hard drive
- To recover data from an external drive, select the drive from the External drives list and click on "Scan for lost data".

Step 3. Check the scan results
- Qiling data recovery software will immediately scan the selected drive for all data, including deleted, corrupted, and existing data.
- You can use the Filter feature to quickly locate files of one kind, such as Pictures, Word, Excel, PDF, videos, emails, and more.

Step 4. Preview and recover data
- Double-clicking a file from the scanned results to preview.
- Choose the files you want and click "Recover".
- To ensure the integrity of the recovered files, it's recommended to save them on a different drive from the original one. This prevents any potential overwriting or corruption of the files. Simply connect an external drive or use a different internal drive to store the recovered files.
Conclusion
Removable hard drives are a convenient and helpful tool, but sometimes they may not be recognized by your PC when plugged in. Don't worry, there are six tested ways to fix this issue, and if you experience data loss during the repair process, you can use Qiling data recovery software to recover your files.
Related Articles
- Microsoft Word Won't Open Windows 10/Mac | Fixed Here!
- How to Recover Data Lost By Ghost Recovery
- Recover Files and Data Deleted by CCleaner [Updated 2022]
- How to Disable AutoSave in Word and Excel
- How to Recover Deleted Audio Files from Memory Card
With the help of audio recovery software for memory card, you can solve the problem of how to recover deleted audio files from memory card on Windows or Mac easily. - How to Recover BKF Files in Windows 7/10
Losing BKF files can be frustrating, especially if they contain important data. However, with the right tools and techniques, you can recover your BKF files and get back to work.