OneDrive Recycle Bin Retention | Recover Deleted Files in OneDrive
Many users are unaware of how to recover deleted files from OneDrive's recycle bin in Windows 10, unlike Windows' own Recycle Bin. This article aims to address this knowledge gap by covering the basics of OneDrive's recycle bin, including its data retention and file restoring capabilities. Let's get started!
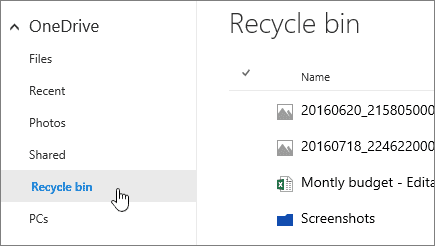
Where Is the Recycle Bin in OneDrive
The Recycle Bin in OneDrive is a folder where deleted files and folders are stored, and can be restored or permanently deleted. It can be found at the top left of your screen.
The OneDrive's Recycle bin basically has two stages:
- First Stage Recycle Bin
- Second Stage Recycle Bin
First Stage Recycle Bin
Deleted files are not permanently erased when you remove them from your PC. They go to the Recycle Bin, a temporary holding area, before being permanently deleted. This is the first stage of the recycle process.
The Recycle Bin is a safety net that allows you to recover files you've accidentally deleted, giving you a second chance to restore what you need.
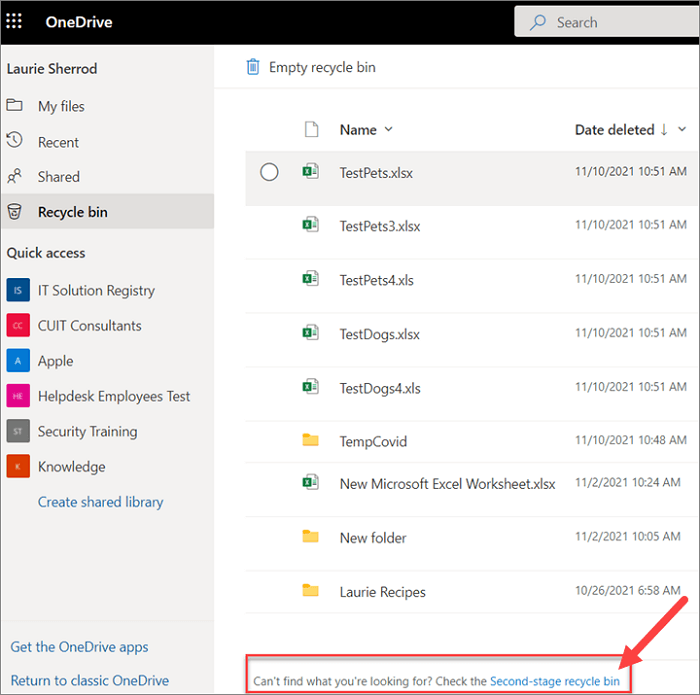
Second Stage Recycle Bin
The second recycling bin stage allows you to recover deleted files that were previously deleted from the recycle bin, essentially storing even files that were thought to be no longer useful.
OneDrive Recycle Bin Retention
OneDrive allows businesses to store and access various data types, making it essential to set a retention rule to avoid future inconvenience. The platform offers the ability to choose retention rules, enabling users to recover deleted files with ease. This feature provides a convenient solution for managing and retrieving deleted data.
To set retention rules for your OneDrive, go to Settings > OneDrive > Retention, and choose the duration for which you want to retain deleted files and folders. You can select from a variety of time periods, such as 1 day, 1 week, 1 month, or 1 year.
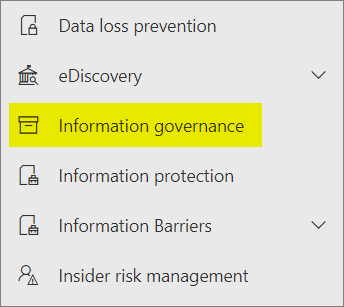
Step 1. Go to the compliance admin center, then click on the "Information governance" option.
Step 2. Click on "Retention Policy" to create a customized one.
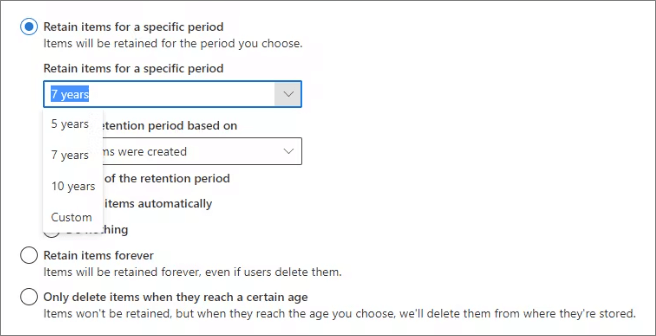
Step 3. To set a retention policy, you need to choose the name and type of the policy. This typically involves selecting a name for the policy and then choosing the type of data that the policy will apply to, such as emails, files, or messages.
Step 4. The OneDrive account can be selected as a location, allowing admins to include or exclude specific accounts.
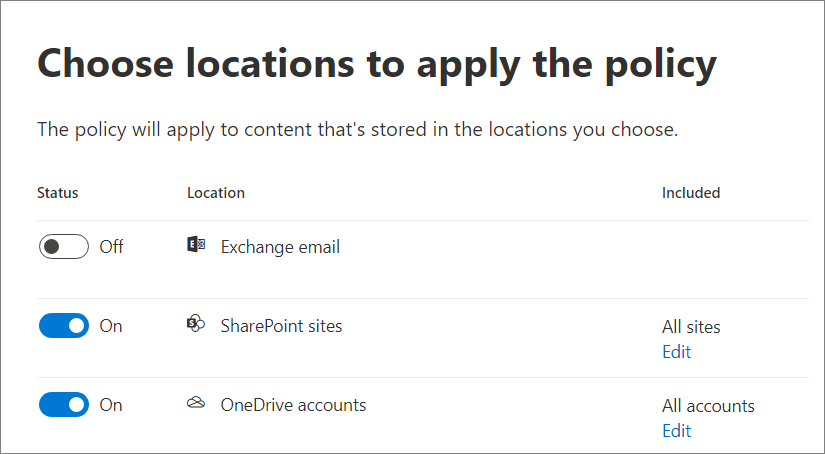
Step 5. Click on "Submit" once you have finalized the retention policy.
To set a retention policy on OneDrive, ensure your rules align with your business documentation needs. This way, you can easily recover deleted data without much hassle.
How to Recover Deleted Files or Folders in OneDrive
Now comes the actual part. In reality, there are many ways to recover the lost or deleted files from the recycle bin of OneDrive. That is why we have selected the top 3 ways to Recover Deleted Files or Folders in OneDrive. Here are all those methods along with their step-by-step guide.
Method 1. Recover Deleted Files from OneDrive Recycle Bin
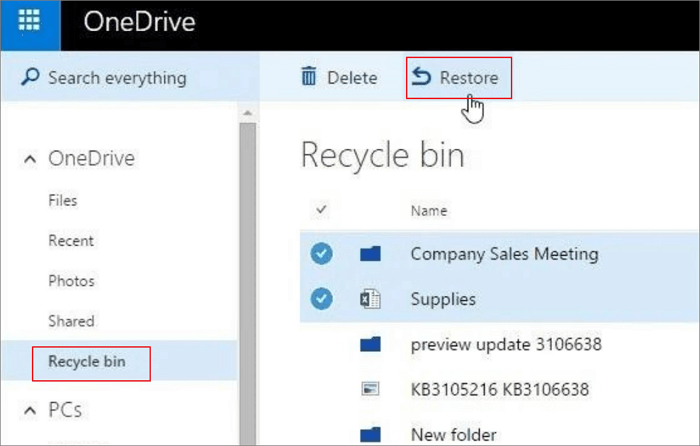
If you've deleted an important document or data in OneDrive, you can try recovering it by checking the recycle bin. To do this, go to the OneDrive website and sign in with your account. Click on the "Recycle Bin" tab, which is usually located at the bottom of the page.
Step 1. In the first step, you are supposed to log in to your OneDrive account.
Step 2. To empty the recycle bin, select the "Recycle bin" option from the left menu.
Step 3. To recover deleted files, check the files you want to recover in the Recycle bin.
Step 4. To recover deleted files from OneDrive's recycle bin, simply select the desired file, click on "Restore" in the menu bar, and the file will be back in its original location. This is a straightforward process that allows you to recover deleted files.
Method 2. Restore Deleted Files or Folders from Your Computer
OneDrive also saves data files in a local storage folder on your computer, updating and monitoring them. This allows for recovering deleted files from the folder.
To restore deleted files or folders from your computer, follow these steps:
Step 1.To access the OneDrive application logo, look for it in your system tray and right-click on it.
Step 2. To access its settings, click on the "Settings" option.
Step 3. Now, you have to click on the "Account Tab".
Step 4. Click on the "Choose Folders" button.
Step 5. To locate the deleted or missing files, navigate to the folder shown in the bottom left corner of your screen through File Explorer, and search for the files within that folder.
To recover deleted files, you can simply locate the folder that contained the file you accidentally deleted. This approach makes it easy to retrieve your lost files. Just find the folder where the file was stored before it was deleted, and you'll be able to recover it.
Method 3. Recover Permanently Deleted Files or Folders in OneDrive
Recovering permanently deleted files or folders in OneDrive may seem impossible, but with the help of reliable data recovery software, it's achievable. Deep Data Recovery is a quality and reliable option that can recover local OneDrive files from various storage mediums, including HDDs, external USB drives, SD cards, and more.
It is one fully-This tool is a user-friendly data recovery solution that can recover deleted files from various scenarios, including accidental deletion, formatting, virus attack, and more.
- HDD and SSD
- External hard drive
- Cloud drive
- Portable storage devices, including USB drives, SD cards, and pen drives, are small, removable storage devices that can be used to transfer files between computers and other devices.
To recover lost files, download a data recovery program that can restore files deleted accidentally, due to hard drive formatting, OS crashes, virus attacks, lost partitions, and other causes.
Step 1. Launch Qiling file recovery software on your Windows computer, select file types, and click "Next" to start the recovery process.

Step 2. To proceed, select the specific file location you want to scan and then click the "Scan" button.

Step 3. After the process, select the "Deleted Files" and "Other Lost Files" folders in the left panel. Then, you can apply the "Filter" feature or click the "Search files or folders" button to find the deleted files.

Step 4. After recovering the files, click the "Recover" button and save the restored files in a location different from the original one.
Conclusion
OneDrive's Recycle bin is distinct from the Windows Recycle bin, and its data retention policies have been explained to provide clarity. Despite this, data loss can still occur if alternative methods fail to work.
We recommend trying Deep Data Recovery. This software can recover lost, formatted, or stolen data from nearly every storage device, including hard drives, solid-state drives, USB drives, and more.
Related Articles
- Does Formatting a Drive Erase Everything? No!
- Undo DiskPart Clean: Recover Data/Partition after DiskPart Clean
- How to Fix 'Getting Windows Ready, Don't Turn off Your Computer'
- M.2 Not Recognized? See How to Make Your M.2 SSD Show Up in Windows
- SQL Error 5171: MDF Is Not A Primary Database File
If you encounter the error message “MDF is not a primary database file” while opening or attaching an SQL Server database file, there is a solution. SQL Recovery with reliable methods can help you resolve this issue and repair MDF to make it work again. - Memory Card Recovery Software: Recover Data from Memory Card
Qiling memory card data recovery software is available for download, allowing you to recover lost files, including photos, videos, and audio files, from your memory card after accidents such as deletion, formatting, or virus attacks.