How to Recover Permanently Deleted Files from OneDrive on Windows 11/10
OneDrive deleted files. To recover permanently deleted files from OneDrive, you can use the Recycle Bin or the local hard drive.
| Workable Solutions | Step-by-step Troubleshooting |
|---|---|
| Method 1. Recover Files from OneDrive Recycle Bin |
|
| Method 2. Recover Lost Files from Your Local Hard Drive |
|
OneDrive Deleted Files Recovery - Recover from OneDrive Recycle Bin
When you delete a file from OneDrive, you have 30 days to recover it, as Microsoft keeps removed files for that timeframe, allowing you to restore them directly from OneDrive.
To undelete OneDrive files in Windows 11/10, open File Explorer and navigate to the OneDrive folder where the deleted file was located. Click on the "OneDrive" icon in the system tray, then click on the "Help & Settings" icon, and select "Settings".
Step 1. Right-click the OneDrive icon and select "view online".
Step 2. To access your OneDrive account, sign in to the OneDrive website at https://onedrive.live.com/about/en-us/.
Step 3. Click the "Recycle Bin" option on the left pane.
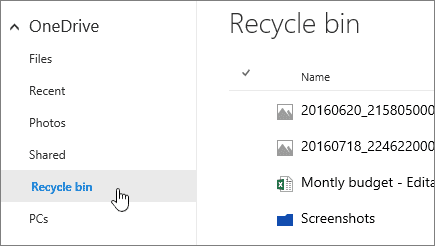
Step 4. On the right pane, all deleted files and folders will be shown. To recover specific items, select their checkbox. To restore everything, click "Restore all items".
- Tip
- When deleting files from the OneDrive desktop app, you can recover them by checking your computer's Recycle Bin, unless you've emptied it or it's overflowing. Even if you've emptied the Recycle Bin, you can still recover deleted files with Deep Data Recovery.
How to Recover Permanently Deleted Files from OneDrive
Your OneDrive folder location is set at C:\Users\[your username] by default, containing all synced files and folders. Even after deleting something, exceeding the 30-day limit, or clearing the OneDrive and Windows Recycle Bin, there's still a way to recover permanently deleted OneDrive files.
You can recover your original OneDrive files by using a file recovery tool to retrieve them from storage mediums like HDDs, external USB drives, SD cards, and others. Tools like Qiling are effective in recovering various file types, including photos and videos, and can do so regardless of the reason for data loss.
Qiling File Recovery Software
- Recover lost or deleted files, documents, photos, audio, and more.
- Recover files from formatted hard drives, emptied recycle bins, memory cards, flash drives, and other storage devices with our expert assistance. Our team can help you retrieve lost data from various devices, including computers, laptops, and mobile devices, even after they've been formatted, emptied, or corrupted.
- Data recovery services can help restore lost data in various situations, including sudden deletion, formatting, hard drive corruption, virus attacks, and system crashes. This can provide peace of mind and minimize the impact of data loss on individuals and businesses.
To recover your OneDrive files, ensure the storage drive containing your OneDrive files is readily available. Then, follow the steps below to scan and recover your lost files.
- Important
- Why is Qiling data recovery utility able to recover deleted files from cloud? When you delete data from a cloud drive, like Dropbox, OneDrive or Google Drive, the local files on your device are also deleted. However, Deep Data Recovery can scan the local drive to find identical files that have disappeared from the cloud drive, effectively recovering the deleted data.
Step 1. Select file types and click "Next" to start
Launch Qiling file recovery software on your Windows computer. Select file types and click "Next" to initiate the file recovery process.

Step 2. Select a local drive
To begin scanning for deleted files from the local drive, select the local drive where the files were originally located. Then, click the "Scan" button to initiate the scanning process.

Step 3. Check for scan results
When the scan is complete, you can start looking for the files that were deleted from both the selected drive and the cloud drive. To find specific files, click "Filter" and choose the category. Then, double-click the file to preview its content.

Step 4. Recover desired files
To recover deleted files, select the files you're looking for, click "Recover", and choose a different location to save the recovered data.
Related Articles
- Microsoft Outlook 2016/2013/2010 Not Responding in Windows 10/11 (5 Fixes)
- Photoshop File Corrupted: How to Repair PSD File Without Any Effort
- How to Restore Previous Versions of File or Folder Windows 10/8/7
- Microsoft Has Committed to Right to Repair, What Does It Mean?
- How to Recover JPEG Files on Mac or Windows
No matter what kind of reasons, we are now should care about how to recover JPEG files under Windows or Mac OS X, right? - How to Recover JPEG from SD Card
It's very easy to recover JPEG from SD card no matter in what cases you lost the JPEG files, deleted it, formatted memory card or your SD card just go corrupt. Check out the SD card JPEG recovery process to get it now!