Restore Overwritten/Replaced/Saved-over XLS/CSV Files
If you've ever experienced the frustration of an Excel file being overwritten or saved-over, you can take steps to prevent it in the future. One solution is to use the "read-only" option when opening the file, which can be done by right-clicking on the file, selecting "Open with", and then choosing the "read-only" option. Alternatively, you can also use a file versioning tool or service, such as OneDrive or Google Drive, which allows you to track changes and revert to previous versions if needed.
If you've overwritten or replaced an Excel file on your Windows PC, don't give up hope - there are ways to restore it. This article provides two reliable methods to help you recover your saved, overwritten, or replaced XLS/CSV files, and also recommends using data recovery software like Deep Data Recovery to recover deleted, lost, or formatted files.
- Tip
- If you've saved an Excel file without closing the app, you can press Control + Z to undo the save operation and revert to the previous editing state.
Method 1. Restore Overwritten XLS/CSV from TMP File
Microsoft Office's AutoRecover feature saves Excel files under editing as temporary files in a specific location on the Windows C drive, which can be the Unsaved Files or Temp folder depending on the OS version. If your Excel file is lost, replaced, or overwritten, you can restore it directly from these temporary files using the following tips.
1. To find the Excel temp files on your PC, follow the temporary file folder location which is usually located at C:\Users\YourUsername\AppData\Local\Temp or C:\Users\YourUsername\AppData\Roaming\Temp. This folder stores temporary files created by various applications, including Microsoft Excel.
- For Windows 7 users:
C:\Users\username\AppData\Roaming\Microsoft\Excel\
- For Windows 8/10 users:
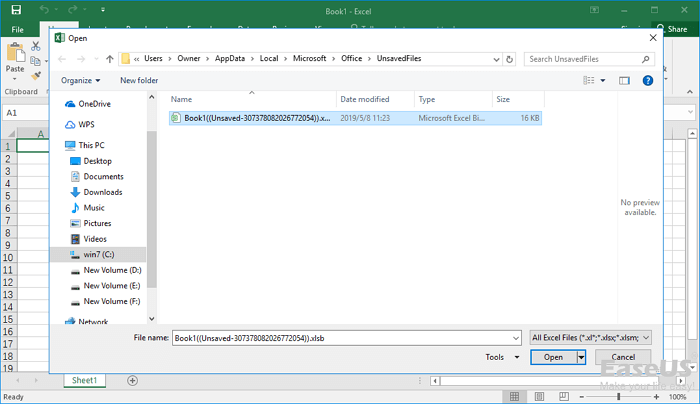
C:\Users\username\AppData\Local\Microsoft\Office\UnsavedFiles\
2. Locate the Excel temp file by date, select it, copy, and save to another safe spot by changing the file extension.
After using the recovery tool, save the restored XLS/CSV files to a safe location to prevent data loss in case of another unexpected issue.
Method 2. Restore Replaced/Saved-Over XLS/CSV File from the Previous Version
If your Excel file (XLS or CSV) got replaced or saved over, you can recover it by following these steps: 1. Open Excel and go to the "File" tab, 2. Click on "Open" and select the location where your file was saved, 3.
1. Try to create a new Excel file with the same name as the overwritten file or find the overwritten saved file. Right-click on the Excel XLS/CSV file and select "Properties".
2. To restore your Excel file, go to Previous Versions, select the latest version or the last version before Excel replaced or saved the file, and click "Restore". This will retrieve your file without losing any saved data, restoring it to its original XLS or CSV format.
If you're a Mac user who's lost an unsaved Excel file, you can try recovering it by following the steps outlined in the article "How to Recover Unsaved Excel File on Mac".
Bonus Tip. Recover Lost/Deleted/Formatted XLS/CSV with File Recovery Software
If you've lost your XLS/CSV files from your PC due to deletion, formatting, a virus attack, or emptying the recycle bin, Qiling data recovery software can help. It's a versatile program that supports recovering deleted files, formatted data, emptied recycle bin data, lost partition data, OS crash data, RAW partition data, and more.
To recover deleted or lost XLS/CSV files, download and use Excel file recovery software to scan your storage device, such as a hard drive, solid state drive, USB flash drive, pen drive, external hard drive, etc. and retrieve the lost files.
Step 1. Select file types and click "Next" to start
Launch Deep Data Recovery, select file types, and click "Next" to start the recovery process.

Step 2. Select location and click "Scan"
To recover lost Excel files, select the drive or folder where the files were located, click the "Scan" button, and let the software scan the selected location for lost Excel files.

Step 3. Locate your excel files
To quickly find the Excel files from the scan results, click the "Documents" option in the left panel, select "Excel", and click "Preview" to verify if the selected files are the desired Excel files.

Step 4. Recover Excel files
Select the desired Excel files, click "Recover", and choose a folder to save the recovered files.
Related Articles
- Files Missing from External Hard Drive but Still Taking Space
- My Documents and Settings Folder is Not accessible in Windows 10! Fix It Now!
- How to Recover Deleted Worksheet in Excel
- Fixed: Recover Lost Google Play Music Files
- How to Recover JPEG from SD Card
You can easily recover JPEG files from an SD card, regardless of the situation - whether they were deleted, the memory card was formatted, or it became corrupt. Follow the SD card JPEG recovery process to retrieve your lost files. - How to Recover Data from RAID 5
A RAID 5 failure, particularly when two drives out of the array fail, can result in data loss. However, with the right approach, it's possible to recover deleted files or lost data from a RAID 5 setup.