How to Add Ringtones to iPhone 13/Mini/Pro/Pro Max
RecentlyApple introduced its iPhone 13 series. Compared with the previous iPhone 12 family, the iPhone 13 series comes with a smaller notch, a brighter display, a faster A-series processor, and an improved camera. These improvements make the iPhone 13 series one of the most popular iPhone models in these years. Many users couldn't wait to buy one when it was going on sale on Friday 24th September.
If you're lucky enough, you may have gotten the iPhone 13. Next, you may need to transfer data from the old iPhone to the new one, download some required apps, or customize your new device by adding ringtones. Transferring data and downloading apps is easy, which has been introduced in our previous guide.
Here we mainly focus on adding ringtones to iPhone 13. Thus, you can set your favorite songas your ringtone and get rid of the boring ringtones that come with your iPhone.
How to Add Custom Ringtones to iPhone 13 with a Ringtone Maker
If you're looking for an easy and quick way to add custom ringtones, you can try this iPhone ringtone maker - Qiling Ringtone Editor. Compared with other methods introduced in this post, this tool offers a more convenient and flexible way to add ringtones. All you need is to import MP3 files, trim the song, add recordings and sound effects, and finally push it to your iPhone.
Apart from making a song a ringtone, it's also helpful in making your alarm sounds or custom text sounds. If you want to generate a personalized ringtone for your new device, let'sdo it with Qiling Ringtone Editor.
Step 1.Launch Qiling Ringtone Editor and connect your iPhone to your computer. Next, drag and drop the song you wish to turn into a ringtone to the interface of this program. Or you can browse your computer to choose a song.
Step 2.Then, you'll come to the Clip Fragment page. From where you can customize your ringtoneby clipping it to your desired length (30s is an ideal lenght for a ringtone).
Step 3.After clipping, you can swipe up to make the sound fade in and swipe down to fade out. If you want to adjust the volume, you can swipe up and down. Once everything gets done, click "Export" to proceed.
Step 4.You can choose "Push to iPhone" to exportthe edited ringtone to your iPhone or choose "Save to Disk" to save it to your computer.
How to Put Ringtones on iPhone 13 from Computer with iTunes
Another convenient optionto put ringtones to iPhone should be using iTunes. The steps involved with iTunes might be a little bit confusing, so you'd better be careful to handle every detail carefully. Before starting, be sure you have installed the latest version of iTunes on your computer. Then, get your MP3 files prepared on your desktop and follow these steps to get a custom ringtone on your iPhone with iTunes.
Step 1. Open iTunes on your computer and head to iTunes Library.
Step 2. Drag and drop your MP3 files to the Library section.
Step 3. Right-click the items you imported from your computer and choose "Song Info."
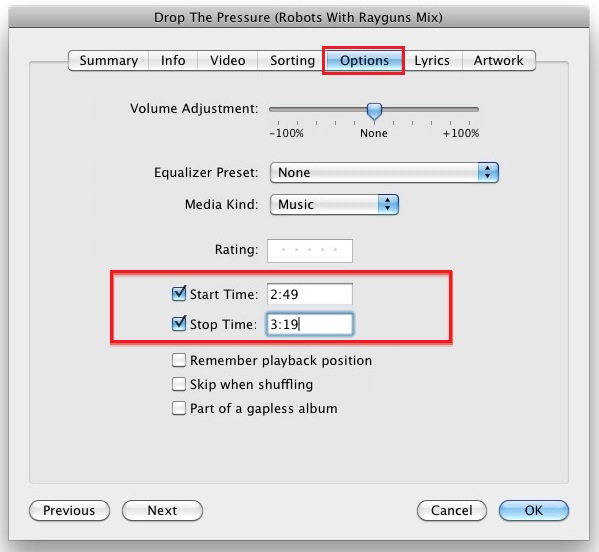
Step 4. A pop-up window appears to show you detailed information about this song. Click on the "Option" tab.
Step 5. In the Options section, you can adjust the volume of your ringtone and set the start/stop time. Once you've done this, click "OK" to proceed.
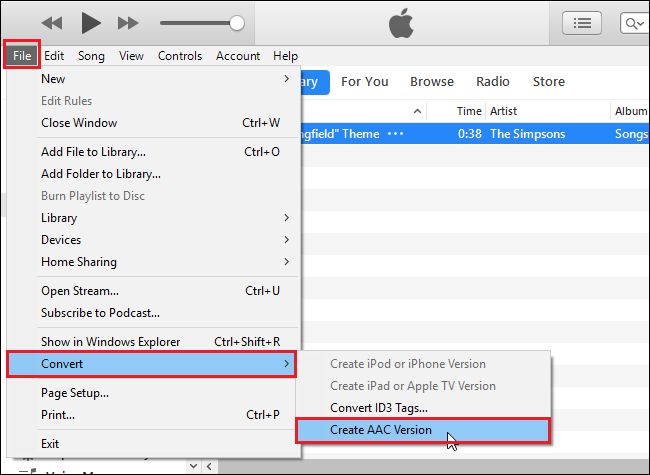
Step 6. Convert the MP3 files to the AAC file by clicking "File" > "Convert" > "Create AAC Version."
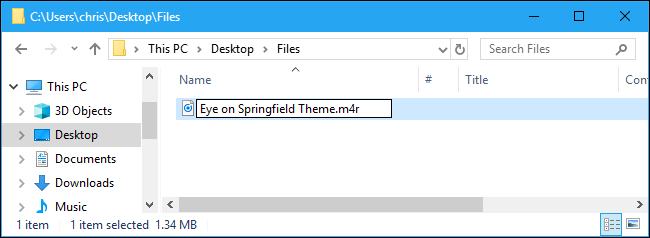
Step 7. Right-click the AAC file you create and select "Show in Windows Explorer." Then, press F2 on your keyboard to change its extension to .m4r (iPhone ringtone file).
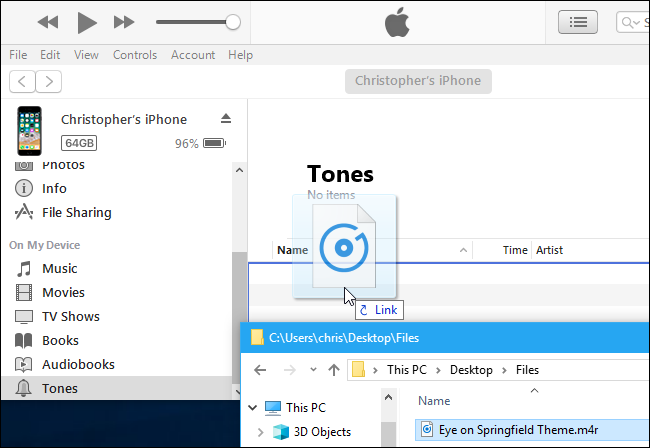
Step 8. Once done, you can sync the ringtone to your iPhone by plugging your iPhone into the computer. Then, click "Devices" in iTunes. From the extended section, choose "Tone."
Step 9. Drag and drop the m4r files to the Tone section. If a drag-and-drop doesn't work, try copying and pasting.
Step 10. Click "Sync" to pass the ringtone to your iPhone. And then, you can follow ourfinal part to set itas your iPhone 13.
How to Add Ringtone to iPhone 13 Without Computer
If no computer is available for adding ringtones, you can use GarageBand to do the same thing. GarageBand is a line of digital audio workstations for macOS, iPad, and iOS devices that allow you to create music. Similarly, you can create your personalized ringtone with this application and directly push it to your iPhone 13 without using any extra tools.
Before proceeding with GarageBand, be sure you've downloaded wanted songs from Safari or have prepared songs in your Apple Music Library. If you're ready, follow these steps to make your ringtone.
Step 1. Download GarageBand from AppStore and open it.
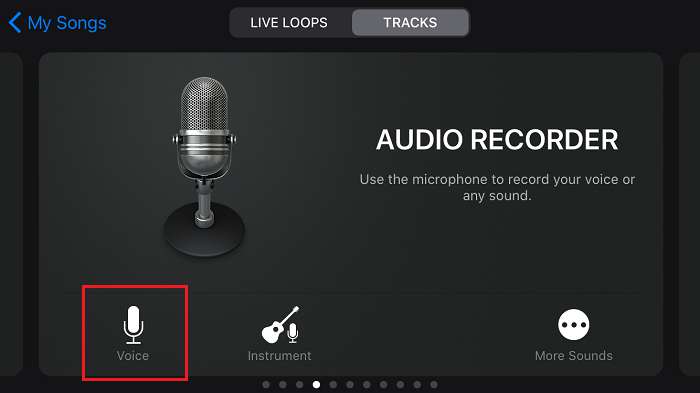
Step 2. On its screen, swipe your screen to find the "Audio Recorder" page. Then, click "Voice" to proceed.
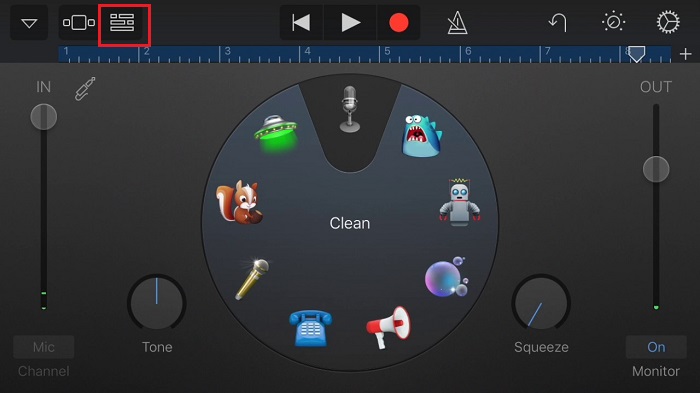
Step 3. Click on the grey icon in the upper left corner.
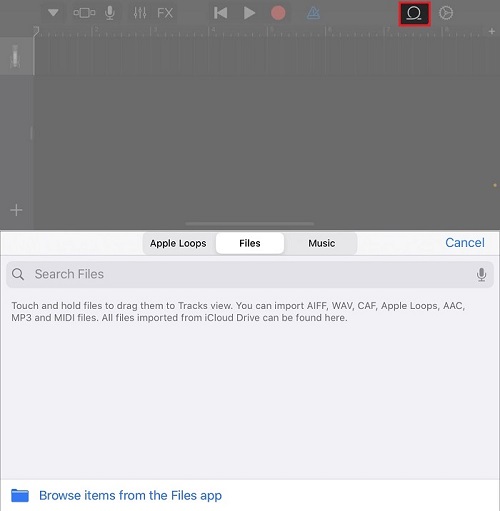
Step 4. Tap the "Loop" icon in the upper right corner. From the drop-down list, you can choose the place where you want to import songs from. You can create a ringtone from the song in Music Library by choosing "Music," or you can also make a ringtone from a song downloaded from Safari by choosing "Files."
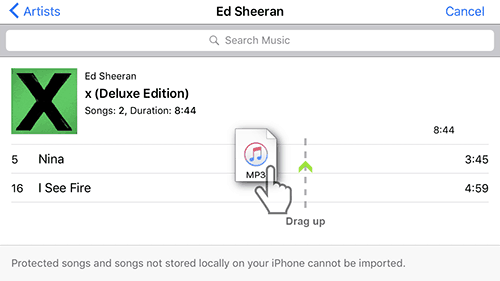
Step 5. Once you've chosen your preferred way, drag and drop the song to the Track screen.
Step 6. In the track screen, tap on the "+" icon in the upper right corner. Then, a new pop-up window will ask you to set the section length. Usually, an iPhone ringtone shall be within 40 seconds.
Step 7. After setting the length of your ringtone, you can trim the song.
Step 8. Once you've finished trimming, tap on the little arrow icon in the upper left corner to choose "My Songs."
Step 9. Then, you'll see all items you create. Tap and hold the item you wish to use as a ringtone and select "Share." From the Share page, select "Ringtone" and tap on "Export."

How to Add Ringtones to iPhone 13 with iPhone Transfer Software
If you've downloaded MP3 files on your computer, you can directly transfer them to your iPhone 13 with this iPhone transfer software - Qiling MobiMover. With it, you can do things like:
- Transfer files between two iPhones.
- Transfer data from an iPhone to a computer, or vice versa.
- Downloadvideos from Facebook or other sites.
- Back up iPhone data
Other than ringtones, other file types like contacts, messages, videos, photos, and more are supported by Qiling MobiMover. Anyway, it is an excellent option to organize your iPhone data.
To add ringtones to iPhone 13:
Step 1.Connect your iPhone to your computer and run Qiling MobiMover > Tap "Trust" on your phone and click "Allow" to enable this programto access your iPhone > Click "Audio" from the interface > Select "Ringtones" to continue.
Step 2.Click "Ringtones" > Select "Add Contents" to locate your ringtones stored on your computer.
Step 3.Select the ringtone you wish to transfer from your computer > Click "Open" to start the transferring. After it completes, you can go to Settings on your iPhone > Tap "Sounds & Haptics" > "Ringtone" to check ringtones on your iPhone.
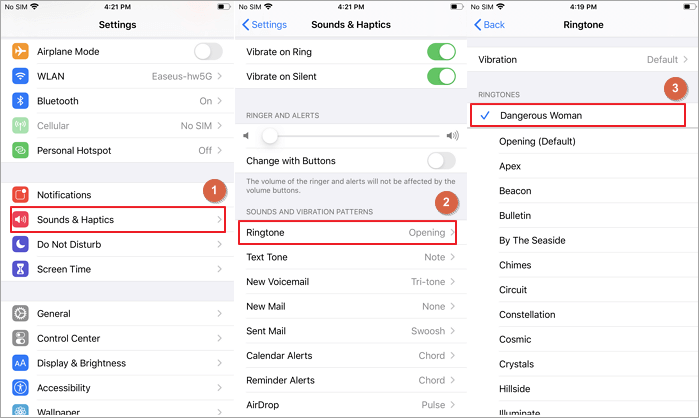
How to Set a Ringtone on iPhone
Once you've made your ringtone, it's time to set itas your iPhone ringtone. Now, you can follow us to do it.
Step 1. Go to "Settings" on your iPhone.
Step 2. Tap "Sounds & Haptics" > "Ringtone."
Step 3. Click the ringtone you like to set as the custom ringtone on your iPhone.
The Bottom Line
That's all about how to add ringtones to iPhone 13. Following this tutorial, we hope you've equipped your new device with some new ringtones. In addition to the methods introduced above, you can buy a ringtone from iTunes Store. That is very easy. All you need is to open iTunes Store on your iPhone and tap "More," then head to "Tones." From there, you can search for the ringtone you like. After choosing the wanted item, tap the price of the ringtone and pay for it by following the prompts.
Now, you can choose your preferred way and make a personalized ringtone for your iPhone 13.
Related Articles
- How to Change Your Ringtone to a Song
- How to Make Ringtones for iPhone Without iTunes
- How to Delete Ringtones from iPhone
- How to Change Your Ringtone on iPhone 11