Solved: How to Activate Protection System in Windows? - Qiling
Protecting your Windows system from crashes and security threats is crucial. You may have experienced issues like disclosed privacy, viruses from malicious sites, annoying ads, and hijacked default settings. To prevent these problems, it's essential to activate the protection system. By taking proactive measures, you can safeguard your computer and data. Let's explore the Windows protection system and learn how to activate it to ensure your system remains secure and stable.

What Is Protection System in Windows?
Windows' protection system periodically creates and saves information about system files and settings, providing a safeguard against data loss. It also automatically saves previous versions of modified files and data, allowing users to recover from changes or errors.
Windows saves these files in a Restore Point created by the protection system before major problems occur, such as program installation or device drivers, and also creates one automatically every 7 days.
Why Do We Need to Activate Protection System?
A protection system in Windows is essential for handling unnecessary problems, and it's a vital feature when using Windows devices. While it may seem unnecessary for computers of other types, the answer is still "Yes" - every computer should have a protection system. However, it's worth noting that the protection system in Windows is closed by default, so it's not automatically enabled. Therefore, it's necessary to activate the protection system to ensure optimal security and functionality. Let's continue exploring this further.
- 1. All computer-driven systems are vulnerable to intrusion and disruption
- 2. Lower the effect of unwanted software
- 3. Make computer run well and efficiently
1. All computer-driven systems are vulnerable to intrusion and disruption
Computer systems are fragile and can be easily damaged by malicious software or programs. Despite their convenience and efficiency, they also pose potential risks if not properly protected. To safeguard files and data, a protection system is necessary to prevent damage.

2022 Five Best Solutions to Backup Files in Windows 11
Windows 11 file backup is a breeze with our five tried and tested methods. Follow this guide to get the job done now and ensure your important files are safely backed up.

2. Lower the effect of unwanted software
The pain of being tortured by unwanted software or ransomware is a frustrating experience. This type of malicious software can launch a intrusive attack on your computer, compromising the stability of network operation and users' practical experience.
3. Make computer run well and efficiently
Overloading a computer or system with too many software, data, or programs can lead to fatigue and eventual crash or drag. To prolong computer service life and increase user satisfaction, it's essential to keep unnecessary supplements away from the computer. This helps prevent excessive strain on the system, ensuring it runs smoothly and efficiently.
How to Activate Protection System in Windows?
Although Windows emphasizes the importance of protection systems, it does not automatically create restore points by default. To activate the Windows protection system, follow the steps below.
Step 1: Launch your Windows and open its search box.
Step 2: Open "Control Panel."

Step 3: Select Small icons within the options below "Viewed by."
![]()
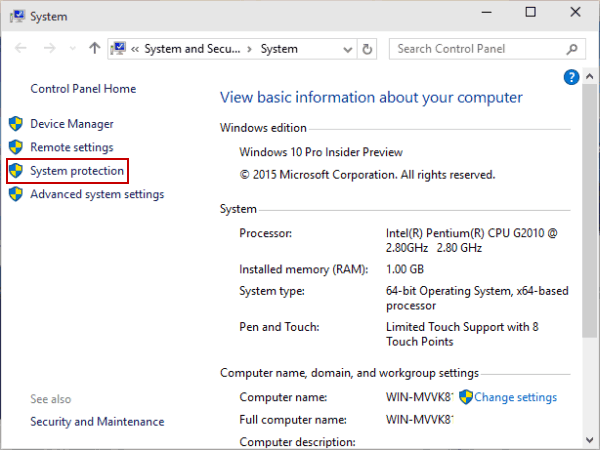
Step 4: Click "System protection."
Step 5: Then under "System Protection," select "Configure."
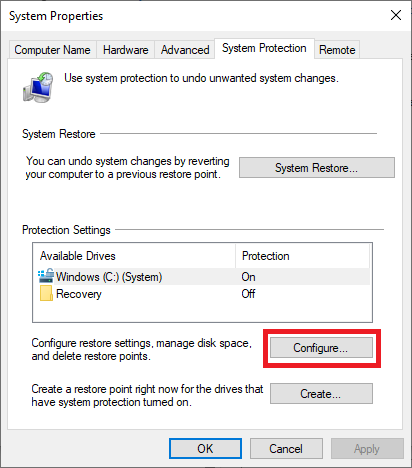
Note: Windows is set under C disk by default.
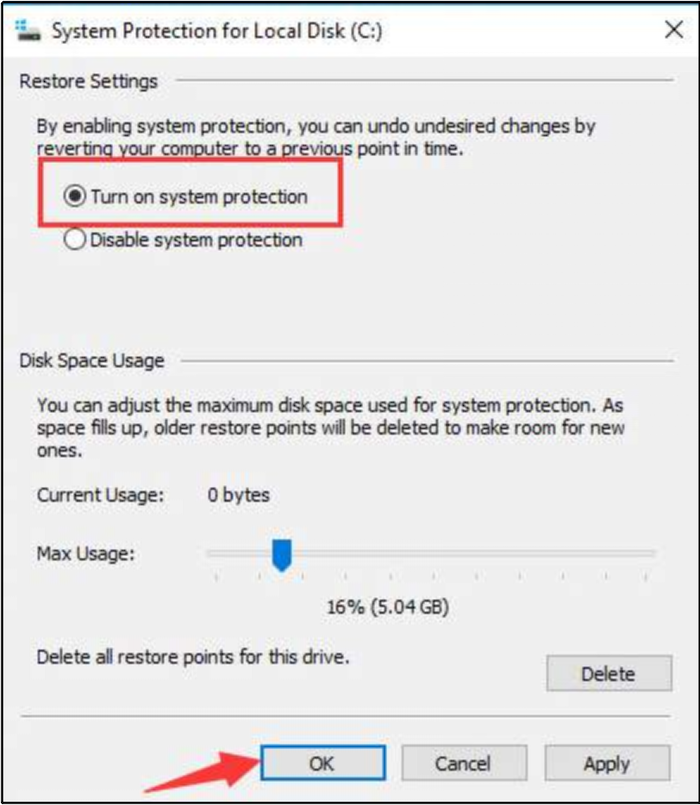
Step 6: Choose Turn on system protection.
Step 7: Click "OK."
Step 8: Restart your computer.
The operation procedure is simple, but the restore points created by the protection system take up space on the system disk, so it's recommended to free up as much space as possible.
Final words
To activate the protection system in Windows, follow the previous method. However, for a more convenient approach, consider using Qiling Backup, a professional data backup and restore tool compatible with both Windows and macOS, to protect your systems and files more securely.
FAQs
1. Should you turn on the protection system?
We recommend opening it because it's better to have a planned solution in place in case of any unexpected problems. Additionally, having a restore point enabled can help keep your system, files, or data safe.
2. How do I remove the protection system?
Removing steps are almost the same as the steps we talked about above, with the most apparent difference being in step 6, where you simply need to click the second option to close it.
Related Articles
- What Is macOS Base System [Everything You Need to Know]
- What Is Cloud Computing? [Everything You Need to Know]
- Fix: Operation Failed with Error 0x0000011b (Windows 10/11)
- What Is M.2 SSD? Definition and Types
- What Is IOPS (Input/Output Operations Per Second) and How Do You Measure It?
IOPS is a measure of storage speed that helps users understand the functionality and capability of physical and network storage, allowing them to gauge overall productivity achieved by disk drives. - Is My Computer Running 32-Bit-or 64-Bit Windows? How to check?
Knowing whether your computer runs 32-bit or 64-bit Windows is crucial for installing compatible software and drivers. Learn how to check your system architecture and the key differences between 32-bit and 64-bit.