How to Boot Surface from USB? [Efficient Information]
Microsoft's Surface brand has introduced a new hardware design, including a unique method of selecting USB boot. However, users may encounter issues with accessing Windows and files, prompting the need to create a bootable drive to repair their device. This can lead to searching for official tutorials on how to operate, making it necessary to guide users through the process of booting their Surface from a USB drive. Let's get started!
Before Booting Surface from USB
Before booting your Surface from a USB drive, it's essential to understand the key points involved. Firstly, you need to ensure that your Surface is set to boot from the USB drive, which can be done by going into the BIOS settings.
- 1. What is Surface?
- 2. Why do you require booting from USB?
- 3. What kind of preparatory work should you do?
These three questions show you the prerequisites and the importance of booting Surface from USB. Let us explore them one by one.
1. What is Surface?
The Surface was released by Microsoft on June 19, 2012, featuring a 10.6-inch display, a USB 2.0 or 3.0 interface, and the Windows 8 operating system. This product is part of a series that includes other notable items, such as the Surface Pro, Surface Laptop, and Surface Book, each with its own unique specifications and features.
Surface Go 3: The most portable 2-in-1 laptop
Surface Laptop Studio: Known as a mighty transformer
Surface Laptop Go 2: 4 colors could be chosen by users, making the appearance much more brilliant.
2. Why do you require booting from USB?
USB has become a practical tool for system maintenance, allowing users to reinstall or repair their system without losing data. It can also perform hardware detection and repair, making it a versatile tool for tasks such as hard disk and memory checks. As a result, USB has become the mainstream method for reloading systems, offering a convenient and effective solution for system maintenance.
If you use a Surface laptop for work, learning how to create a USB recovery drive can be helpful in case of emergencies. This can come in handy for recovering, upgrading, or resetting your Surface, allowing you to get back to work quickly.
3. What kind of preparatory work should you do?
To make a Surface boot from a USB drive, you'll need to prepare it in advance. This typically involves making some modifications to the USB drive itself, which may require additional steps depending on your specific needs. However, I can provide a quick navigation guide if you need it.
1. Make a bootable USB driver (suitable for the method1)
The simplest way to get a bootable USB drive is to download the Windows Media Creation Tool from Microsoft. This tool allows you to create a bootable USB drive for Windows 10, which can be used to install the operating system on a new computer or to repair an existing one.
If the bootable USB is not detected in the Bios, you can try the following steps: Check that the USB drive is properly inserted and the Bios is set to boot from the USB drive. Make sure the USB drive is in a bootable format, such as FAT32 or NTFS.
A bootable USB drive not showing up or recognized in Windows 11/10/8/7 can be frustrating, especially when you need it to boot your system. This issue can be caused by various factors, including incorrect USB drive formatting, outdated or corrupted drivers, or issues with the USB drive itself.
To resolve the issue of a bootable USB drive not showing up or being recognized in the BIOS boot menu in Windows 10/8.1/8/7, first identify the root cause of the problem and then apply the most effective solutions to repair the bootable USB flash drive that is not showing up, detected, read, or recognized.

2. Make sure you turn off Fast Startup
3. Prepare wired mouse and keyboard
When booting a tablet, the lack of operation conditions can sometimes disrupt or even devastate the process. To avoid any issues, it's recommended to be prepared with a Wired Mouse and matched Keyboard in advance, ensuring a successful boot-up.
How to Boot Surface From USB
After completing the works above, you can start booting Surface from a USB. There are two efficient methods to help you achieve this.
Method 1: Use the Volume-Down button
Step 1: Shut down your Surface first and wait about ten seconds to ensure the laptop is closed completely.
Step 2: Plug the bootable USB drive into a USB port on the Surface.
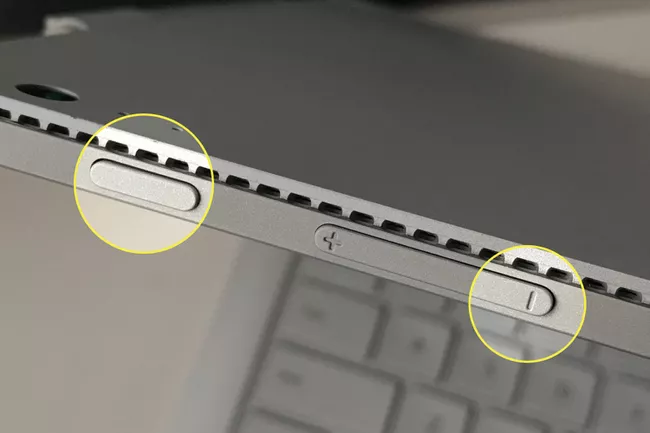
Step 3: To start your laptop, press and hold the volume-down button on the side, then press and release the power button.
And then, you will see the Microsoft or Surface logo.
![]()
Step 4: Continue to hold the volume-down button, and release it once spinning dots appear beneath the logo.
Step 5: Follow the instructions on the screen and boot from your USB.
Method 2: Use the Volume-Up button.
This tutorial is more complex than the previous one because it requires entering UEFI. Let's move on.
Step 1: Turn off your Surface, then wait about 10 seconds to ensure it has been turned off.
Step 2: Press and hold the volume-up button (Volume+) on your Surface while pressing and releasing the power button.
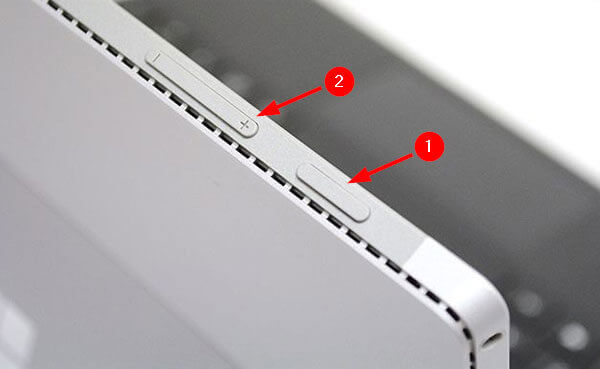
Step 3: To access the Surface UEFI interface, press and hold the volume-up button while powering on the Surface Laptop, and then release the button when the UEFI screen is displayed. If installing a non-Microsoft system, disable Secure Boot under the Security interface.

Step 4: Under Boot Configuration, you can see the USB Storage item, drag it to the first position

Step 5: Under Exit, click "Restart now" to restart from the USB.
Bottom Line
Now that you have full and explicit information on how to boot your Surface from USB, you can use this to your advantage for fresh installs or upgrades of Windows, running bootable antivirus programs, and more. Don't forget to follow the steps above to reset your USB boot disk if they work for you.
FAQs
What are the steps to boot a Surface from a USB drive?
1. What to do if the USB drive doesn't work?
To troubleshoot the issue, try to set up the USB drive again, but first transfer any vital data on the USB drive to a safe location. If the issue persists, you can seek assistance from a Microsoft official for further guidance.
2. What is UEFI boot mode?
UEFI boot mode refers to the boot process used by UEFI firmware, which stores all initialization and startup information in an EFI file on the EFI System Partition (ESP).
Related Articles
- What Is SDRAM? Synchronous Dynamic Random-Access Memory Explained
- How to Check Your PC's CPU Temperature [2 Methods]
- What is Windows Image Boot (WIMBoot)?
- What Is Boot Partition? [Specifically Explained]
- What Is RDP? Introduction to Remote Desktop Protocol
Do you know what is RDP? This article will provide a brief introduction to RDP by discussing its features and advantages in a structured manner. Read through the details to know more about how you can easily create an RDP. - Recover Deleted DCIM Folder from Android
Here is the best DCIM folder recovery solution to recover deleted DCIM folder from Android phone, be it from the internal storage or memory card (SD card, xD card, microSD card, CF card). Try it to retrieve images, videos, and other files from your Android devices, cameras or Smartphones with ease.