How to Reinstall Failed/Cancled Updates in Windows 10
How to install failed Windows update
You've noticed two failed updates in your Windows 10 Update history, and you'd like to reinstall them. Unfortunately, pressing the "Check for updates" button won't make the new update available again. To reinstall the failed updates, you can try the following: go to the "Update history" section in Settings, find the failed updates, and click on the "Uninstall updates" button next to them. This should allow you to uninstall the updates, and then you can try installing them again by pressing the "Check for updates" button. If the issue persists, you can also try restarting your computer or running the Windows Update Troubleshooter to resolve the problem.
Microsoft frequently releases system updates to minimize bugs and provide the best user experience. These updates are automatically available in the Windows Update section under Settings > Update & security. Users can simply click "Check for updates" to initiate the installation process.
Users may unknowingly assume an update has been installed successfully without verifying the update status or history, which may show the actual outcome of the update as succeeded, failed, or cancelled.
To resolve the issue of failed Windows 10 updates, you need to reinstall the latest significant updates. This requires a preparatory job to ensure a 100% safe Windows 10 reinstallation, protecting all necessary data and system. A backup solution is necessary before considering a system update or reinstall.
Backup System and Data Before Reinstalling System That Failed
- Warning
- Since a system update may fail and cause data loss, it's highly recommended to back up your computer before reinstalling the update.
Qiling Backup is a highly recommended Windows backup and recovery solution. This Windows backup software allows for easy backup of disk, partition, files, and system, creating a compressed backup image that saves storage space. With just one click, you can restore all backed-up data, making it a convenient and efficient solution for all your backup and recovery needs.
Step 1. Launch Qiling Backup on your computer, click System Backup on the Backup and recovery page to back up your Windows operating system.

Step 2.Your Windows operating system information and all system related files and partitions will be automatically selected, so you don't need to do any manual selection at this step. Next, you'll need to choose a location to save the system image backup by clicking on the illustrated area.

Step 3. The backup location can be a local drive, external hard drive, network, cloud, or NAS, and it's recommended to use an external drive or cloud to preserve system backup files.

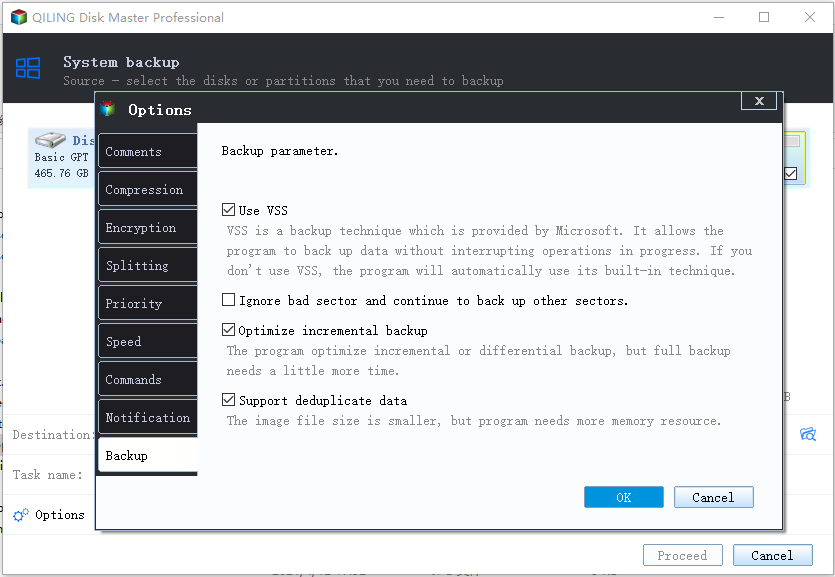
Step 4. Customization settings like enabling an automatic backup schedule in daily, weekly, monthly, or upon an event, and making a differential and incremental backup are available in the Options button. Clicking "Proceed" will initiate the Windows system backup process, which will display the completed task on the left side in a card style.
When resuming a system update that was interrupted, failed, or cancelled, it's essential to prioritize protecting your computer data to the utmost.
Guide: How to Reinstall Failed Windows 10 Updates
Depending on your own preference, choose either of the following options to restart your failed system update even it's no longer available in Check for update button.
Option 1. Rename the Software Distribution folder
This option is somewhat troublesome but has little impact on the computer data.
Step 1. In the Windows 10 Search box, type: %windir% and Press "OK".
Step 2. Locate the "SoftwareDistribution" folder and rename it as "SoftwareDistributionOld".
Step 3. To view the update history on a Windows computer, click "Start", then "All Programs", followed by "Windows Update", and finally "View update history". This will show all installed and failed updates. Locate the failed update in the Status section, click the red X, and you'll see the specific update build number, such as KB123456.
Step 4. Go to the Microsoft Downloads page and search for the update number KB123456 to download it onto your PC.
Step 5. Run the downloaded update file to install the update again on your computer.
Option 2. Clean install Windows 10 update
Here we'd like to introduce you a simpler way to clean install Windows 10 system update without requiring a CD or USB recovery drive, which is to reset your computer with everything back to its fresh state. Your data files should be fully backed up before doing this procedure.
Step 1. Go to Settings and click "Update & Recovery".
Step 2. Click "Recovery", tap "Get Started" under "Reset This PC".
Step 3. Choose "Remove everything" and then choose "Remove files" and clean the drive to clean reset PC.
Step 4. Finally, click "Reset".
Wait patiently until your computer restarts, then check for Windows updates in Settings > Update & security > Windows Update.
If you prefer the other way to clean install Windows 10 with a recovery drive, you can click the link to learn about it.
Related Articles
- Windows 10 Quick Access Not Working, Not Responding, Slow to Open
- 3 Ways to Fix USB Device_Descriptor_Failure Error in Windows
- How to Upload Files to Google Drive Automatically
- Back Up and Restore Outlook 2016 for Mac
- Checksum Error in WinRAR? How to Fix the Checksum Error (2023)
If you're experiencing a Checksum error in WinRAR, you can try repairing and recovering incomplete or partially corrupt files using professional recovery software. This can help you recover files that were not fully downloaded or were damaged during the download process. - 10 Fixes to Solve Chromebook Black Screen [2024 Guide]
If your Chromebook is showing a black screen, try booting it in safe mode, checking for software updates, and resetting the browser. You can also try booting in recovery mode, checking for hardware issues, and running a virus scan. If none of these solutions work, you may need to reset your Chromebook to its factory settings.