Backup and Restore Windows 8.1 with/Without Built-in Tool [Full Guide]
Windows removes or replaces some simple tools with more complex or functionally constrained alternatives, making it less user-friendly than some of its predecessors.
In Windows 8 and 8.1, the Backup and Restore feature is replaced by File History, and automatic system backups are no longer available.
To back up and restore Windows 8.1 and Windows 8, you can use the built-in Windows Backup and Restore feature. This feature allows you to create a system image of your computer, which includes a backup of your operating system, programs, and files.
Built-in Backup Tools on Windows 8.1
Microsoft replaced Backup and Restore with File History in Windows 8 and 8.1, making File History the default option for creating backups.
File History is simpler to use, allowing for automatic backup of files saved in specific folders, such as pictures, videos, documents, music, and desktop, directly to a network location or external drive.
To create a system backup on Windows 8.1, you need to manually initiate the backup process, and it cannot be automated or scheduled to run at a specific time or day.
The File History feature automatically backs up files from the libraries (desktop folders, documents, pictures, videos, and music) and files downloaded from OneDrive.
Backup and Restore Windows 8.1 Without Built-in Tool
Since the "Backup and Restore" feature was removed from Windows 8.1 and replaced with File History, which only backs up libraries and desktops, users have an alternative solution.
Qiling Backup is an award-winning utility that simplifies backing up and restoring computers with just a few clicks.
With Qiling Backup, you can clone USB drives, partitions, or specific files, clone a bootable hard drive, create a backup image, save backups on the cloud, locally, or in a network shared location, and more.
To enable the "Hot Backup" feature, download Qiling Backup and follow these steps.
1 - Backup Windows 8.1 with Qiling Backup
Qiling was founded in 2004 to simplify PC backup and recovery, and has since become the leading backup and recovery software with over 40 million users and 20,000 partners.
Here's how to backup the files with Qiling Backup:
Step 1. Start with selecting the Disk/partition backup button.

Step 2. You can use the command "dd" to back up a whole disk or a certain partition. For example, to back up the entire disk, you can use the command "dd if=/dev/sda of=/path/to/backup.img bs=4M".
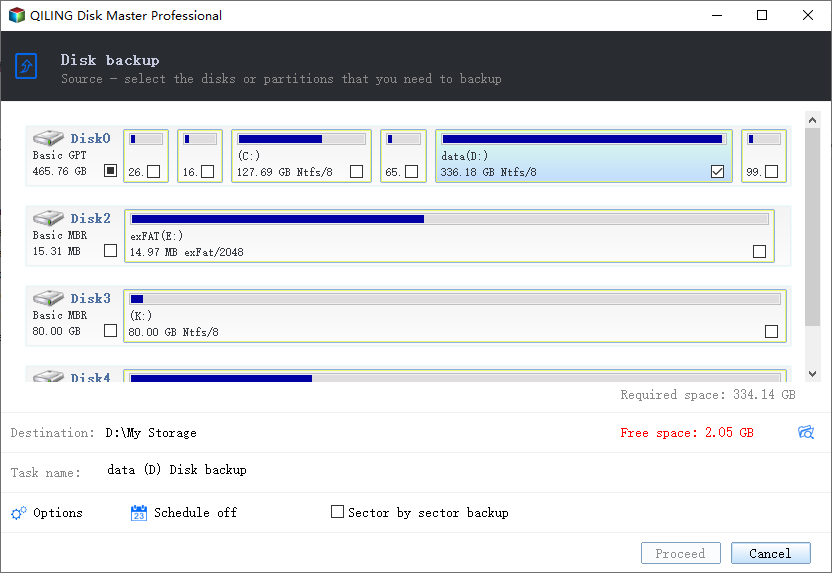
Step 3. Select the destination where you want to save the backup.

Step 4. For disk/partition backup, you can save the backup to either a local drive or a Network-Attached Storage (NAS) device.

Step 5. After the backup process is completed, the task will be displayed at the left. You can click on it to further manage your backup, such as recovering it or creating an incremental backup.

2 - Restore Windows 8.1 Files with Qiling Backup
Qiling Backup, built by Qiling, is a simple solution for all your PC backup and recovery needs, making it easier than Windows' in-built solutions that can be a complicated process.
Here's how to restore your files with Qiling Backup:
Step 1. Launch Qiling Backup, click "Browse to Recover".
Step 2. To recover your data, go to your backup destination and select the backup file you want to recover. The backup file created by Qiling Backup is typically an .fvd file.

Step 3. Choose the recovery location. You can recover data to a specific location or to original location.
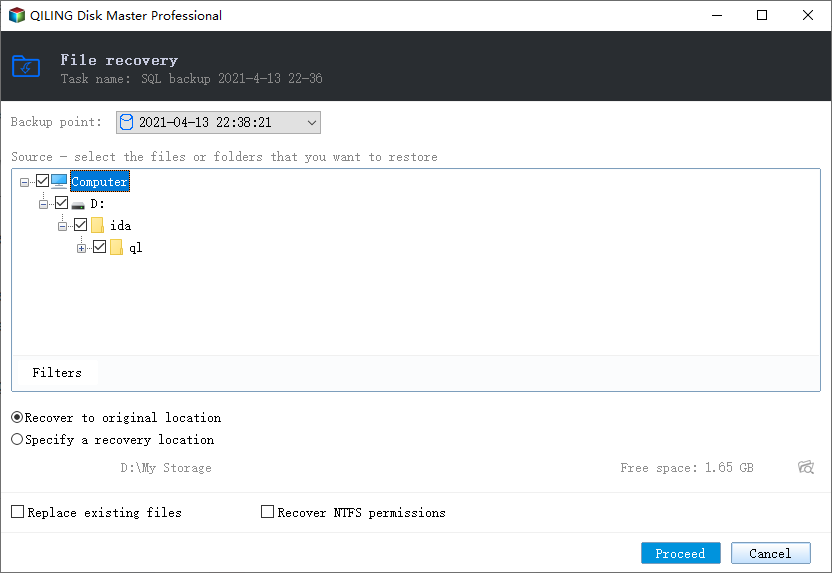
Step 4. Click "Proceed" and the recovery would start.
Backup and Restore Windows 8.1 Data with Built-in Tool
You can back up and restore your files and data with its built-in backup tool, File History, or create a system image of your PC using File History.
1- Backup Windows 8.1 with Control Panel
A system image is a copy of a hard drive that includes all necessary drivers, system settings, files, and programs to run Windows.
Here's how you could backup and restore your PC using File History:
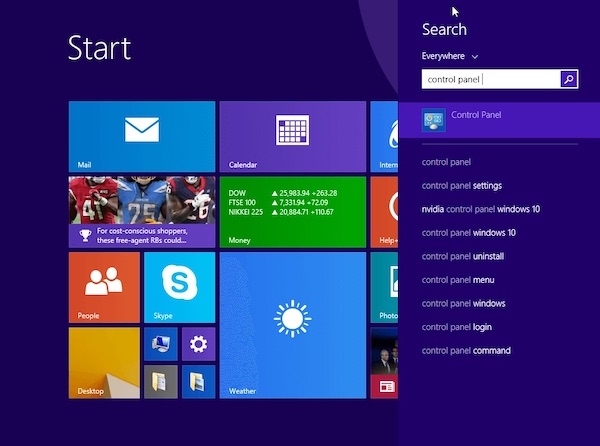
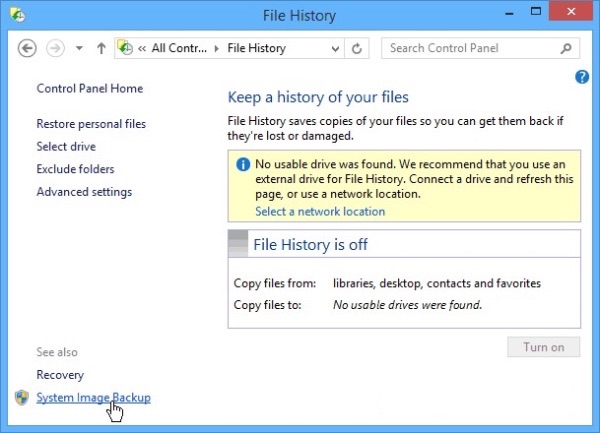
Step 1. Connect your USB flash drive, then click on the magnifying glass icon to search for "Control Panel."
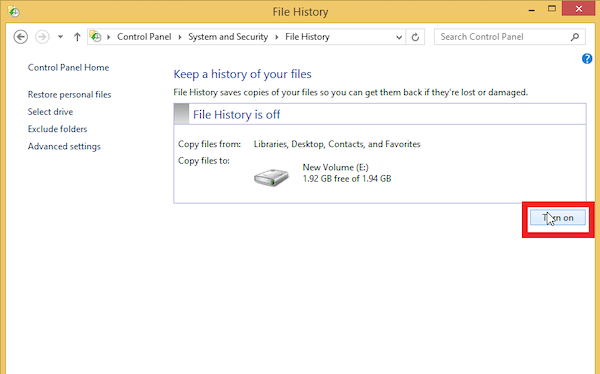
Step 2. Open the Control Panel, click on "System and Security", and then select "File History".
Step 3. Click "Turn On" to enable File History.
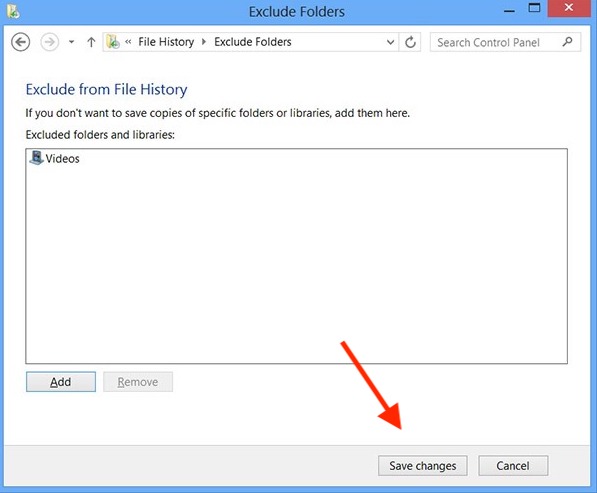
Step 4. Select "Exclude folders" from the left window pane, remove the apps you don't want to back up, and click on "Save Changes" to exclude certain folders.
Step 5. Now select "System Image Backup."
Step 6. Select the location where you want to save the system image backup, and then click "Next".
Step 7. In the "Confirm your backup settings" window, confirm that everything is properly selected, and click "Start backup".
Depending on the file size and read/write speed, creating a system image can be a time-consuming process.
Restore Windows 8.1 with File History
To restore your data with File History, log in as an administrator, and then follow these steps:
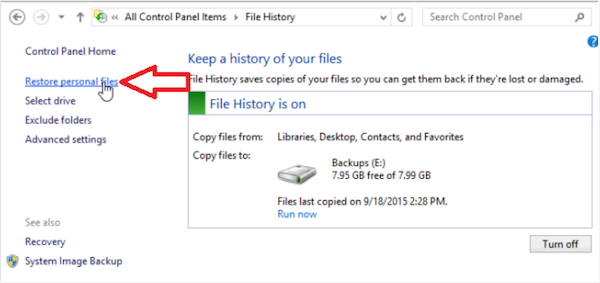
Step 1. To restore personal files in Windows 8, open the Charm Bar, search for "File History," and select it from the search results, then choose "Restore personal files."
Step 2. After the program loads and opens, select the backup file by locating it in the drive where you have saved it, and then click the refresh button to restore your data with the backup file.
Step 3. Allow some time for the restoration process to complete, as it may take a while depending on the backup file size and other factors.
The Epilogue
File History is the default backup option in Windows 8 and 8.1, allowing users to automatically back up their library files and folders, but requiring manual creation of system backups.
Qiling Backup should be the default choice for users who prioritize convenience and reliability in their file backup needs.
Qiling Backup is a comprehensive backup tool that goes beyond just backing up files and folders. It can create a bootable disk, clone a drive, and even upload backups to the cloud, offering a wide range of features in one convenient solution.
Backup and Restore Windows 8.1 FAQs
Windows 8.1 has a built-in backup and restore tool called File History. It automatically saves copies of your files to an external drive or network location.
1. Does Windows 8 have a system image backup?
Windows 8 allows users to create system image backups through File History, which enables the creation of a complete backup of the system, including operating system, settings, and installed applications.
2. Can I download a Windows 8.1 recovery disk?
You can download a Windows 8.1 recovery disk from the Microsoft website, but be cautious of downloading from other websites.
3. Where is the Windows 8.1 system restored?
You can restore Windows 8.1 on a computer already using Windows 8.1, but not on a Windows 10/11 computer with a Windows 8.1 recovery image. You can't restore a Windows 10/11 computer with a Windows 8.1 recovery image.
4. How to refresh, reset, or restore your Windows 8.1 PC?
To refresh, reset, or restore your Windows 8.1 PC, go to the Start screen, type "refresh your PC" in the search bar, and click on the "Refresh your PC" option that appears. Alternatively, you can go to the Start screen, type "reset this PC" in the search bar, and click on the "Reset this PC" option that appears.
Refresh your PC:
- Step 1. To access the PC settings, drag your mouse to the upper-right of the screen, bring it to the bottom of the right edge of the display, click on "Settings", and then select "Change PC Settings" from the menu.
- Step 2. Now click "Update and Recovery" and then click "Recovery."
- Step 3. Click "Get started" under the "Refresh your PC without affecting your files" option.
- Step 4. Now, simply follow the on-screen instructions.
Reset your PC:
- Step 1. To update your Windows 10, drag the mouse to the top right corner of your screen, then move it to the bottom right corner. Open the Settings app by clicking on it, and select "Change PC Settings".
- Step 2. Choose "Update and recovery," and then select "Recovery."
- Step 3. Now select "Get started", under "Remove everything and reinstall Windows."
- Step 4. To complete the process, follow the on-screen instructions.
Restore your computer to a previous state:
- Step 1. Open the Charms bar by pressing "Win + C."
- Step 2. To access the Control Panel, click on the search button at the bottom left corner of the screen and type in "Control Panel" in the search bar. This will allow you to access the Control Panel, where you can make various changes to your computer settings.
- Step 3. To open the "Control Panel", click on it from the search results.
- Step 4. To initiate the recovery process, open the control panel and search for "Recovery." From the search results, click on the "Recovery" option.
- Step 5. Click "Open System Restore" and follow the instructions to complete the process.
Related Articles
- How to Schedule A Weekly Backup to Microsoft OneDrive[3 Tips]
- Backup HDD with Bad Sectors [Detailed Guides]
- Best Bootable USB Drive Creator Tool for Windows [2022 Update]
- How to Backup External Drive to OneDrive with Every Possible Way
- How to Clone HDD to M.2 NVMe SSD on Windows 10 using Ghost
Want to know how to use the Ghost Image to clone an HDD to M.2 NVMe SSD? You'll get a detailed stepwise guide in this post, and we'll also provide a Ghost Image alternative to help you clone HDD to M.2 NVMe SSD easier. - How to Create a Dell Recovery Disk for Windows 7/8/10/11 (Three Ways)
If you're looking for ways to create a Dell recovery disk, this article will guide you through three methods to help Dell laptop users create a recovery disk, making it easy to get back to a working state in case of a system failure or other issues.