How to Change Android SD Card to A Bigger One in Windows 10/8/7
Quick Access to Clone Android SD Card to a Larger One
1. To connect both of the SD cards to your computer, you can use an SD card reader or a USB adapter. Once connected, download Qiling Backup to your computer.
2. Open Qiling Backup and go to the Clone feature.

3. Select the SD cards that you want to clone and choose the destination SD card to save the data.
4. The process of cloning a USB drive involves creating an exact copy of the original drive's contents, including all files, folders, and settings. To do this, you would first need to preview the disk layout to ensure that the cloning process will be successful.
To transfer data from one SD card to another or clone an SD card, you can use a computer and an SD card reader. First, insert the source SD card into the reader and connect it to the computer. Then, insert the target SD card into the reader as well. Next, use a software such as Qiling Backup or Qiling SD Card Clone to clone the source SD card to the target SD card. This will transfer all data, including files, apps, and settings, from the source SD card to the target SD card.
PAGE CONTENT:
- Part 1. Clone Android SD Card to a Larger One with Software
- Part 2. Manually Transfer Data from One SD Card to Another
Changing to Larger Capacity SD Card, How to Transfer Data?
"You're looking to expand your storage on your S8. You can insert a microSD card, which is a smaller card that fits into the SIM card slot. Make sure to purchase a card that's compatible with your phone's specifications.
To move videos and movies from your existing SD card to the new one, you can follow these steps:
To store an application's data on the SD card, you can use the `Environment.getExternalStorageDirectory()` method to get the path to the SD card, and then use that path to store your data. For example, you can use `File file = new File(Environment.getExternalStorageDirectory(), "mydata.txt");` to create a file on the SD card. You can also use the `getExternalFilesDir()` method to get the path to the app's own directory on the SD card, which is a good place to store app-specific data.
Many Android users face the issue of a full memory card, requiring them to replace it with a larger one. However, this can lead to a new problem: how to switch to a bigger card without losing any data.
Fortunately, this guide includes solved the issue of transferring data from an Android SD card, allowing you to clone the data exactly as it is to a new card without losing any files. Alternatively, you can also try a free method to copy files to the new card, making it easy to change and replace Android memory/SD card.
Part 1. How to Clone Android SD Card to a Larger One with Software
To upgrade to a larger SD card, you'll need to transfer your Android storage files to the new card and then clone the new card to the larger one. This process involves two main steps: moving your existing storage files to the new SD card and then duplicating the new card's contents onto the larger one. This ensures that your Android device continues to function as expected with the increased storage capacity.
1 - Transferring Data from the Internal Storage to an SD Card
To transfer media files from internal storage to a memory card, you need to connect your phone to a computer, open the phone's file system, and copy the media files to the memory card. Alternatively, you can use a file transfer app on your phone to transfer the files. Once the media files are transferred to the memory card, you can then transfer the data from the old SD card to the new one using a card reader or a file transfer app.
Step 1. Open File Manager or My Files from its location on your phone.
Step 2. To access the storage settings on your phone, go to the settings app and select the storage option. From there, you can view a list of different file categories and available storage options, and tap the desired folder to view its contents.
Step 3. At the upper right side of the screen, tap Menu (three vertical dots) to show a drop-down list of actions.
Step 4. Tap Edit and select All the files, or choose individual files you want to move. Tap Move.
Step 5. To move files from My Files to the SD card, go back to My Files using the Home icon, and tap SD Card. Then, tap the desired location on the SD card and select Move Here.
Your phone will start moving the files to the SD card. This process can take a few minutes, so be patient. Once it's done, you can free up some space on your phone by deleting the original files.
2 - Clone SD Card Android to a New SD Card with Qiling
If you want to transfer data from a smaller SD card to a larger one, Qiling SD card clone software is a simple and effective solution. This tool supports various types of disk/partition cloning, backup, and file backup, allowing you to clone and upgrade your SD cards without losing any data. Simply download and install it on your PC, connect the smaller SD card and the new larger card, and you're ready to start transferring your data.
Preparations:
- Connect the two SD cards to your computer using an SD card reader and ensure they can be detected by the computer. This step is crucial to verify that both cards are in good condition and can be read by the computer.
- Download Qiling Backup to your computer.
Step 1. Open Qiling Backup and go to the "Clone" feature in the tools page.

Step 2. Select one of the SD cards that you want to clone.
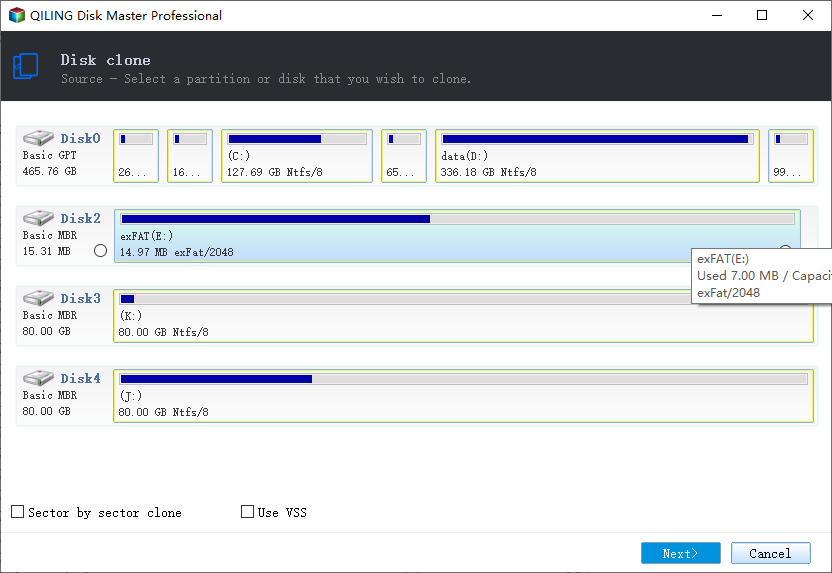
Step 3. Select the other SD card as the destination to save your data.
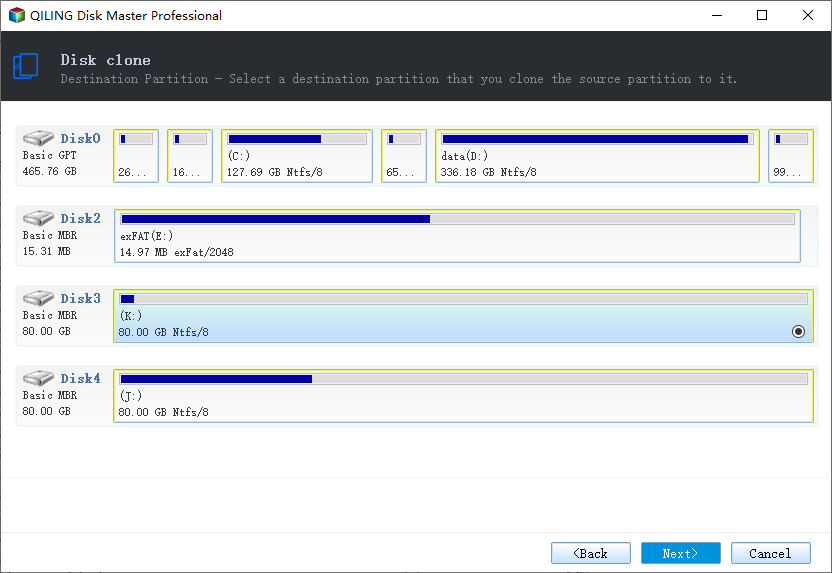
Step 4. Preview the disk layout and then click Proceed to execute the SD card cloning process.

Qiling Backup can help you back up your Android SD card data, allowing you to clone a hard disk/partition completely, providing powerful capabilities at an affordable price.
Part 2. Manually Transfer SD Card Data to the New One
You can manually move data and change the Android SD card by copying files and data onto the new card, using a USB cable to connect your device to a computer, and then transferring and managing files between your computer and device, or between your device's internal storage and memory card using the Windows file explorer.
Step 1. Connect your Xperia device to a Windows computer using a USB cable.
Step 2. If you receive the Allow access message, tap "ALLOW".
Step 3. Open Windows Explorer. Your Android device appears under This PC.
To transfer files from an old SD card to a new one, you can connect your phone to your computer, copy the desired files, and then copy them to the new SD card. However, this method may not work for newer phones that no longer have SD card slots, as they often rely on internal storage and proprietary mobile chips. Instead, you can use this method on older cell phones that still have SD card slots, allowing you to expand storage space by inserting a new card with data.
Conclusion
You can easily clone an SD card to a new one with Qiling Backup, which also allows you to migrate OS to SSD, create file backups, and transfer system with ease. If you need help, Qiling is there to assist you.
Clone Android SD Card to a Larger One FAQs
If you still want to learn more about the SD card data transfer, read these questions and answers below.
What does cloning a drive mean?
Disk cloning is the process of creating a 1-to-1 copy of a hard disk drive (HDD) or solid-state drive (SSD), or even an SD card, not just its files. This process is often used for upgrading a disk or replacing an aging one with a fresh one, allowing the clone to replace the original disk in its host computer.
How do I clone an SD card?
Steps to clone an SD card:
Step 1. Connect both of the SD cards to your computer. Download Qiling Backup to your computer.
Step 2. Open Qiling Backup and go to the "Clone" feature.
Step 3. Select one of the SD cards that you want to clone.
Step 4. Select the other SD card as the destination to save your data.
Step 5. Preview the disk layout and then click Proceed to execute the USB cloning process.
How do I back up my pictures to my SD card?
To back up your SD card, copy the entire SD card as an image by using the reverse technique of flashing your SD card, which involves copying an image file from your computer to the SD card. This process involves copying the entire SD card to an image file on your computer, which can be done step-by-step.
How do I recover pictures from my SD card?
To recover deleted photos from an SD card on Windows 10/8/7, you can use a data recovery software such as Deep Data Recovery Wizard. This software can scan the SD card and recover deleted photos, even if they have been overwritten.
1. Download and Install Deep Data Recovery.
2. To attach the device containing the SD card to your Windows PC, simply insert the SD card into the device, such as a card reader or an SD card slot on your computer, and then connect the device to your PC using a USB cable. Once connected, your PC should automatically recognize the device and the SD card, allowing you to access and transfer files as needed.
3. Launch Deep Data Recovery and select your SD card from the list of available disks.
4. Click the "Scan" button and allow Deep Data Recovery to scan your SD card for recoverable files. This will initiate a thorough search of the card for any files that can be recovered, allowing you to see what data can be salvaged.
5. Once you've selected the photos you want to recover, choose a new location to store them. This is to prevent the original location from being overwritten and losing the recovered photos.
6. Click "Recover" to recover all the photos on your SD card. This will scan the card and display the recoverable photos, allowing you to select and save them.
Related Articles
- ISO to USB: How to Burn ISO to USB in Windows 10
- Work from Home Equipment Checklist: What Do You Really Need To Work From Home
- [Free] How to Make a Full Backup of Windows 10/8/7
- Bootable USB Drive Not Showing Up or Recognized in Windows 10/8/7
- How to Clone SSD to Larger SSD in Windows 10/8/7
- Incremental Backup Archive Bit and Backup Methods
Incremental and differential backup methods, often used in conjunction with archive bit, are compared and contrasted in this article. The archive bit, a flag used to track file changes, is also discussed in relation to these backup methods.