How to Clone Server Hard Drive on Windows Server 2019/2016/2012
If you're looking to upgrade or replace your old and small Windows Server 2012/2008 hard drive with a newer and larger one for better performance, you can clone your Server hard drive to a new HDD/SSD. This process allows you to transfer your operating system, programs, and data to the new drive, effectively replacing the old one. To do this, you'll need to use a cloning software, such as Qiling Backup, which can create an exact replica of your old hard drive on the new one. This way, you can enjoy the benefits of a faster and larger storage device without having to reinstall your operating system and applications.
PAGE CONTENT:
- 1. Preparation - Get Everything Ready
- 2. Clone Server Hard Drive - Clone to New Hard Drive
- 3. Set Cloned Hard Drive Bootable - Make New Server Disk Bootable
This tutorial will guide you through upgrading your Windows Server hard drive, safely transferring the Windows Server system and all data from one hard drive to another.
How to Clone Windows Server Hard Drive
Upgrading a hard disk and migrating data to a new disk in Windows Server requires a more complex process than simply copying and pasting. The Server system cannot be booted properly using this method, making it necessary to use specialized tools or follow a structured process to ensure a successful transfer of data and system files to the new disk.
Upgrading a Windows Server hard drive can be efficiently done by cloning the existing hard drive, which is a reliable method for transferring data and system in Windows Server 2016, 2012, 2008, and 2003. To achieve this, you'll need to use a trustworthy Server cloning software.
Download Windows Server Cloning Software
Here, reliable Windows Server cloning software - Qiling Backup Server with its disk cloning feature makes the disk cloning process easy for all levels of Windows Server users.
To upgrade your hard disk to a new one, you can download the cloning software from the official website. Once downloaded, follow the guide to clone your existing hard disk to the new one.
After downloading and installing this software on your Server computer, let's start cloning your hard disk now.
#1. Preparation - Make Old and New Hard Disk Ready
With Qiling Backup installed on your Windows Server computer, you still have one more thing to do. It is to get both your old and new hard disks ready.
#1. Clear Useless Files on Old Drive
To free up space and speed up the cloning process, delete junk files and remove large files from your old disk. This will help you save a lot of useful space.
#2. Install and Initialize New HDD/SSD
To ensure a successful disk cloning process, make sure to purchase a hard drive or solid-state drive (HDD/SSD) with equal or greater storage capacity than the original one. This will prevent data loss or cloning failure due to insufficient space.
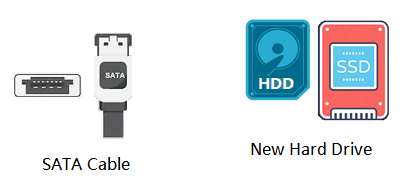
To install the new hard drive correctly, first, ensure it is properly seated in the computer case and securely fastened to prevent any damage or movement. Next, connect the SATA cables to the motherboard and power cables to the power supply unit.
Step 1. Shut down Windows Server PC and install the new HDD or SSD correctly.
Connect the new hard drive to your computer's motherboard using the SATA cable and power cable.
Step 2. Press Windows + R keys, type diskmgmt.msc, and click "OK".
Step 3. Enter Disk Management, right-click the new hard drive or SSD, and select "Initialize Disk".
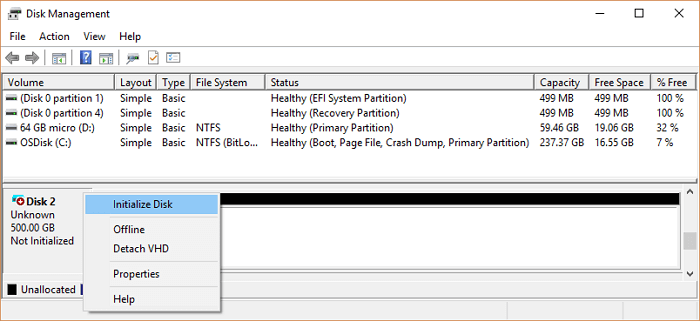
Step 4. To ensure a smooth transition, the new disk should have the same partition style as the old source disk. This means that if the old source disk uses Master Boot Record (MBR) or GUID Partition Table (GPT), the new disk should also be set to the same partition style. Confirm this change by clicking "OK" in the dialog box.
#2. Clone Windows Server Hard Drive with Server Clone Software
With Qiling Server, you can now clone the entire Windows Server system, including installed applications and data, from an old disk to a new hard drive or SSD in a quick and hassle-free process.
Tutorial: Upgrade and Clone Windows Server 2019/2016/2012/2008/2003 Hard Drive
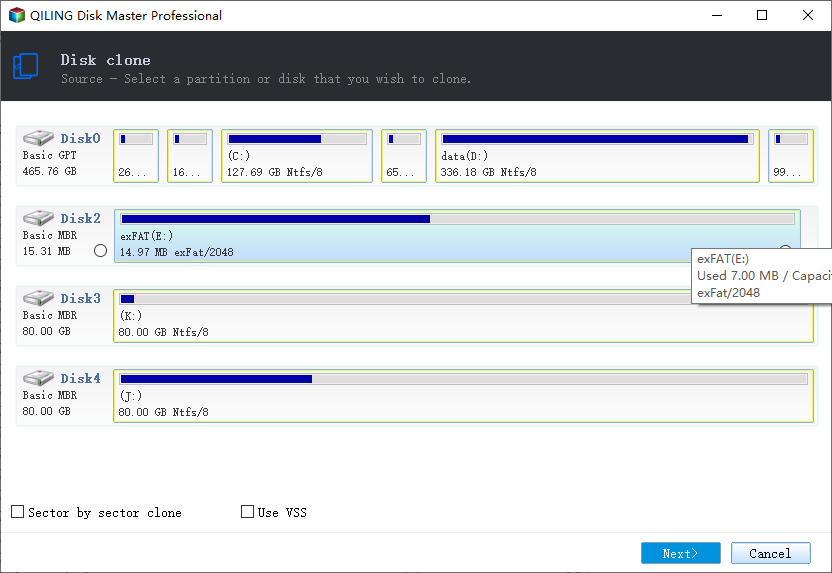
Step 1. Launch Qiling Server cloning software and click "Clone".

Step 2. Choose this entire hard disk or simply a single partition on it as the source disk. Click "Next".
Step 3. Choose the SSD as the destination disk, then click "Next" to continue the cloning process.
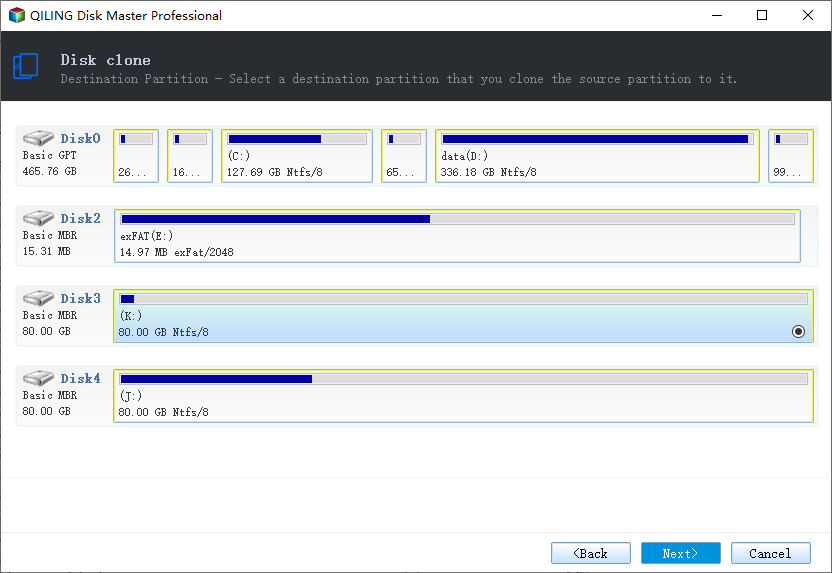
Step 4. Preview the disk layout and click "Proceed" to execute the Server hard drive cloning operation.
Also, tick the option "Optimize for SSD" to achieve a better SSD performance after clone.

#3. Set Cloned Hard Drive Bootable after Cloning
To set up the cloned drive as the boot drive on a Windows Server computer, you should first ensure the cloned drive is properly connected and recognized by the system. Then, you can follow the Windows Server setup process to configure the cloned drive as the boot drive, which may involve setting the drive as the active partition, assigning a drive letter, and configuring the boot order in the BIOS or UEFI settings. This process will vary depending on the specific version of Windows Server being used, so it's recommended to consult the relevant documentation or seek assistance from a qualified IT professional if needed.
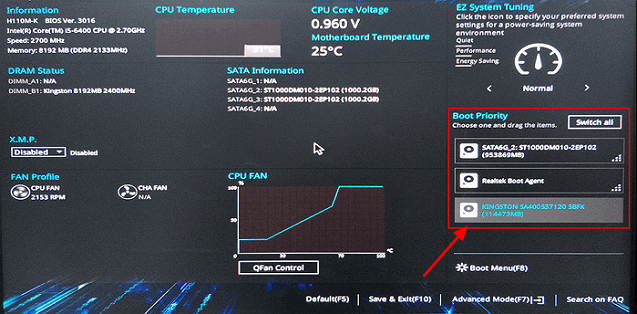
Step 1. Restart the Server PC and press F2/F12/Del to enter BIOS.
Step 2. Go to the Boot section, set the Server computer to boot from the new hard drive.
Step 3. Save the changes, exit BIOS, restart PC.
After this, your computer will boot up Windows Server on the new hard drive. All you need is to wait for the process to complete.
Conclusion
Qiling Backup is a reliable Server cloning software that helps you upgrade and clone a Windows Server hard drive.
- To clone a server, you'll need to download a reliable server cloning software and have the old and new disks ready.
- Then, you can clone Windows Server 2019/2016/2012 hard drive.
- After cloning, remember to set up the new disk as the boot drive in Windows Server BIOS. This is an important final step to ensure the cloned system is fully functional and can boot properly.
Cloning a Windows Server hard drive to a new HDD/SSD can be done without data loss or boot issues. The process involves using software like Qiling to create an exact replica of the original drive, ensuring that all data, settings, and boot information are transferred to the new drive. If you have any further questions about cloning hard drives or Qiling cloning software, the answers can be found below.
People Also Ask About Cloning Server Hard Drive
1. What to do or how to deal with the old disk after cloning the Server hard drive?
You can either physically disconnect the old drive and store it safely, or you can simply format it to reuse its space on your computer.
1. To repurpose an old hard drive as a secondary data drive, first, ensure it's completely free of any personal data by securely erasing it using a tool like DBAN or a disk wiping software. Next, install an operating system on the drive, such as Linux or a lightweight version of Windows, to make it functional.
2. Clean the drive and sell it.
To thoroughly clean a hard drive, you can use a reliable disk management tool like Qiling Partition Master to wipe it.
2. What else can Qiling Server cloning software do?
Besides disk cloning, Qiling Backup can also be used to perform other operations on Server computers, including Windows Server 2019/2016/2012/2008/2003, etc.
- Backup Server system partition
- Backup MS SQL Server, MS Exchange Server
- Backup and recover files
This software offers advanced features beyond basic backup, allowing you to back up Windows Server systems and recover them to different hardware.
3. Does cloning a hard drive copy the OS?
Cloning is an operation that copies everything from the target drive to another hard drive, making everything on the new disk exactly the same as the old one.
If you clone a system hard disk, the cloning process will copy your operating system to the new disk.
Related Articles
- How to Ghost Hard Drive in Windows 10
- Windows 10 Sync Folders to External Drive Solutions
- How to Set Dell Factory Restore without Losing Data?
- Clone GPT Disk in Windows 10 - This Method Would Work!
- Windows 7 Backup and Restore - How Does It Work? (2 Cases)
Backup is an efficient way to avoid data loss. If you want to figure out how Windows 7 backup works, read this article carefully. - Solved: No System Restore Points in Windows 7
Are you frustrated by no system restore points in Windows 7? Don't worry about it. Here, I shows you why and how to solve no system restore points in Windows 7?