Windows 11 Upgrade | Convert MBR to GPT Without Deleting Partitions
PAGE CONTENT:
- What Is UEFI & How to Check Partition Style?
- 1. Convert MBR to GPT using Qiling Partition Master
- 2. Convert MBR to GPT using Disk Management
- How to Check Your Computer Boot Mode?
- How to Change the Boot Mode to UEFI?
- How to Enable Secure Boot on Windows?
Microsoft's CPO, Panos Panay, announced on June 24, 2021, that a new version of Windows, Windows 11, would be released, with a leaked beta version showing a revamped user interface and improved performance.
Many users are attempting to upgrade their computers from Windows 10 to Windows 11, but unlike regular updates, Windows 11 has specific hardware requirements. A table of these requirements is available, allowing you to check if your computer is capable of upgrading to Windows 11.
Windows 11 MBR or GPT? | Hardware Requirements for Windows 11
| Component | Minimum Requirements |
| Processor | A compatible 64-A processor with a clock rate of at least 1 GHz and at least 2 cores, compatible with either x86-64 or ARM64 architectures. |
| Memory (RAM) | At least 4 GB |
| Storage Space | At least 64 GB |
| System Firmware | UEFI |
| Security | Secure Boot, enabled by default |
| Trusted Platform Module (TPM) version 2.0 | |
| Graphics Card | Compatible with DirectX 12 or later with WDDM 2.0 driver |
| Display | A high-definition display with a diagonal size of more than 9 feet, featuring 8-bit color depth per channel, resulting in a resolution of 720p. |
| Internet connection and Microsoft accounts | To complete the first-time setup on Windows 11 Home, an internet connection and Microsoft account are required. |
Windows 11 requires the system firmware to be UEFI. UEFI (Unified Extensible Firmware Interface) is a replacement for the traditional BIOS (Basic Input/Output System) that allows for a more modern and flexible interface for system firmware. It provides a standardized way for operating systems to interact with the system hardware, enabling features like secure boot, fast boot times, and support for large storage devices. UEFI is a requirement for Windows 11, and it's used to ensure a more secure and efficient boot process.
What Is UEFI & How to Check Partition Style?
UEFI (Unified Extensible Firmware Interface) is a modern firmware interface that replaced the traditional BIOS (Basic Input-Output System). Introduced with Windows Vista Service Pack 1 and Windows 7 in 2007, UEFI has become the default system firmware for computers in recent years, offering improved startup and shutdown speeds, and supporting hard drives larger than 2.2TB.
UEFI-enabled computers use the GUID Partition Table (GPT) partition style, which is more flexible and compatible with modern hardware than the traditional Master Boot Record (MBR) style. A key advantage of GPT is that it has no limits on disk size or the number of partitions that can be created, whereas MBR disks are limited to a maximum of 4 partitions. In contrast, GPT disks can support up to 128 partitions, making it a more versatile and user-friendly option.
Upgrading to Windows 11 requires a GPT partition style, but if you're unsure whether your disk is GPT or MBR, you can check by following these steps:
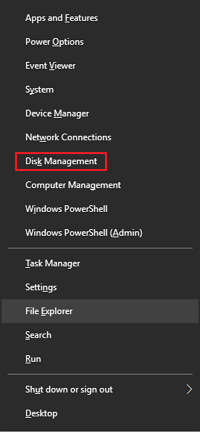
Step 1. Right-click the Windows icon and choose Disk Management.
Step 2. In the Disk Management window, right-click the disk you want to check, and click Properties.
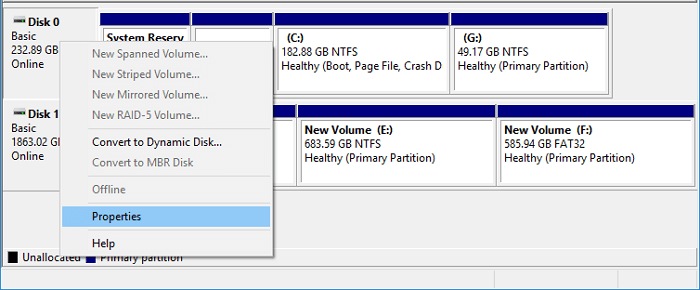
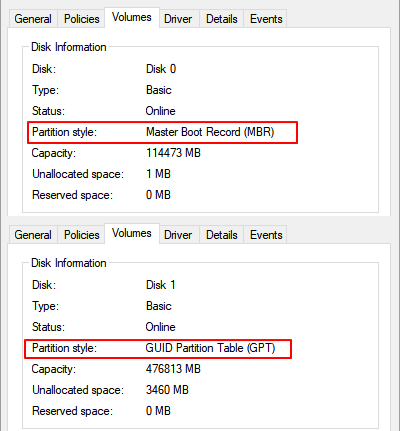
Step 3. It will open the Device Properties window. Click the Volumes tab, here you could see your disk's partition style.
If your disk is currently using the Master Boot Record (MBR) partition style, you can upgrade to Windows 11, but you'll need to convert your disk to use the GUID Partition Table (GPT) style instead. This is the only requirement for upgrading to Windows 11. The upgrade process will take care of the conversion for you.
2 Ways to Convert MBR to GPT on Windows PCs
Upgrading to Windows 11 requires not only a disk upgrade, but also a partition style change if the disk is larger than 2 TB. To utilize the full capacity of a larger disk, it needs to be converted from Master Boot Record (MBR) to GUID Partition Table (GPT). This can be achieved using either Windows built-in tools or third-party partition management software on Windows PCs.
This guide will describe two methods to convert MBR to GPT. The easiest and safest method is using Qiling Partition Master, while the other method involves using the Windows built-in tool, Disk Management.
Method 1. Convert MBR to GPT using Qiling Partition Master
Qiling Partition Master is a tool designed to help users manage their disk partitions, specifically allowing them to convert from MBR to GPT without deleting any partitions, thereby preventing data loss.
You can download this tool to convert your Windows 10 system to GPT before upgrading to Windows 11, following the guide below.
Step 1. Download and launch Qiling Partition Master on your Windows computer.
Step 2. Click the MBR disk that you want to convert.
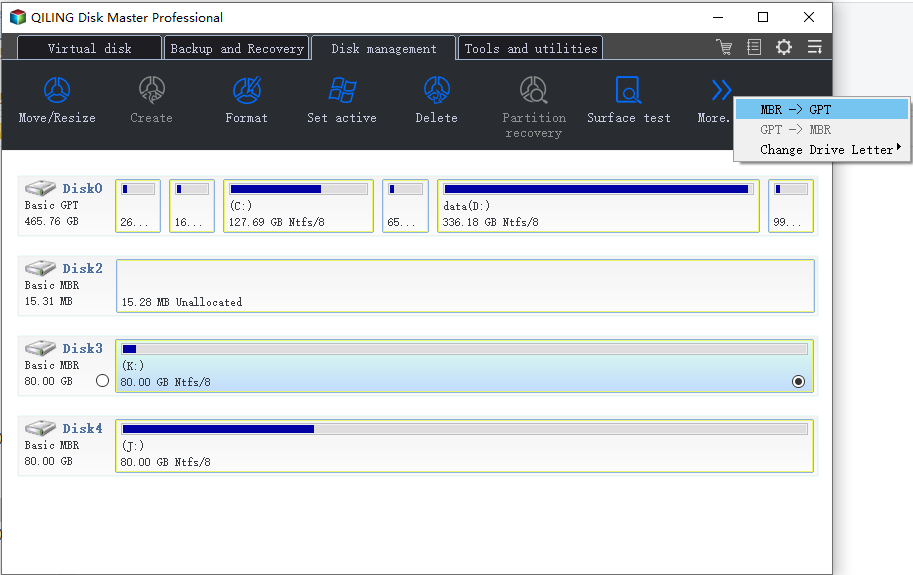
Step 3. Click "More..." and click "MBR -> GPT" to convert partition.
Method 2. Convert MBR to GPT using Disk Management
In Disk Management, users can extend, shrink, delete, and format volumes and disks, and convert a partition from MBR to GPT, but this method requires deleting all partitions, resulting in data loss, so it's essential to make a full backup before proceeding.
If you have backed up your partitions, you can follow the steps below to convert MBR to GPT. You can use the command `gdisk /dev/sda` (replace `/dev/sda` with the actual device name of the disk you want to convert) to open the GPT disk utility.
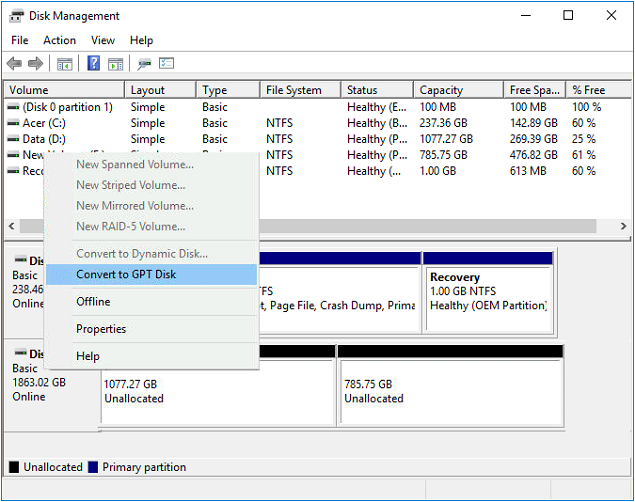
Step 1. Right-click the Windows icon and choose Disk Management.
Step 2. In the Disk Management window, right-click the volumes in your target disk and choose Delete Volume, repeating this process until all volumes are deleted.
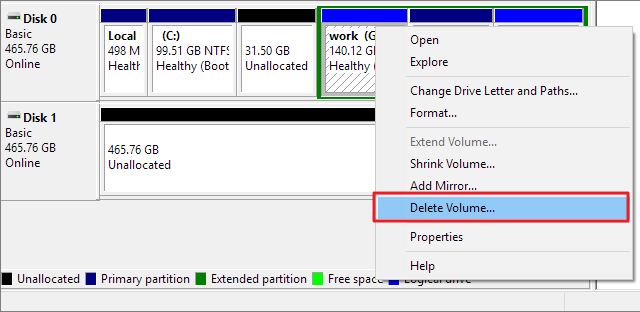
Step 3. When the whole disk is displayed as unallocated space, right-click the disk and choose Convert to GPT Disk.
To convert the partition style from MBR to GPT, you need to change the boot mode to UEFI. First, check if your computer uses UEFI or BIOS by looking for the boot mode in your computer's BIOS settings. If it's UEFI, you can proceed with the conversion. If it's BIOS, you'll need to change it to UEFI before converting the partition style.
How to Check Your Computer Boot Mode?
Step 1. Press the Windows + R keys at the same time. Type MSInfo32 in the Run box and hit Enter.
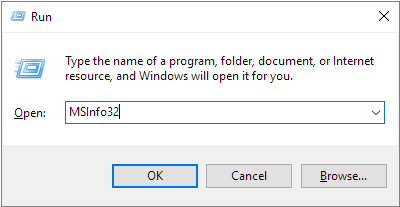
Step 2. This operation will open the System Information window. Find the BIOS Mode, check whether it displays as UEFI or Legacy.
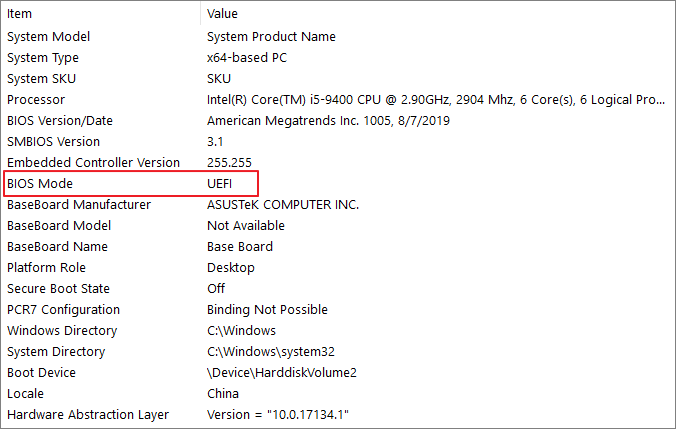
If your computer's boot mode is UEFI, it will be displayed as UEFI, but if it's BIOS, it will be shown as Legacy.
How to Change the Boot Mode to UEFI?
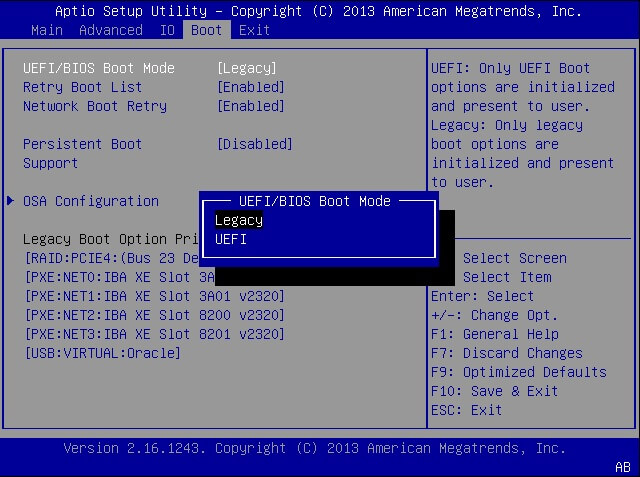
You can follow the steps here to change the boot mode to UEFI. This process will do no harm to your data.
Step 1. Shut down and restart your computer.
Step 2. Keep pressing the F2 key until the BIOS Setup Utility screen appears.
Step 3. Select Boot, under the Boot tab, use the up and down arrows to choose UEFI mode, and press Enter.
Step 4. To save the changes and exit the screen, press F10.
How to Enable Secure Boot on Windows?
After changing the boot mode to UEFI, you need to enable Secure Boot, which is also a requirement for upgrading to Windows 11.
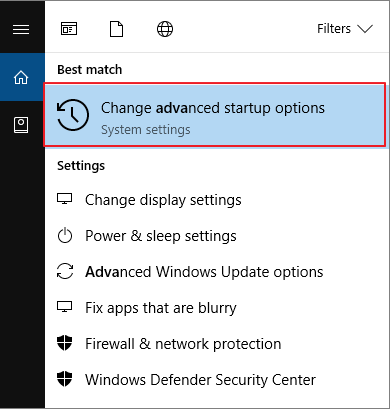
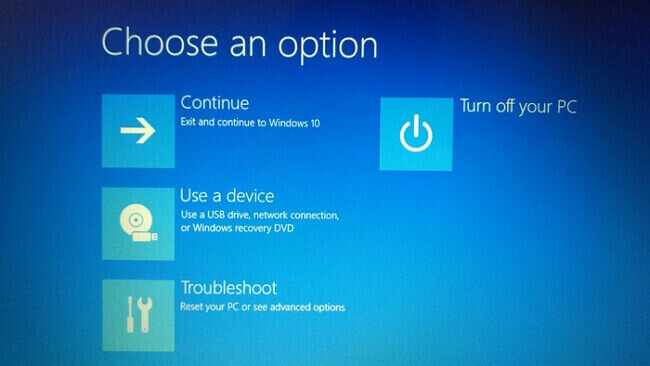
Step 1. Search Advanced startup in Windows search bar. Then select Change advanced Startup Options.
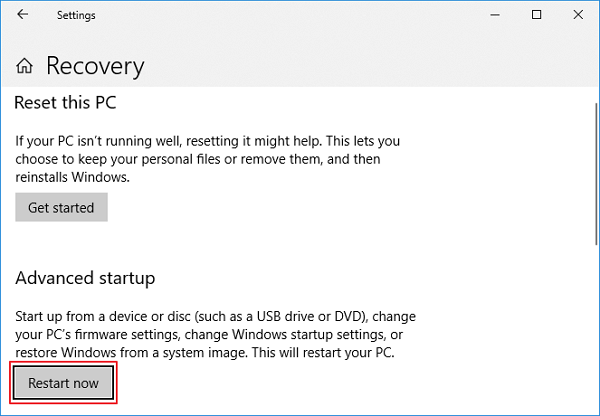
Step 2. In the opening screen, find Recovery > Advanced startup. Click the Restart now button.
Step 3. Your computer will restart with the following screen, click Troubleshoot.
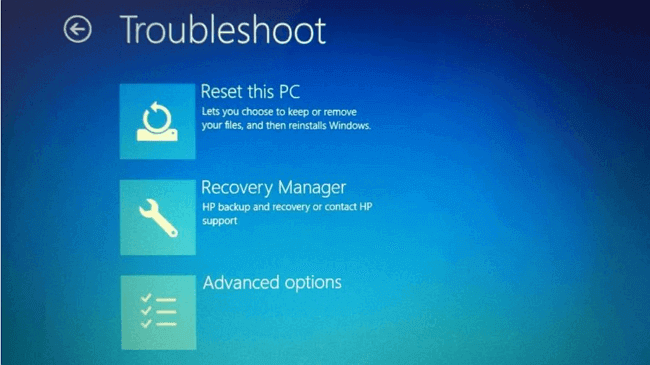
Step 4. Under the Troubleshoot, choose Advanced options.
Step 5. Choose UEFI Firmware Settings.
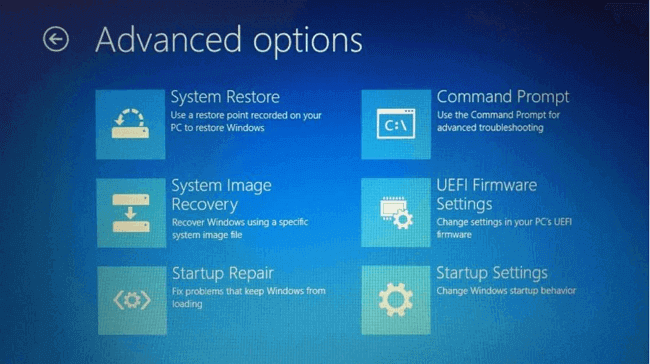
Step 6. After clicking UEFI Firmware Settings, the system will restart or ask to restart, and then start in BIOS mode, displaying a different BIOS setup.
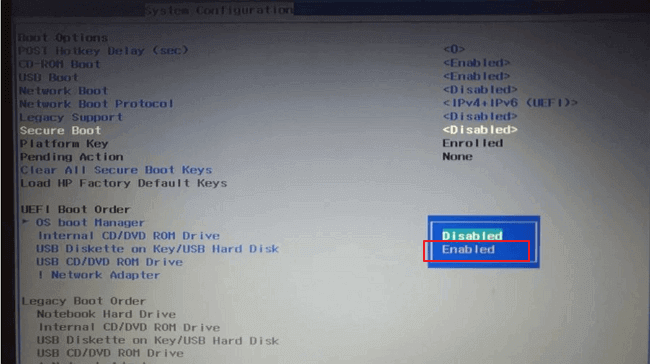
Step 7. Under the BIOS settings, click on the Security tab.
Step 8. Use the Up and Down arrow to choose the secure boot option, and change the secure boot to Enabled.
Convert The Partition Style to GPT Before Upgrading to Windows 11!
The new Windows 11 requires a GPT partition style and UEFI boot mode, so we'll show you how to convert your disk to GPT. We recommend using Qiling Partition Master as it won't cause any data loss during the conversion. After converting to GPT, you'll also need to change your boot mode to UEFI, and detailed guides for these steps can be found in this article. By following the instructions, you can successfully convert from MBR to GPT.
Related Articles
- Fix Diskpart Clean Not Working on Disk/USB/SD Card [5+ Fixes]
- How to Convert GPT to MBR (Without Data Loss) with 3 GPT to MBR Converter
- SSD Optimzier for Windows 11 Free Download with Ultimate Guide
- How to Access Linux EXT4 Partition and Data on Windows 11/10/8/7 in 2022
- Fix "Not Enough Space on the Disk in Windows Server"
- Fixed: WD My Passport Ultra Not Showing Up/Detected
- How to Clone Hard Drive for Disk Upgrade, Data Transfer, SSD Migration
Cloning a disk can quickly transfer data, programs, and the system to a new hard drive, making it a good choice for upgrading disks, migrating SSDs, or transferring data.