HDD RAW Copy Tool: Upgrade Disk, Copy Disk, Recover Disk
Product name: Qiling Disk Copy
Highlighted product features: sector level copy/clone (raw copy)
The purpose of this tool is to copy, duplicate, or clone a hard disk or partition, as well as to replace a damaged one, and to recover data sector by sector from bad sectors.
Supported OS: Windows
The software supports a wide range of storage devices, including IDE HDD, SSD, USB HDD, SCSI HDD, SATA HDD, and Firewire (IEEE 1394) HDD.
Overview of HDD RAW Copy Tool
The character "Raw" makes the way of copying/cloning a hard drive slightly different.
The disk copy utility with Raw feature works by directly accessing and copying the raw data from the source disk to the destination disk, bypassing the operating system and file system. This allows for a raw, unformatted copy of the disk, preserving the exact byte-for-byte copy of the original disk, including any and all data, whether it's files, folders, or empty space.
It initiates a sector-by-sector copy of all areas of the hard drive, including the partition table MBR/GPT, boot records, all partitions including blank space as well. In a word, you use a RAW copy tool only when you want to keep an exact duplicate of a hard drive.
When is the HDD RAW copy tool a must-have
For some forensic purposes
To support a complete electronic evidence discovery, it's essential to copy the entire contents of the hard drive, including hidden data areas that may not be visible on the computer. This involves making a bit-for-bit copy of the drive, which includes all files, folders, and metadata, as well as any deleted or hidden files that may be stored in the drive's unused space.
For damaged hard drive recovery
To recover data from a damaged hard drive, it's recommended to make a copy of the drive and perform data recovery on the copy. Qiling Disk Copy can ignore bad sectors, saving time that would be spent waiting for slow copying with other software. This approach allows for efficient data recovery and minimizes the impact of damaged sectors on the copying process.
For ultimate backup
Backing up your computer involves saving not only your files but also the operating system, partition allocation, and disk space to a new drive for future use. This comprehensive approach ensures that all data, including system settings, program configurations, and user files, are safely preserved in case of a hardware failure, software corruption, or other disaster.
A RAW copy tool can easily satisfy the common demands of replacing an old hard drive with a new one without losing data or reinstalling the operating system. It's a simple, powerful, dedicated, and user-friendly disk copy software that makes it easy for anyone to handle the disk copy job.
How to Create a RAW Copy of an HDD or SSD
Step-by-Step Guide:
Activate Qiling Disk Copy for a smooth disk copying or cloning process.
Step 1: Download, install and run Qiling Disk Copy on your PC.
Choose "Disk/Partition clone" to start.

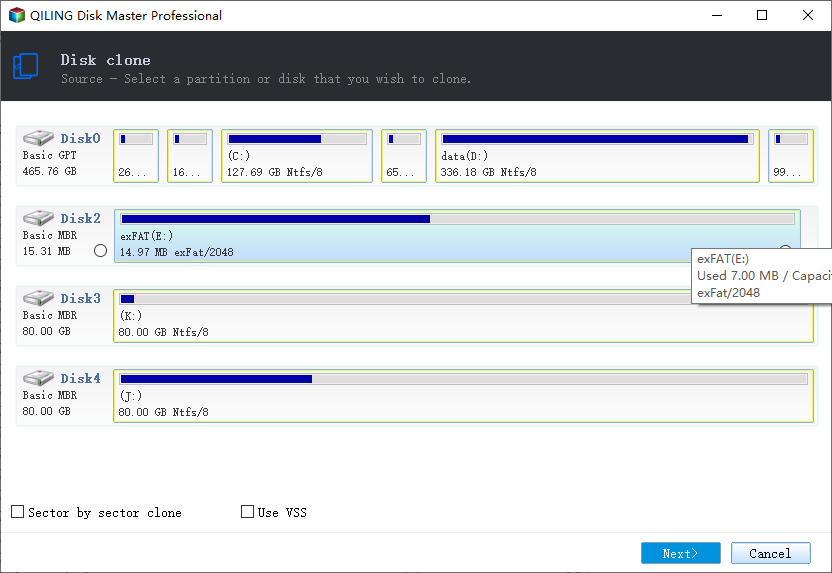
Step 2. Select the source disk that you want to clone. Click "Next" to continue.
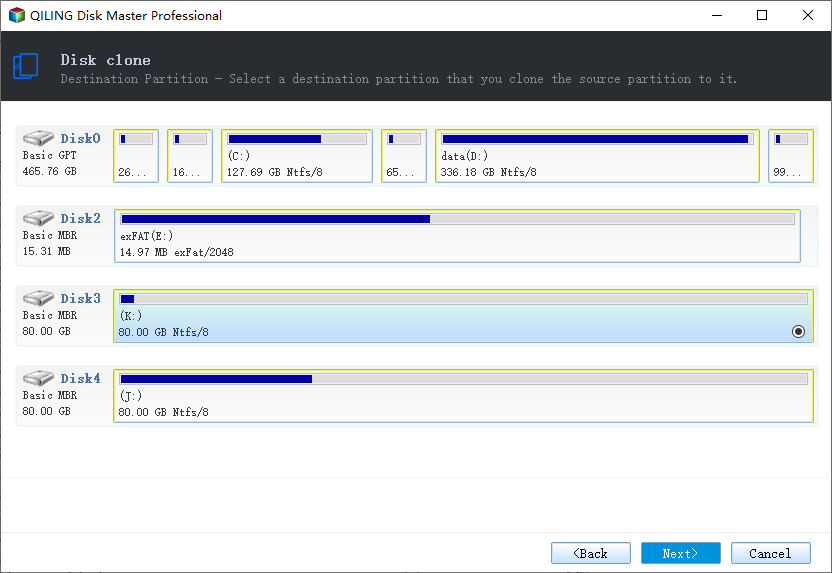
Step 3: Select the destination disk where you want to clone/copy the old disk and click Next to continue.
Step 4: Check and edit the disk layout as Autofit the disk, Copy as the source or Edit disk layout.
If your destination disk is an SSD drive, make sure to select the "Optimize for SSD" option when the target is an SSD.

Step 5: Click "Proceed" to start the hard drive cloning process.
A warning message will appear stating that the data on the destination disk will be overwritten. If you don't have important data on the destination disk, click "OK" to proceed.
Related Articles
- How to Move Windows Boot Partition to A New Drive
- [Windows Clone] How to Clone OS in Windows 10/8/7
- Upgrade Sony PS4 Hard Drive to Bigger Drive without Reinstallation
- Cloned Hard Drive Won't Boot? Make Cloned Drive Bootable in 3 Fixes
- [2 Solutions] How to Transfer Autocad to New Computer
In this article, you will see how to transfer autocad to new computer. We will introduce 2 solutions to move autocad in Windows 10, 8, 7, which applies to transfer all settings, even autocad license transfer. - How to Transfer Database from One Server to Another (5 Ways)
Transferring a database from one server to another or from one computer to another is a crucial process that can be achieved in several ways. One effective method is using the Qiling server migration software, which simplifies the transfer process.