Upgrade Sony PS4 Hard Drive to Bigger Drive without Reinstallation
How to Upgrade Sony PS4 Hard Drive Without Reinstallation
To upgrade or change the Sony PS4 hard drive to a bigger one, you can follow these steps: First, back up your existing data to an external hard drive or cloud storage. Then, purchase a larger hard drive that is compatible with your PS4. Next, shut down your PS4 and remove the existing hard drive. Insert the new hard drive into the PS4's hard drive bay, making sure it's securely seated. Finally, restart your PS4 and it will automatically recognize the new hard drive. You won't need to reinstall any files or re-download game packs, as your PS4 will transfer the data from the old drive to the new one.
If your PS4 hard drive is becoming full, don't worry! You can easily upgrade to a bigger one without losing any game files or data. This article will guide you through a simple method to replace and upgrade your Sony PS4 hard drive, allowing you to continue playing without any interruptions.
| Procedures | Step-by-step Guide |
|---|---|
| 1. Back Up PS4 Files | Go to your PS4 Home screen, and insert the external storage device into one of the PS4 USB ports...Full steps |
| 2. Remove Old PS4 Drive | Power off PS4 and unplug the AC power cord, and then disconnect the other cables...Full steps |
| 3. Upgrade the PS4 HDD | Replace the new hard drive in the bracket for the PS4 system's hard drive...Full steps |
| 4. Install the PS4 System Software | Visit the PS4 System Software Update page. Follow the instructions to download and install the update...Full steps |
| 5. Restore the PS4 Backups | Go to "Settings > System > Back Up and Restore". Select the "Restore PS4" option...Full steps |
Preparations to PS4 Hard Drive Upgrade
To upgrade the hard drive on your PS4, you'll need a new hard drive that's compatible with the console, a screwdriver, and possibly a USB cable. You'll also need to back up your data and transfer it to the new drive.
- PS4 full-size system
- Phillips screwdriver
- A computer connected to the Internet
- External storage device with at least 1GB of free space
- The PS4 system only supports 2.5-inch internal hard drives, specifically 9.5mm or slimmer, and Serial ATA (SATA) drives, not Parallel ATA (PATA) or other types.
If you prefer to manually change the PS4 hard drive on your own, follow these tips: First, purchase a compatible replacement hard drive, making sure it's the same size and type as the original one. Next, shut down your PS4, unplug the power cord, and locate the hard drive.
Procedure 1. Back Up Game Files Saved on PS4 Hard Drive
As a PlayStation Plus subscriber, you can back up your saved game data to online storage, storing up to 100GB of data and 1000 saved items. Alternatively, if you prefer to back up your entire PS4, you can do so using an external device, following the steps outlined below.
To sync your trophies, go to the PSN account settings, then select "Trophies" and click "Sync Now". This will sync your trophies with your account, ensuring they're included in future backups.
To sync trophies on PS4, go to the "Trophies" section, press the "Options" button, and select "Sync Trophies With PSN". Afterwards, back up your PS4 data before replacing the hard drive with a larger one.
Step 1. Go to your PS4 Home screen, and insert the external storage device into one of the PS4 USB ports.
Step 2. Go to "Settings" then click on "System", then "Back Up and Restore" and finally "Back Up". Confirm the data you are going to back up.
Tip
If you don't back up Applications, you'll have to download or reinstall them when you restore the data from your backup.
You should back up your saved game data to prevent losing any progress if you replace your hard drive.
A progress bar will display the current backup status, allowing you to cancel the process at any time if needed.
Step 3. Customize the name of the backup. When done, highlight "Back Up" and press the "X" button.
Step 4. Remove the external storage device from the PS4 system.
- To view captures, go to Settings > System Storage Management > Capture Gallery, where you can see all recorded content.
- You can press Options and Copy to USB Storage Device or click the Share button to upload pictures to Facebook for safekeeping.
- You can also save your videos to a USB drive, Facebook, or YouTube by following the same steps.
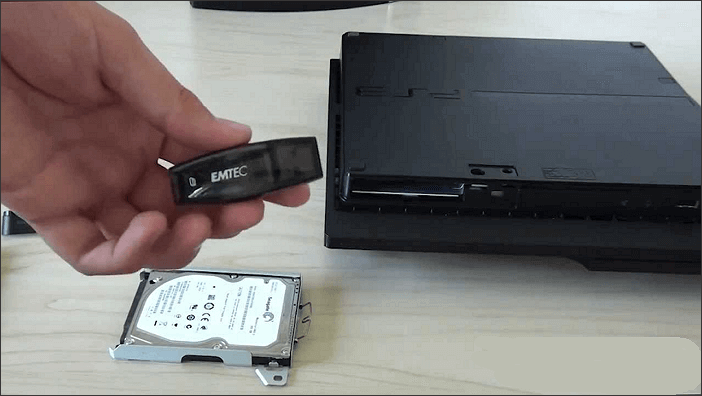
Procedure 2. Remove the Old PS4 Internal Hard Drive
Step 1. Power off PS4 and unplug the AC power cord, and then disconnect the other cables from the system.
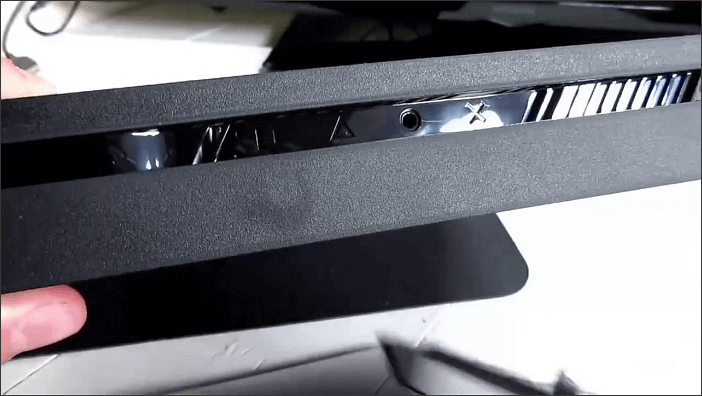
Step 2. To remove the hard drive cover, place both hands on top of it and slide it to the left. Then, lift the right side first when removing the cover.
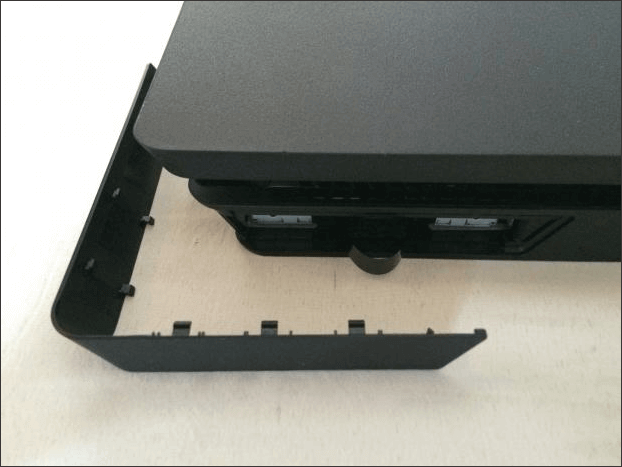
Step 3. Remove the screw and pull the internal hard drive toward the front of the system to remove it
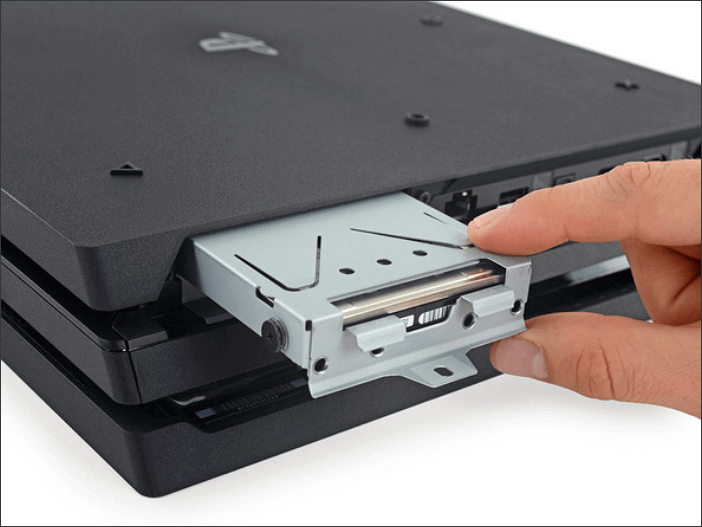
Step 4. Remove the four screws with a Phillips screwdriver from the sides of the hard drive case.
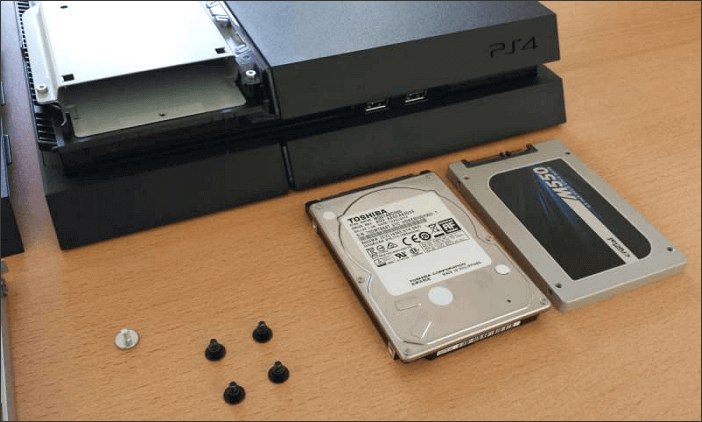
Procedure 3. Install and Upgrade to the Bigger PS4 HDD
Step 1. Replace the new hard drive in the bracket for the PS4 system's hard drive.
Step 2. Attach it with the screws (four places). Do not over-tighten the screws.
Step 3. Attach the new internal hard drive to the system using the screw, making sure to fully insert it into the hard drive bay.
Procedure 4. Install the PS4 System Software on the New Hard Drive
To get a PS4 to recognize a hard disk, you need to have the PS4 recognize and reformat the hard disk itself, followed by installing the latest PS4 system update software.
Step 1. Visit the PS4 System Software Update page and follow the instructions to download and install the update on a USB or an external device, which requires 1GB of free space.
Step 2. To enter PS 4 Safe Mode, press and hold the Power button until you hear the second beep, then install the software.
Step 3. Select "Initialize PS4 (Reinstall System Software)", and press the "X" button.
Step 4. To update your PS4, plug an external storage device containing the system update into a USB port on the console. Click "OK" and press the "X" button to confirm the update.
Step 5. Choose "Next" and press the "X" button. The update file is copied to the PS4.
Step 6. Once the copy is complete, read the System Software License Agreement, select "Accept" and press the "X" button, then the system software is installed onto the PS4.
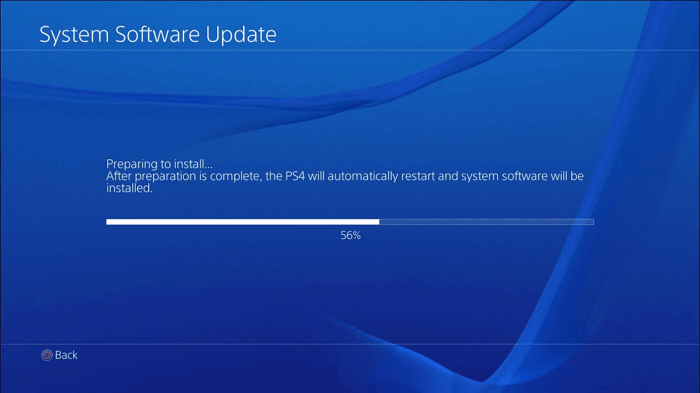
Step 7. After the update is completed, the PS4 will restart. Then, press the PlayStation button on your controller and log in with your user profile.
Step 8. Sign in with your existing account on PSN or create a new one.
Step 9. Verify the system version by going to the "Settings > System > System Information" screen. Your system is now updated.
Procedure 5. Restore the PS4 Backups from an External Device
To restore saved data from an external device or a USB storage device to your PlayStation 4 system, insert the device into the console's USB port, navigate to the "Settings" menu, select "System", and then choose "Restore Default Settings". This will initiate the system restore process, which may take a few minutes to complete.
Step 1. Connect a USB storage device or external hard drive to the system.
Step 2. Go to "Settings > System > Back Up and Restore".
Step 3. Select the "Restore PS4" option and the backup file you'd like to restore.
Select "Yes" on the screen that tells you the system will restart and initialize, whether or not the backup process is completed.
To restore saved data from online storage on PlayStation, sign in to your account, go to settings, then Application Saved Data Management, followed by Saved Data in Online Storage, and finally select Download to System Storage to restore the desired data.
Related Questions About PS4
Follow the troubleshooting steps below if you see some PS4 error codes or other PS4 issues.
Can you switch hard drives on ps4?
Replacing or upgrading the internal HDD in a PS4 or PS4 Pro is a simple process that allows you to switch to a standard SATA II hard drive or an SSD no thicker than 9.5mm.
How do I transfer games from one ps4 hard drive to another?
1. Backup Game Files Saved on PS4 Hard Drive
2. Remove the Old PS4 Internal Hard Drive
3. Install and Upgrade to the Bigger PS4 HDD
4. Install the PS4 System Software on the New Hard Drive
5. Restore the PS4 Backups from an External Device
How to fix corrupted database error on PS4?
If you're experiencing a PS4 data or database corrupted issue, there are two potential solutions. You can try to resolve the problem by deleting the system software and rebuilding the database, or by resetting the PS4 to its factory settings. This may help to resolve the corrupted data and get your PS4 up and running smoothly again.
1. Fix PS4 Corrupted Database
2. Fix PS4 Corrupted Data
If your PS4 database or data is corrupted, you can try to fix it by following the steps in the full guide on how to fix corrupted PS4 database or data. This guide provides detailed instructions and solutions to resolve the issue.
How to fix the PS4 fails to turn on?
To get ps4 to turn on, follow the tips below:
- Replace the power supply
- Replace the power cable
- Connect the console to a wall outlet
- Fix the power button
- Clear the dust in your PS4
- Insert a disk into your PS4
- Rebuild the PS4 database
- Get specialized manual services
Extra Tips - Upgrade Hard Drive to a Bigger One Easily
If you're looking to upgrade or replace your system hard drive or second hard drive, Qiling Disk Copy is a powerful tool that can meet your needs, offering a range of effective features.
Tip
Since the PS4 hard drive can't be recognized by Windows 10/8/7, Qiling Disk Copy can't adjust or clone the partition on the PS4 disk, limiting its use to only cloning hard drives that Windows OS can recognize.
Recommended: Upgrade HDD/SSD with the Disk Cloning Tool
Qiling Disk Copy allows you to easily clone and upgrade your hard drive to a new disk without any complex operations, and is fully compatible with all Windows systems. This disk cloning software can even help you update and clone your hard drive to a bigger HDD/SSD, making it a convenient solution for upgrading your disk.
Step 1: Download, install and run Qiling Disk Copy on your PC.
Step 2. Choose "Disk/Partition clone" in the tool page to start.

Step 3. Select the smaller hard drive as the source disk. Click Next to continue.
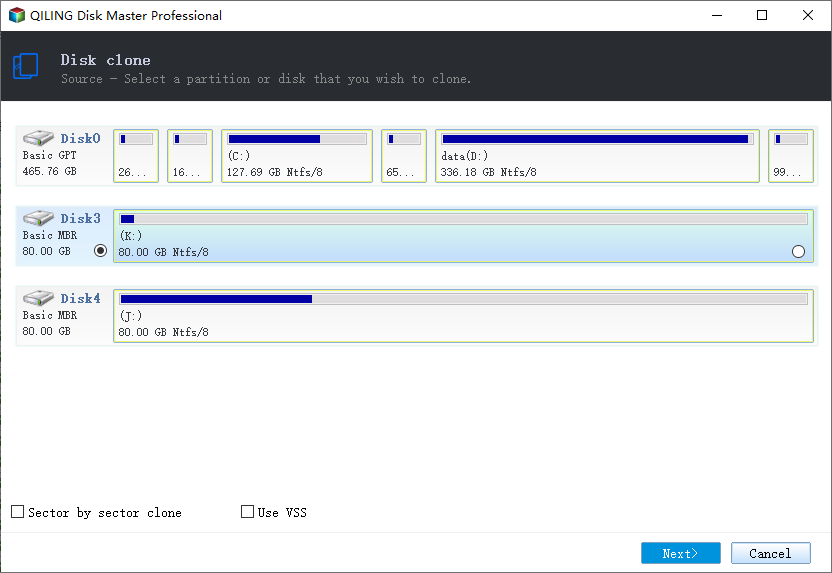
Step 4. Select the bigger hard drive where you want to clone/copy the old disk and click Next to continue.
To copy or clone a hard disk, the destination disk should be at least as large or even larger than the source disk to ensure a successful transfer of data.
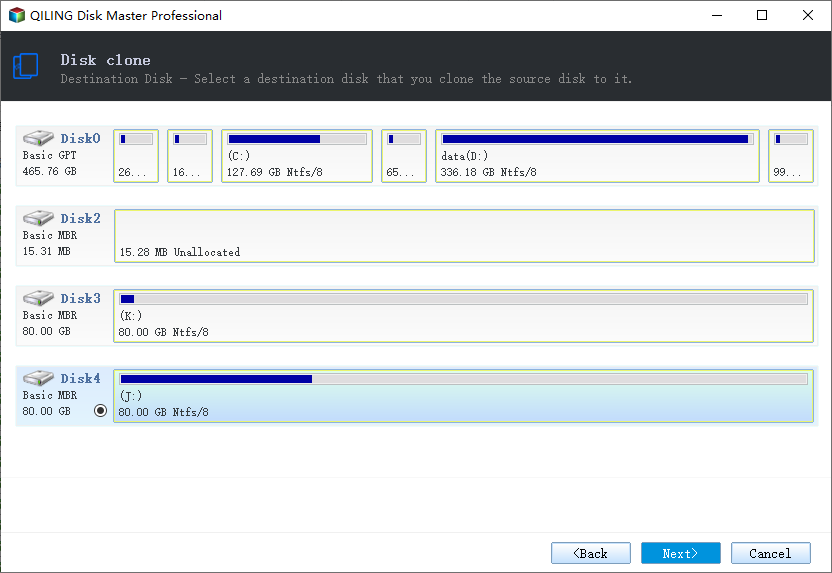
Step 5: Check and edit the disk layout.
If your destination disk is an SSD drive, be sure to select the "Optimize for SSD" option if the target is SSD.
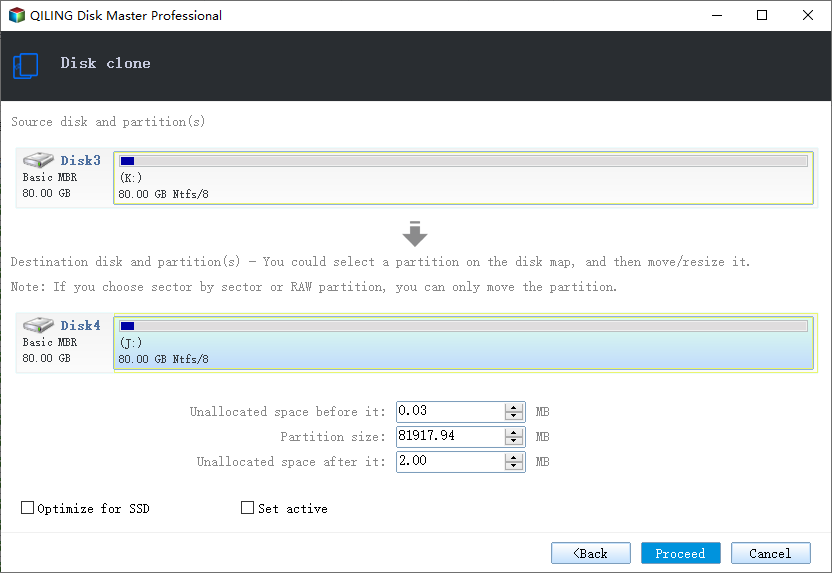
Step 6: Click "Proceed" to start the hard drive cloning process.
A warning message will appear, stating that the data on the destination disk will be overwritten. To proceed, click the "OK" button, provided you do not have any important data on the destination disk.
Related Articles
- How to Migrate Linux Installation to New Drive
- Linux Clone HDD to SSD Without Re-installing
- Clone Hard Drive to Larger Drive Without Reinstalling Windows and Programs
- Best Bad Sector Repair Solutions to Check and Remove Bad Sectors on Hard Disk
- How to Move Windows Boot Partition to A New Drive
- Does Crucial Have Cloning Software?
Does Crucial have cloning software? Do you want to know the answer? This article will tell you whether Crucial SSD has cloning software and provide a cloning tool named Qiling Disk Copy to help you.