How Does Windows Backup Work? Explanation to All 3 Windows Backup Tools
PAGE CONTENT:
- 1. File History Windows 8/10 - Default
- 2. Backup and Restore Windows 7/10 - Default
- 3. Qiling Backup Windows 7/8/10 - Download
"There are two kinds of computers - Those that have failed and those that will fail."
Losing your computer's data and having to rebuild it from scratch can be a painful experience. A full backup of your entire Windows OS installation, customized configuration, programs, and files can save you from this hassle. With a backup, you can recover your computer to its previous state in case of a system crash, hardware failure, malware attack, or other unexpected disasters that damage your hard drive and corrupt your files. This way, you can avoid reinstalling the OS and prevent permanent data loss.
Windows Backup Strategy - What Is It?
The Windows backup strategy for PC and laptop users can be divided into two categories: using the native Windows backup tool preinstalled with the system, or a third-party alternative that needs to be manually downloaded. Both options provide a solution for backing up desired data, with the choice between a basic and advanced solution.
The native Windows backup tool has remained largely unchanged across Windows versions, whereas a third-party backup program is often the better choice due to its continuous optimization, updating, and upgrading, which ensures a seamless, secure, and reliable backup process.
- In Windows 7, the default Windows backup program is "Backup and Restore".
- In Windows 8, the default Windows backup program is "File History" which allows users to automatically back up their personal files to an external drive or network location, ensuring that their files are safe and can be easily recovered in case of a system failure or data loss.
- In Windows 10, Microsoft kept both File History and Backup and Restore (Windows 7) to allow users to choose their preferred backup method.
Qiling Backup is the go-to third-party backup application for PC users, offering the most cost-effective yet powerful Windows backup and recovery solution. Notably, 99% of its backup options are free, making it an attractive choice for those looking for a reliable and budget-friendly backup solution.
How Does Windows Backup Work?
To set up a backup task, start by creating a full backup, which serves as the base for any subsequent backup tasks on your PC.
The default Windows backup plans have limited configuration options, whereas the Qiling free backup software offers a broader range of customization options to select what items to back up.
| Backup Configurations | File History | Backup and Restore | Qiling Backup |
|---|---|---|---|
| Hard Drive or Partition | No | Yes | Yes |
| Operating System | No | Yes | Yes |
| Files and Folders | Yes | Yes | Yes |
| Outlook/Exchange Mail | No | No | Yes |
| Compress Backup Image | No | No | Yes |
| Encrypt Backup Image | No | No | Yes |
| Backup Automation | No | No | Yes |
How to Back Up Files and Folders Using File History
Windows File History is the primary backup strategy for Windows 10 computers, specifically designed for backing up files and folders such as saved games, downloads, favorites, pictures, and documents. Users can customize the backup by adding or removing folders, and it's recommended to exclude OneDrive folders as they are already synced to the cloud.
To make File History work, you must:
- To save backups, consider using an external hard drive, a USB flash drive, or an SD card. These portable storage options can store a significant amount of data, allowing you to keep your backups separate from your main device.
- Use additinal backup method to create a system backup image
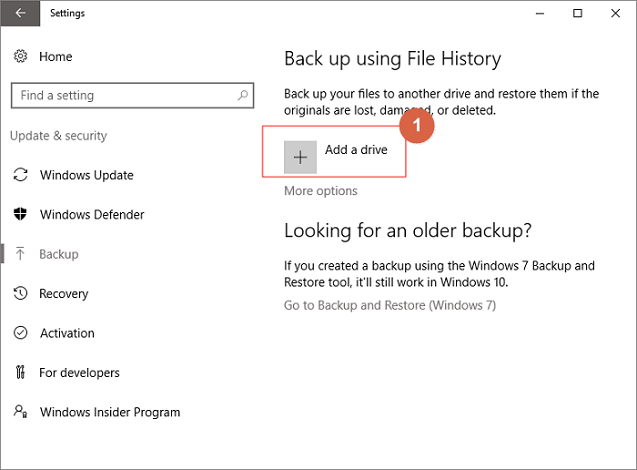
Step 1. To set up automatic backups, go to Start > Settings > Update & Security > Backup, then select Add a drive and choose an external drive or network location where your backups will be stored.
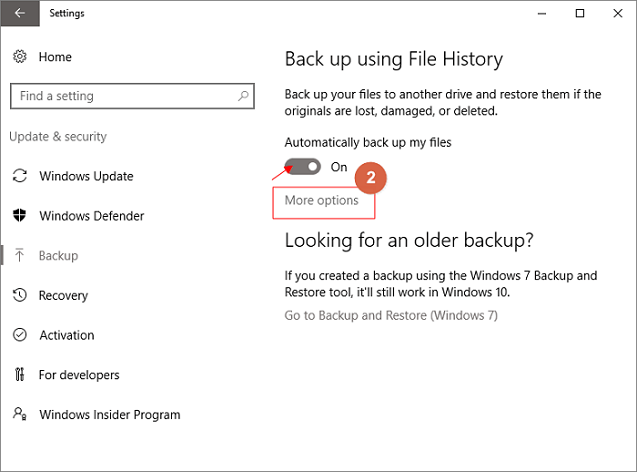
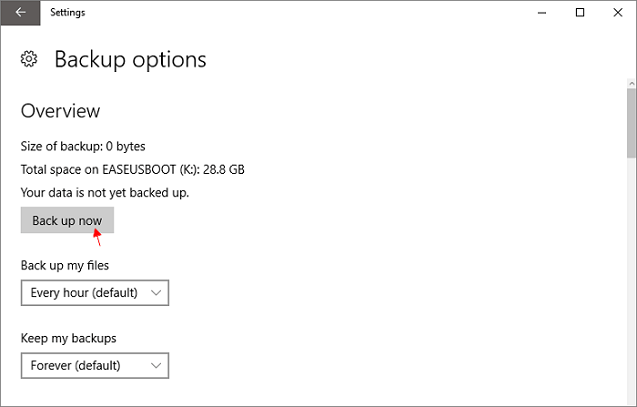
Step 2. After choosing a drive, the Automatically back up my files option will be enabled, and then select More Options to set up the cycle time and folder of backup settings.
Step 3. To set up automatic backups, choose the cycle time of how often you want to back up your files, and the retention period of how long you want to keep your files. This will ensure that your important files are safely backed up and easily recoverable in case of data loss or system failure.

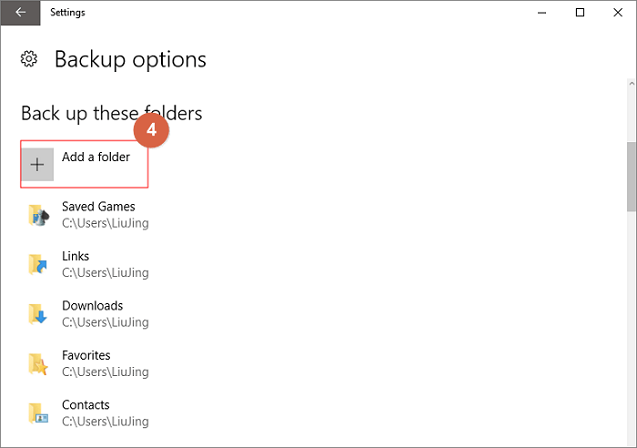
Step 4. The backup program lists the folders that are currently backed up, and also allows users to add new folders to the backup list by selecting the "Add a folder" option.
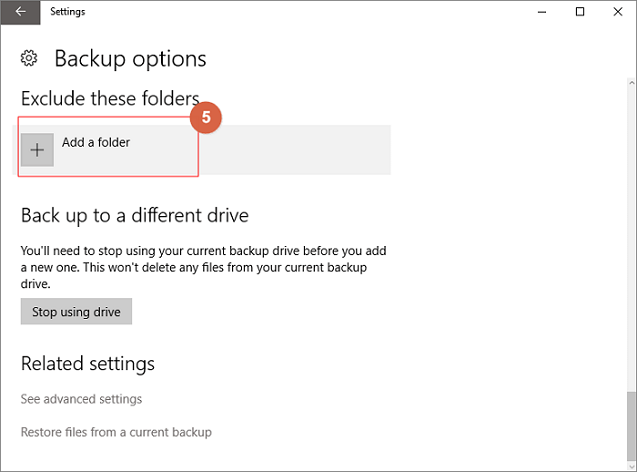
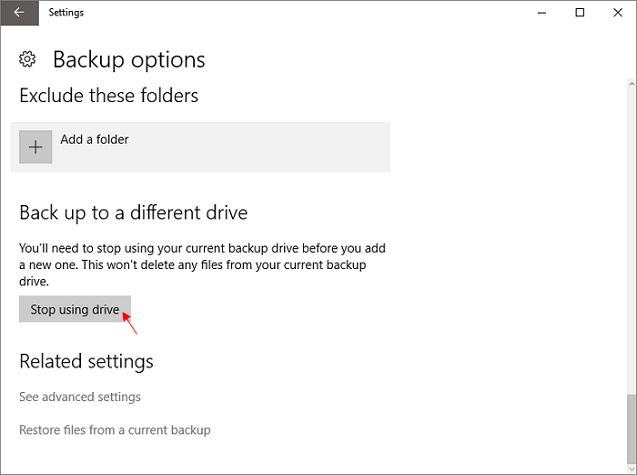
Step 5. At the same time, you can exclude some folders you don't want to backup by clicking "Add a folder" under the option "Exclude these folders".
Step 6. After the setup is completed, please select Back up now.
Step 7. To switch to a different backup drive, you need to stop using your current backup drive first. Then, you can select the option to stop using that drive, and after that, you can choose another drive to back up your files.
How to Back Up PC Using Windows 7/10 Backup and Restore
Compared to File History, the older Backup and Restore program can create more comprehensive backups, including the operating system and files/folders. However, this requires manual selection of what to back up, unlike File History which uses default Windows settings.
Windows 7 and Windows 10 Backup and Restore lets you:
- To create a backup of items on your PC, select the items you want to back up, such as a drive, selected files and folders, or the entire operating system. This will ensure that all your important data is safely stored in case of any system failures or hardware malfunctions.
- Save the backup images to a local hard disk, an external hard disk, or network drive, ensuring they are safely stored and easily accessible for future reference.
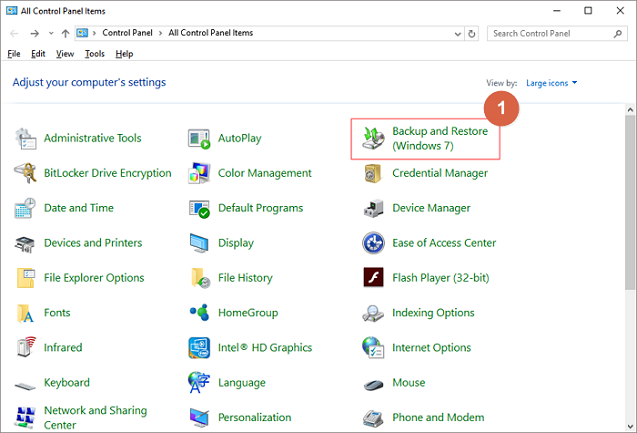
Step 1. In Windows 10, for example, open Control Panel and find the option "Backup and Restore (Windows 7)" and open it.
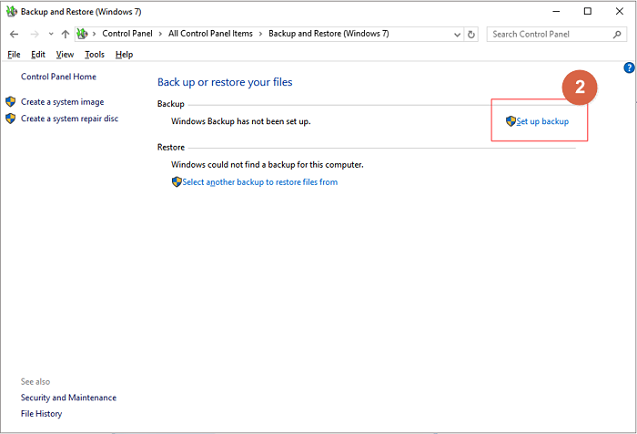
Step 2. To set up a backup file on your computer, click the Set up backup link if it's the first time you're doing this.
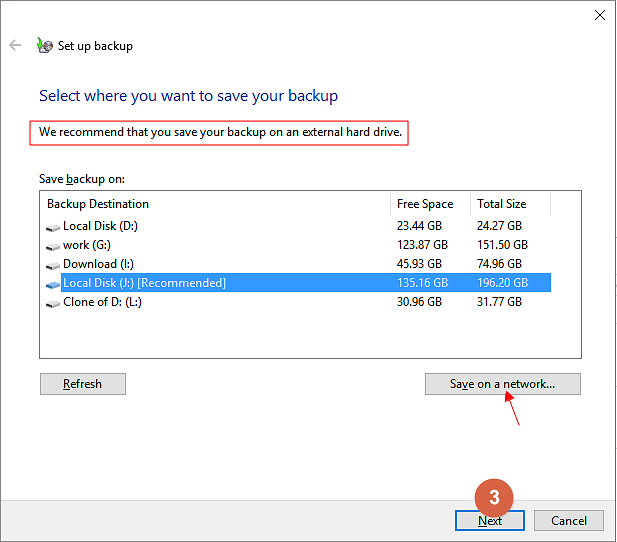
Step 3. Select the destination drive to save the backup, which can be a local drive, external drive, or network drive, and click "Next".
Step 4. You need to select what the backup will contain, choosing between "Let Windows choose (Recommended)" and "Let me choose".
- If you choose the default option "Let Windows choose", Windows Backup creates two backup types in one operation: a system image for disaster recovery and a backup of user data files in libraries, the desktop, and default Windows folders.
- The second option "Let me choose" allows you to back up individual folders, drives, or libraries, giving you more control over what you want to back up.
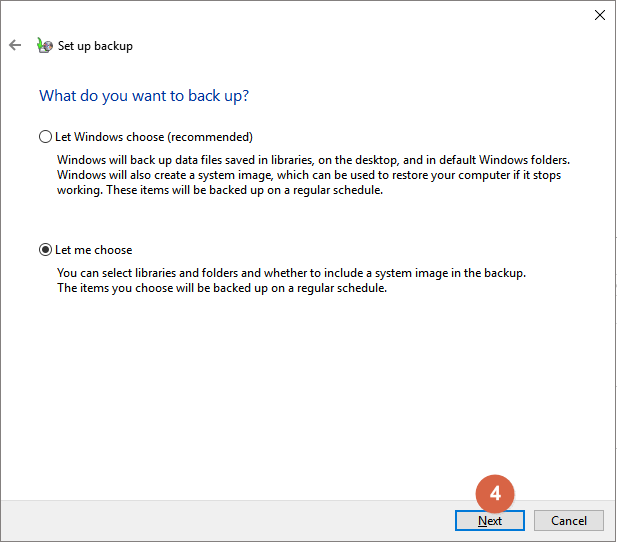
Let's continue with "Let me choose". You can choose all desired items in every drive and folder. It's recommended to tick the option "Include a system image of drives" so you can restore your computer if it stops working.

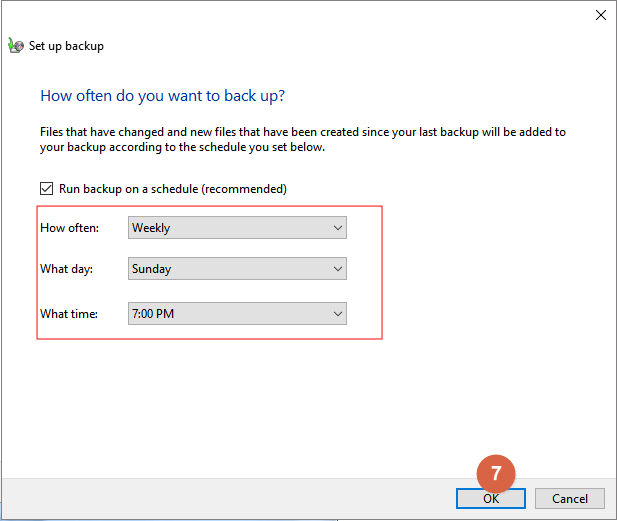
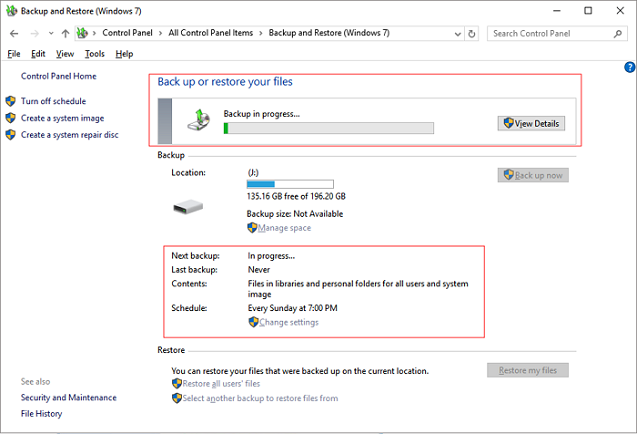
Step 5. You can review the backup task and have the option to select how the backup process will run. To configure your scheduled backups, use the "Change schedule" link, then click "Save settings and run backup" when done.
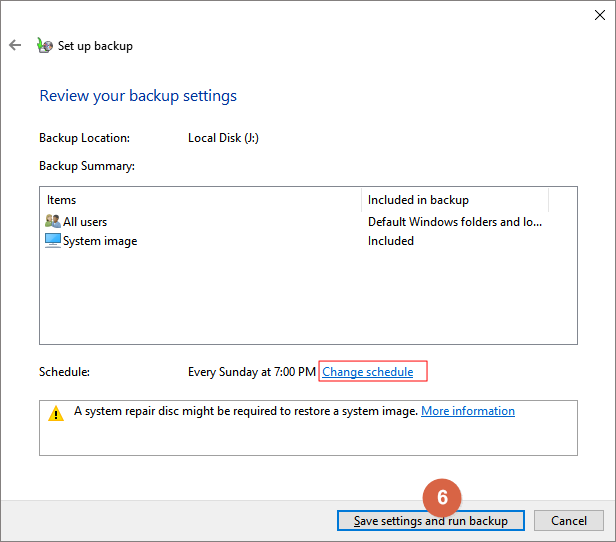
The "Change schedule" feature allows users to customize the frequency, day, and time of a backup task, enabling them to optimize its efficiency by adopting a recommended schedule.
Step 6. After completing the configurations, the window displays the backup in progress, with detailed information on the backup status below, including the next and last backup, contents, and schedule.
How to Back Up Everything Using Qiling Backup in Windows 10/8/7
Many users may find the steps to create a backup in File History or Backup and Restore overwhelming due to their length and complexity. In contrast, Qiling Backup prioritizes ease of use, making the process much simpler.
The third-party free backup software offers more backup jobs and customization options compared to native Windows backup tools, allowing users to tailor their backup files more effectively.
- To ensure comprehensive data protection, it's recommended to create three types of backups: a full backup, an incremental backup, and a differential backup. A full backup involves copying all data from the original source to a backup location, providing a complete snapshot of the data.
- Support one-click smart file backup without manually configuring the first backup
- Compress the accumulative backup images in a minimized size
- Encrypt the backup image with passwords
- This feature allows you to save backups of your data to a cloud drive, providing an additional layer of security and accessibility. By integrating with popular cloud services like Google Drive, Dropbox, and OneDrive, you can automatically store your backups in a remote location, ensuring they are safe from local hardware failures or data loss.
- To automatically backup files to an external hard drive and USB flash drive after being plugged in, you can use a combination of scripting and scheduling. First, create a script using a command-line tool like rsync or robocopy to copy files from a designated folder to the external hard drive and USB flash drive.
Step 1. Open Qiling Disk Master and select "File backup" as the backup mode in the "Backup and recovery" page.
Step 2. Select the files to backup and select the backup destination.

To back up specific files, browse the left pane to select the desired files, then click "Browse" to choose a destination for the backup.
You should save the backup file in a separate storage device or drive to prevent it from getting corrupted or destroyed.

Step 3. Create a backup plan to automatically back up selected files.
To create a flexible and automatic backup plan, click "Schedule: Off".
To set the automatic backup schedule, select the desired frequency (daily, weekly, or monthly) and click "Save" to confirm the changes.

And the Image-A reserve strategy will help you keep the backup image in accordance with the image retention rule, ensuring that the backup image is maintained as required.
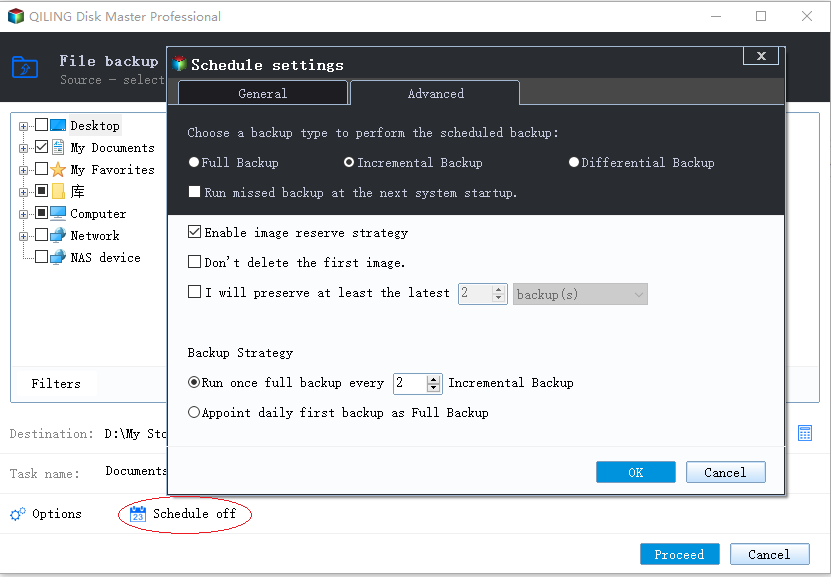
You can also click "Backup options" at the left bottom to set more advanced parameters for your plan.

Step 4. Click "Proceed" to execute your operation.
Related Articles
- Create System Image on USB Drive in Windows 10/8/7
- Deploy Windows 10 with Best Windows 10 Deployment Tool
- How to Clone C Drive to SSD in Windows 10
- How to Backup Windows 10 with [1] Qiling Backup and [2] File History
- Learn How to Make Full Backups with 3 Windows 10 Backup Options
- Moving Server to Cloud, What To Consider and How to Do It [2022 Complete Guide]
Are you looking for a complete and safe guide that can insist you moving Server to Cloud without losing any data? This page will give you a full guide on what you need to consider and how to move Server to Cloud with detailed instructional steps.