How to Automatically Backup Files to An External Hard Drive in 3 Ways
To prevent data loss from a severe system crash, hardware failure, or virus attack, it's best to create a backup of your computer data on an external hard drive. This is the most recommended way to ensure your data is safe.
Here are 3 backup tools to protect your files from various disasters effectively:
- #Tool 1. Windows Backup Software - Easiest
- #Tool 2. Windows Backup and Restore
- #Tool 3. Windows File History
Here, you may pick up backup software as your first choice to protect your data with ease, as it's reliable and easy to use.
Which to Choose? Qiling Backup, Backup and Restore, File History
Choosing a backup tool can be confusing, with options like Qiling Disk Master, Windows Backup and Restore, and File History. To help with the decision, a brief comparison table has been provided, outlining the key features and differences between each tool, allowing users to select the one that best suits their needs.
| QiLing Disk Master | Windows Backup and Restore | File History |
|---|---|---|
| Back up files, folders, hard drive partition, and OS. | Back up files, folders, hard drive partition, and OS. | Back up files and folders under C:/ user folder. |
| Support Windows 10/8/7, Windows XP and Vista | Support Windows 10/7 | Support Windows 8/10 |
| Easy | Complex | Complex |
For Windows beginners or those seeking an easy way to automate file backups to an external hard drive, Qiling Disk Master is definitely worth considering.
How to Automatically Backup Files to External Hard Drive - 3 Tools
To automatically back up files to an external hard drive in Windows 10, 8, or 7, you can use the built-in Backup and Restore (Windows 7) or File History (Windows 8/10) feature. For Windows 7, go to Control Panel > System and Security > Backup and Restore, then click "Set up backup" to select the external drive and choose what to back up. For Windows 8/10, go to Settings > Update & Security > Backup, then click "Add a drive" to select the external drive and choose what to back up.
#Tool 1. Use Windows Backup Software
To automatically back up your computer data to an external hard drive, consider using a reliable Windows backup software. A third-party option like Qiling Disk Master can simplify the process for you.
Pros: The software offers multiple file backup features, has a fast and small image size, and is portable, making it a convenient and efficient tool for users.
Cons: Not 100% free.
What you can back up with Qiling Disk Master software:
- To back up your hard drive partition, you can copy the data to an internal or external hard drive or solid-state drive (HDD/SSD), or save it to a cloud drive for remote storage. This ensures your files are safely stored and can be easily restored in case of a system failure or data loss.
- To back up specific files, you can copy them to an internal or external hard drive (HDD) or solid state drive (SSD), or upload them to a cloud drive for safe storage. This way, you can ensure that important files are protected in case of a system failure, data loss, or other unforeseen events.
- Backing up the Windows operating system involves saving its data to an internal or external hard drive or solid-state drive, or uploading it to a cloud drive for safekeeping. This ensures that in case of a system failure, data loss, or hardware malfunction, the user can easily restore their OS to its previous state.
Qiling Disk Master software allows Windows users to easily back up their files to a desired device. It offers two options to automatically backup files to an external hard drive, making it a convenient solution for users.
#Option 1. Automatically Backup Files to External Hard Drive by Daily, Weekly, or Monthly
Preparations:- Connect your external hard drive to your computer.
- Download Qiling Disk Master.
Step 1. Launch Qiling Disk Master software and choose the File backup option on the main window.
Step 2. First, select the files or folders you want to backup, and then choose the external hard drive as the destination for the backup.
You can enter "Plan name" and "Description" for specifying your file backup.
 IMPORTANT NOTE:
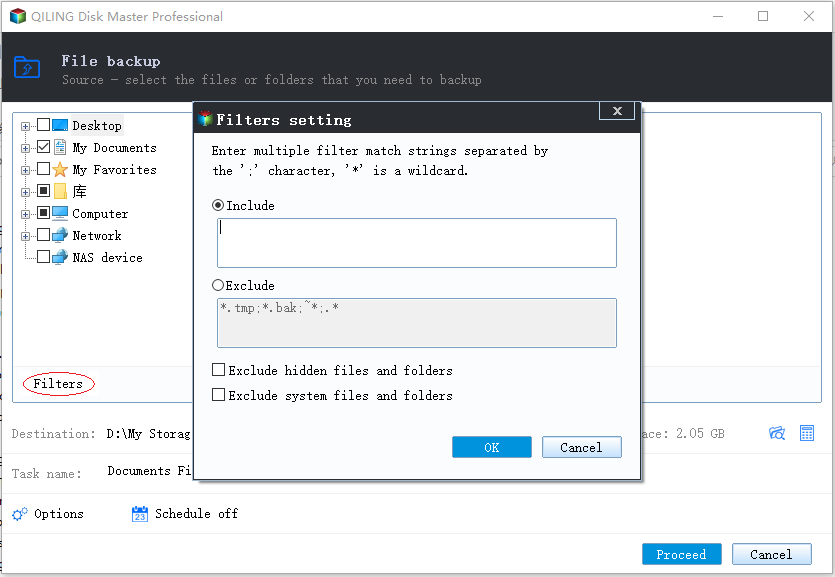
 Here, multiple types of files including Documents Files, E-mail, Financial Files, Music Files, Picture Files, and Video Files, etc can be selected for backup. You can click "Filter" to specify certain types of files to backup.
The software allows for advanced backup plans in the "Options" section, where users can compress the backup image, encrypt the backup for privacy protection, and enable a sector-by-sector backup.

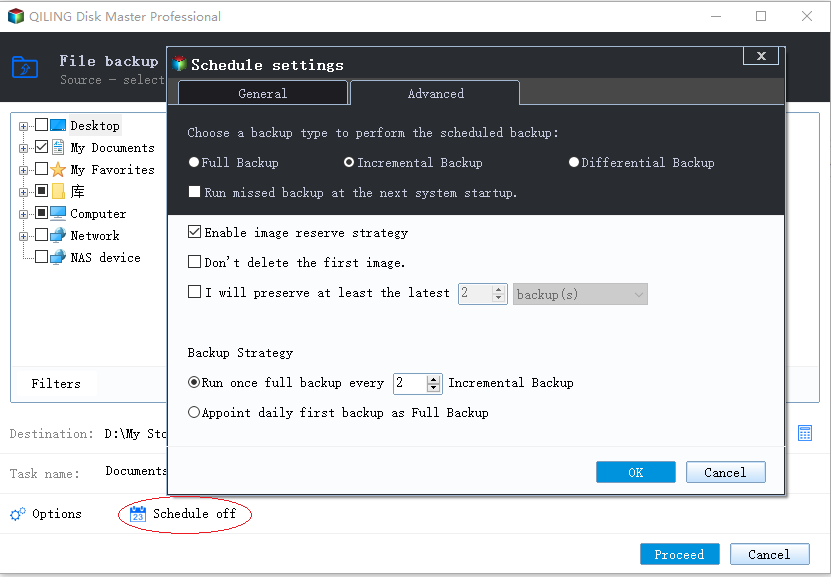
Step 3. To schedule a backup, click on the "Schedule" option, which opens the Backup Scheme window. Here, you can create a plan to backup files at a later time, on a daily, weekly, or monthly basis, or in response to a specific event.

The schedule is to create an automatic backup plan, which is not a prerequisite for backup.
The "Advanced > Enable image reserve strategy" feature allows you to efficiently manage growing backup images by preserving them in a setup time or quantity, making the backup process more economical.
Step 4. Click "Proceed" to back up folders or files to the external hard drive.
#Option 2. Automatically Back Up Files to External Hard Drive When Plugged In
This smart backup program allows you to automatically backup to a USB drive when it is plugged in.
You can also do this to your external hard drive:
Preparations:- Connect your USB to your computer
- Download Qiling Disk Master.
Step 1. To set up Qiling Disk Master to automatically copy files from a USB drive, launch the software and select the "File backup" option from the window. This will enable the software to automatically copy files from the USB drive when it is plugged in.
Step 2. Decide on a backup location, note the schedule, and initiate a backup plan by setting it to start upon a specific event.
The backup is to be automatically executed in the event of a system failure or crash, data corruption, or any other unforeseen circumstance that may result in data loss or system downtime. This ensures that critical data and system configurations are preserved and can be quickly restored in the event of an emergency, minimizing the impact on business operations and user productivity.
- System startup - Backup runs automatically when the system starts up.
- System shutdown - Backup runs automatically when the system is shut down.
- User logon - Backup runs automatically when Windows logs in.
- User logoff - Backup runs automatically when Windows logs off.
- USB device plugged in - Automatic backups are triggered when the USB device is inserted, assuming it's been set as the backup destination.
Step 3. To trigger the backup or copying task, plug in the USB device and click "OK" on the warning message that appears. Note that the task will only be executed on the exact device used to create the task, not on any other device.
Step 4. After making all the desired changes, save them and re-plug or reconnect your USB drive. Once your computer recognizes the drive, the automatic copying and backup process will start.
To create a new automatic backup plan, the previous backup image saved at the last time is required, or else the backup software won't work properly even if it detects the same USB device.
Qiling Disk Master automatically runs backups to a connected backup drive according to a user-set schedule, and allows for changes to be made to previous settings at any time.
#Tool 2. Use Windows Backup and Restore
Windows Backup and Restore is a native tool for backing up and restoring files. It allows users to manually set up backup plans, including system image backups to external hard drives, based on a fixed time interval.
Pros: Free, fast, and portable.
Cons: Huge image size, nearly the same as the source files.
See what you can backup with Windows Backup & Restore:
- Back up files to an internal or external hard drive.
- Back up partition to an internal or external hard drive.
- Back up Windows system to internal or external HDD/SSD.
Tutorial: How to Set Up Automatic Backup Plan to Back Up Files to External Hard Drive
Note This operation requires constant connection of the external hard drive to the computer, which may expose the backup image to risks of deletion, infection by viruses, or false operations.
Step 1. Connect the external hard drive to your PC.
Step 2. Go to Settings > System and Security > Backup and Restore (Windows 7).
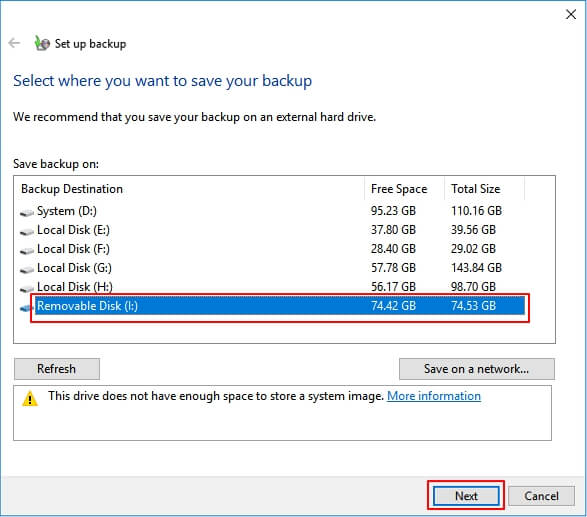
Step 3. Click "Change settings", select the external hard drive ("Removable Disk") to save a backup, and click "Next".
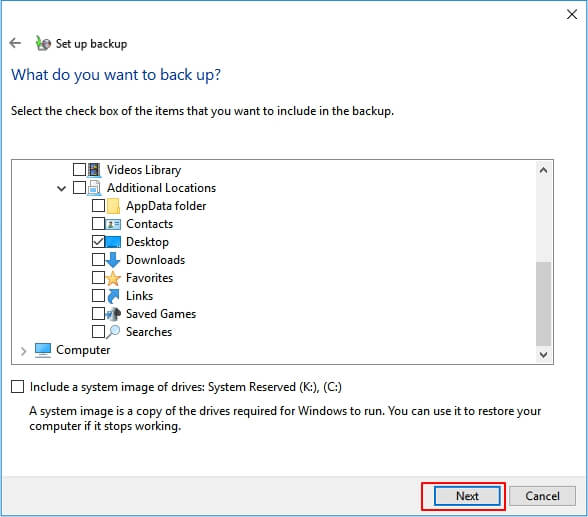
Step 4. Then click "Let me choose" and "Next" to specify files that you need to back up. Click "Next".
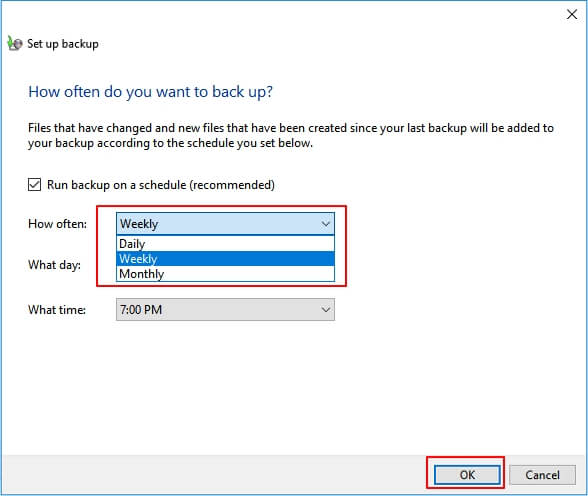
Step 5. Click "Change schedule", set to run backup on a schedule by daily, weekly, or monthly, and click "OK".
Step 6. Click "Set settings and run backup".
Wait patiently for Windows Backup and Restore to finish the process.
#Tool 3. Use Windows File History
Windows File History is a built-in tool that allows you to create an automatic backup plan of specific files on computers, similar to Windows Backup and Restore.
Pros: Free, and fast.
Cons: Huge image size, can't back up non-system drive files.
See what you can backup with Windows File History:
- Back up Desktop files.
- Back up Documents, Pictures, Music, Downloads.
- Back up Once Drive in the user account.
Tutorial: How to Automatically Back Up Files to Your External Hard Drive via File History
To enable File History to automatically back up your computer data to your external hard drive, always keep your external hard drive connected to your PC. This will allow File History to run continuously and keep your data backed up.
Step 1. Connect your external hard drive to PC.
Step 2. Open Control Panel, select "File History".
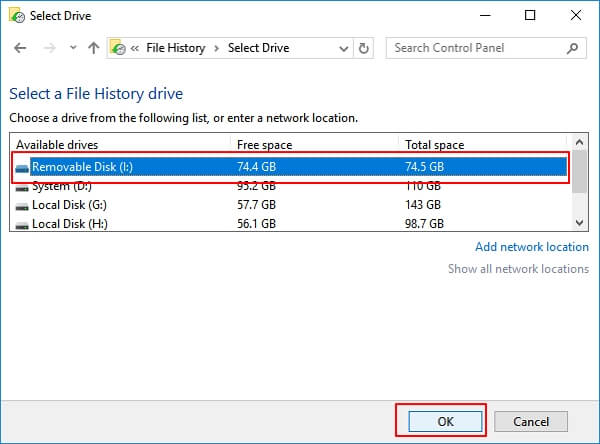
Step 3. Click "Select drive" on the File History window.
Step 4. Select your external hard drive "Removable disk" and click "OK" to continue.
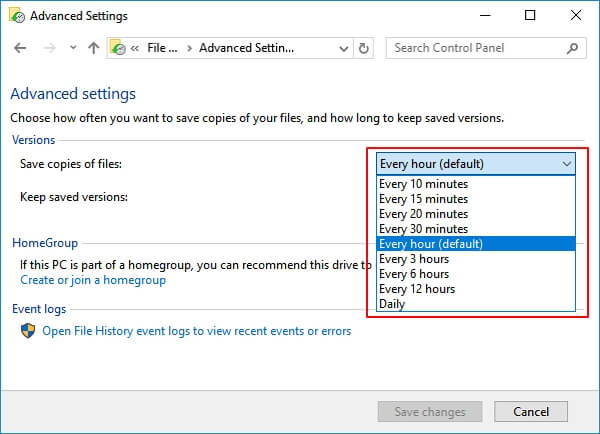
Step 5. Click "Advanced Settings", you can set how often to save copies of your files by minutes, hours, or daily.
Step 6. Click "Run now".
File History will automatically back up all folders under C:/Users/your username to your external hard drive.
It's Your Turn. Take Steps to Automatically Back Up Your Files Now
To protect your personal data on a Windows PC, it's smart to automatically backup files to an external hard drive, especially on Windows 10/8/7. This simple strategy ensures your computer data is safe and secure in case of any unexpected events.
We've collected 3 tools to help you back up your files, and Qiling Disk Master stands out with its schedule backup feature, making it the easiest and most efficient solution. Regardless of which tool you choose, take action now to protect your valuable files.
Related Articles
- Hard Disk Backup in Windows 10/8/7 [Beginners' Guide]
- Partition Backup|How to Backup Partition with Windows Partition Backup Software
- Backup Computer to USB Flash Drive in Windows 10/8/7
- How to Ghost Windows 10 64-bit System and Applications Easily
- Upgrade Xbox One to Bigger Drive without Losing Game Files in 3 Steps
- Ghost Windows 7 Using Hard Drive Ghost Software
- Does Crucial Have Cloning Software?
Does Crucial have cloning software? Do you want to know the answer? This article will tell you whether Crucial SSD has cloning software and provide a cloning tool named Qiling Disk Copy to help you.