How to Password Protect Flash Drive Windows 10
PAGE CONTENT:
To safeguard a USB flash drive with a password, there are various tools available, such as the official SanDisk SecureAccess utility for SanDisk drives and WD Security software for Western Digital external hard drives. Alternatively, in Windows 10, you can use practical methods to encrypt, lock, or password protect a flash drive along with files and folders.
How to Password Protect Your Flash Drive with BitLocker
BitLocker is a Windows feature that encrypts local hard disks and removable drives, requiring a password or smart card PIN for access. If your USB flash drive is formatted with NTFS, FAT, FAT32, or exFAT, you can follow this guide to password-protect it and prevent unauthorized access.
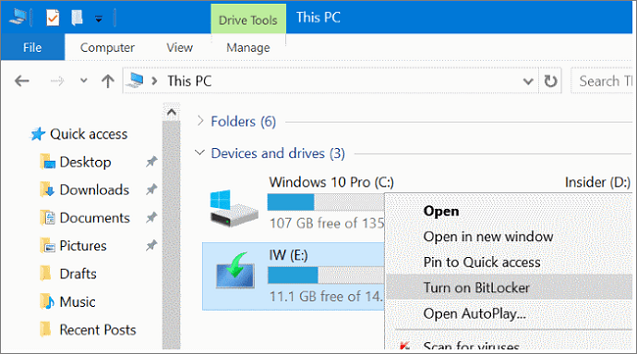
Step 1. To correctly connect your flash drive to a Windows 10 PC running Pro or Enterprise edition, ensure it appears in This PC in File Explorer and shows up as a removable drive (e.g. G:) with a drive letter.
Step 2. Right-click on your flash drive and you'll be presented with an option called Turn on BitLocker. Click it and continue.
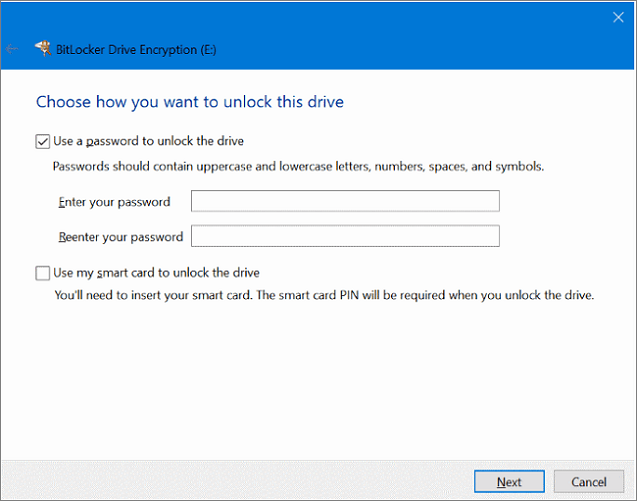
Step 3. On the popped up window, you can freely set a password to protect the drive. The password should contain uppercase and lowercase letters, numbers, spaces, and symbols to make it strong, and it's the only passage to unlock this BitLocker encrypted drive the next time. Click "Next".
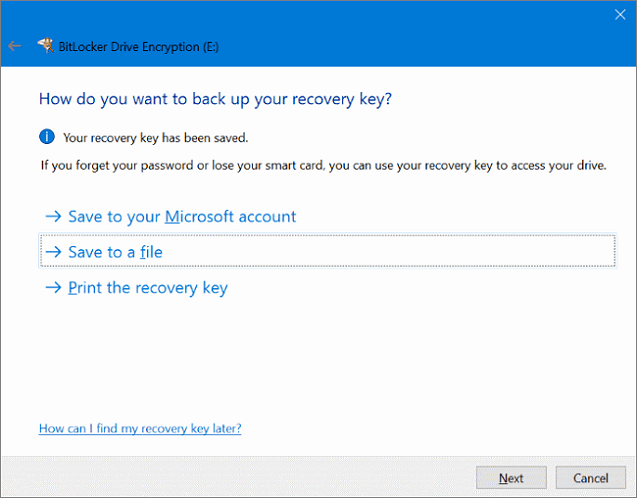
Step 4. You're given a suggestion to backup the recovery key with three options: save to your Microsoft account, save to a file and print the recovery key, and click "Next".
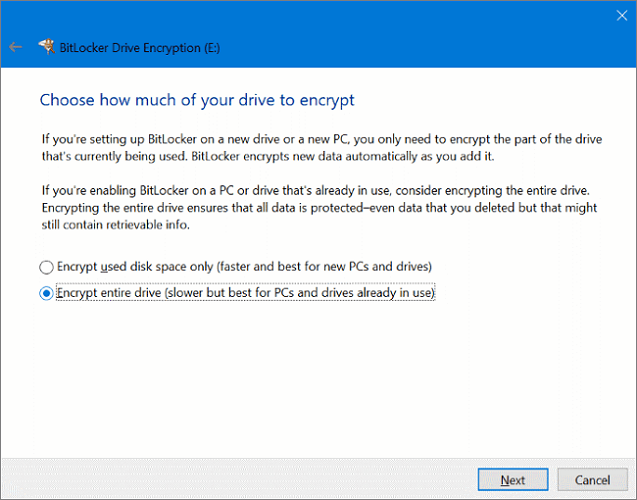
Step 5. The user should decide how much of their drive to encrypt, carefully reading the explanation of the two options "Encrypt used disk space only" and "Encrypt entire drive", and then click "Next".
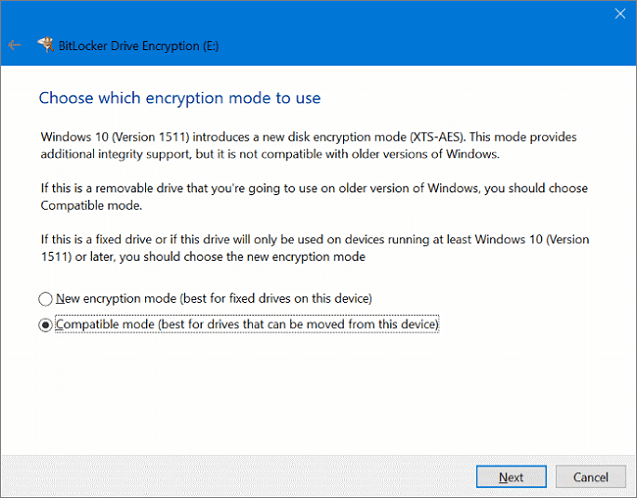
Step 6. You'll be then welcomed by two encryption modes: new encryption mode or compatible mode. Since you're trying to safeguard a flash drive, you'd better choose the compatible mode. Click Next.
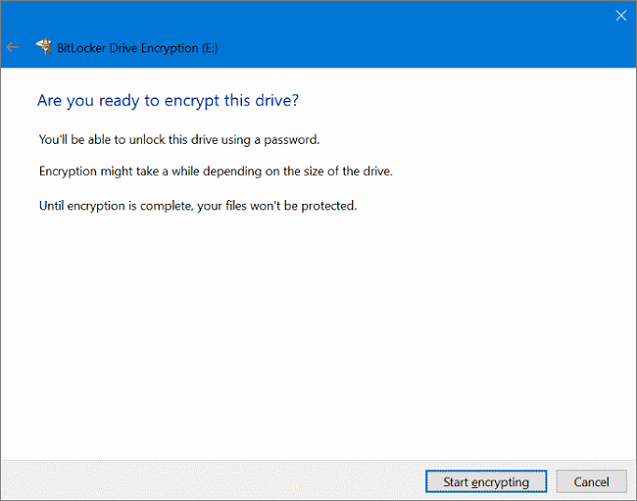
Step 7. With some warnings carefully bared in mind, click "Start Encrypting" to begin the encryption process. BitLocker will work immediately to encrypt your flash drive with a set password.
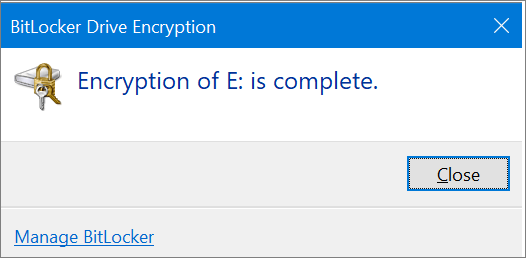
Step 8. If the prompt message Encryption of X: is complete, you're successfully done. You can disconnect your flash drive now.
How to Password Protect Files & Folders on Flash Drive with Software
Unlike BitLocker, which protects an entire flash drive with a password, you can also use a third-party file backup software with encryption to secure your USB drive's contents. This way, only those with the password can access the files.
If you're not a Windows 10 Pro or Enterprise user, you can still use Qiling Backup to encrypt your data for enhanced security. To do this, simply download the software on your Windows 10 PC and take a few minutes to set it up, allowing you to start encrypting your data.
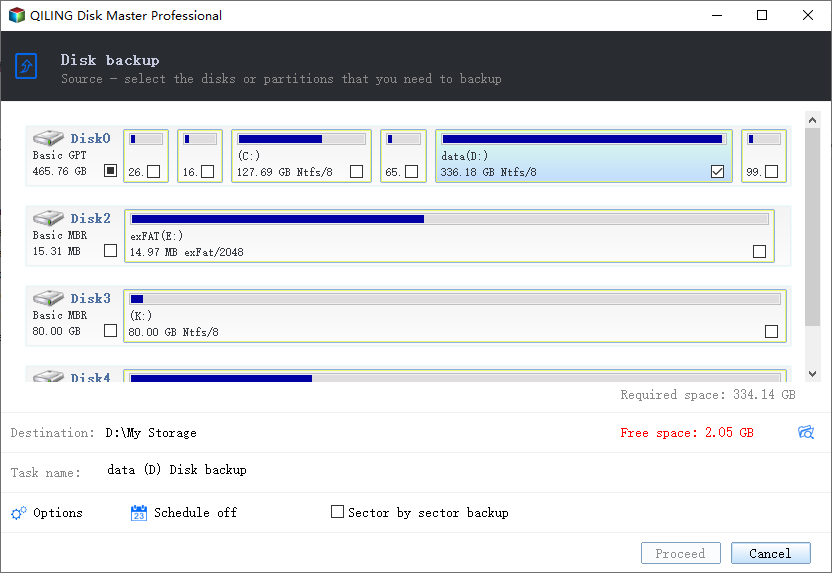
Step 1. Launch Qiling Backup. On the "Backup and recovery" page, you can choose to go with either "Disk/partition" or "File".
Disk/partition backup enables you to create a complete backup image of an entire flash drive's data, which can then be encrypted for added security.
File backup allows you to encrypt only the selected files or folders on the flash drive, and then encrypt them.
For full protection of the flash drive, you're suggested to choose Disk/partition backup.
Step 2. To initiate a backup, select the disk or partition you want to protect, choose a destination to store the backup image, and optionally add a "Plan name" or "Description" to the backup image for easy identification. This will allow you to easily locate and unlock the backup when needed.
Step 3. Click "Backup options" in the lower part to encrypt the backup image with a unique password.
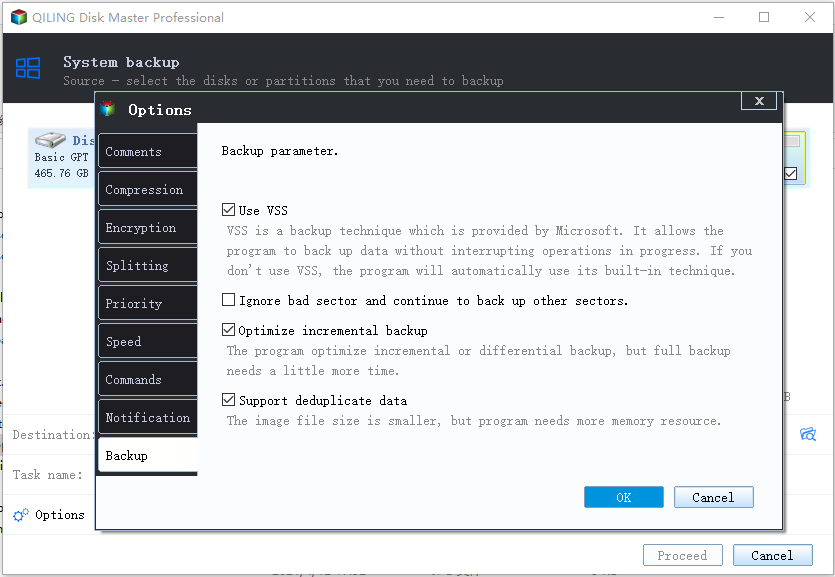
Step 4. To protect images with a password, click on the "Encryption option" and select the "Set Password" box, entering a password of 15 characters or less that uses the AES256 algorithm.
Note: Keep your password confidential and save it properly to avoid losing data. Note that Qiling is unable to decrypt encrypted images.
Step 5. After confirming the password, click "OK".
Step 6. Click "Proceed" to complete the backup task, by then you'll make the encrypted backup with a password in success.
After deleting your files from the flash drive, you can leave only the encrypted backup image, making it impossible for anyone to access or view your backups without your permission.
Related Articles
- How to Backup SD Card to Google Drive
- USB Bootable Software & Bootable USB Creation Tool
- Copy/Move Windows.old Folder to External Hard Drive
- Backup Files & Programs before Factory Reset Windows 10 PC
- [Free] How to Make a Full Backup of Windows 10/8/7
- How to Reimage a Lenovo Laptop Step by Step
Find your Lenovo laptop in bad condition and want to reimage it? This article provides you a clear guide.