How to Backup SD Card to Google Drive
The increasing popularity of cloud storage services has led to a shift in how people store their important files, opting for cloud drives over traditional methods like hard drives or portable storage devices. This shift is largely driven by the perceived safety and convenience of cloud storage, which offers a more secure and hassle-free way to store data, making it a preferred choice for many.
1. There are numerous cloud services available, many of which offer free versions, including Google Drive, Dropbox, and OneDrive.
2. To upload files from a local drive to the cloud, you'll need to have a cloud account and password, which are the only credentials required for this process.
3. You'll have the least chance of data being damaged due to hard drive error issues or computer won't boot error that frequently happens.
To make Google Drive an ideal backup place, you can benefit from it by using it as a cloud drive to backup your SD card. To do this, you can follow a detailed guide, such as backing up your SD card to Google Drive, which will allow you to store your files securely and access them from anywhere. This way, you can ensure that your important files are safe and can be easily retrieved in case of any data loss or device failure.
How to Backup SD card to Google Drive from Android
If you're using an SD card on your Android device and want to back it up on your phone, you can use either the Photo gallery app or the Google Drive app. The Photo gallery app allows you to backup your SD card content, while the Google Drive app enables you to upload and store your files and photos in the cloud.
Method 1. Backup Android SD Card with Google Drive app
Step 1. Download and install the Google Drive app on your Android.
Step 2. Open the app when it finished installing. Log in to your Google account.
Step 3. Tap on the + icon on the lower right corner of the panel. Then click "Upload".
Step 4. Select the files you want to backup on your SD card, and click Done after choosing a path from the Open button.
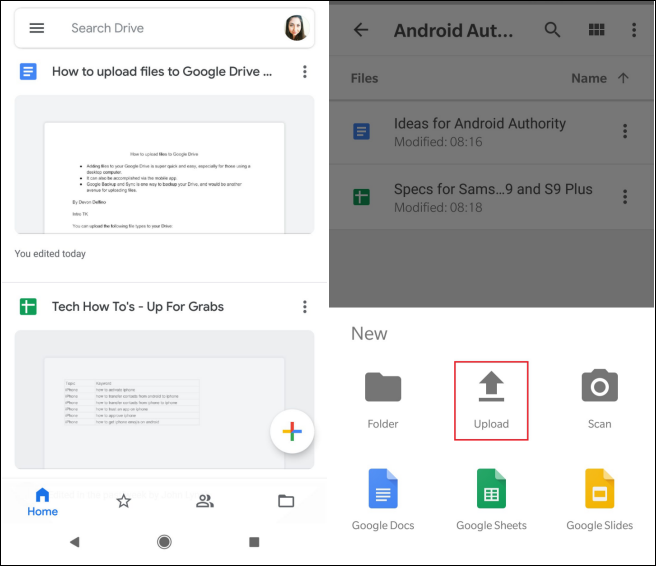
Google Drive will automatically start backing up the selected files to the Google Drive cloud immediately.
Method 2. Backup SD Card with Android Photo Gallery
If you only need to backup SD card photos on Android, you can also choose the Photo Gallery to backup, as an alternative option.
Step 1. To open the Android Photo Gallery, first locate the Photos app, then click on it to open. Next, click the "Send" or "Menu" button, which is usually represented by three vertical dots. If you are using a Samsung device, you can also click the SHARE button to continue.
Step 2. Click "Save to Drive" to upload selected pictures or videos to Google Drive.
Step 3. The backup progress will be displayed on your phone, waiting for all photos to be uploaded to Google Cloud.
One problem with uploading SD card files to Google Drive
You can't currently choose the SD card as a backup location in Google Photos, but you can set it as the default folder for your photos on your Android device. This way, all your photos will be stored on the SD card, and you can then use Google Photos to back them up and sync them. To do this, go to your device's Settings > Storage > SD card, and set it as the default storage location for your photos. This will save your photos to the SD card by default, and you can then use Google Photos to back them up and sync them.
It's not uncommon for Android users to face issues with cloud backups. If you're experiencing difficulties with cloud backup, you might consider exploring alternative backup methods. One option is to use a local backup solution, such as a USB drive or an external hard drive, to manually transfer your data to a safe location.
How to Backup SD Card to Google Drive on PC
You can also back up your SD card data from your computer by using software such as Qiling Backup, or by connecting your phone to your computer and using the built-in backup feature. This allows you to back up your data to a more stable storage device, such as an external hard drive or a cloud storage service like Google Drive. This method provides an additional layer of protection for your data, especially if you have a lot of important files on your SD card.
Method 1. Backup SD Card with Google Drive Folder
This method allows you to copy and paste SD card data directly to the Google Drive folder on your computer. To do this, follow the detailed steps which involve copying and pasting SD card data to the Google Drive folder on your computer.
Step 1. Download and install Backup and Sync on your computer.
Step 2. Connect your SD card to your computer.
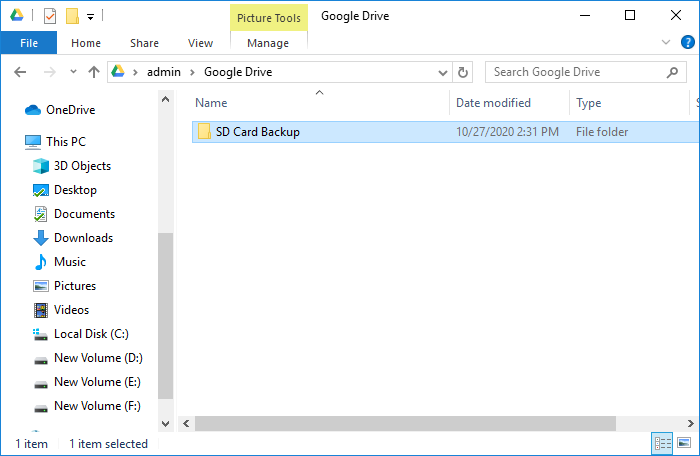
Step 3. Navigate to the "Google Drive" folder.
Step 4. Copy and paste the data you want to backup from your SD card to the "Google Drive" folder.
To create a new folder in Google Drive to store backup data, simply navigate to the Google Drive interface, click on the "New" button, select "Folder" from the dropdown menu, and give the folder a name. Once created, the data will be automatically synchronized to Google Drive, ensuring it's safely stored and accessible from anywhere.
Method 2. Backup SD Card with Backup and Sync
To change the settings in Backup and Sync to back up your SD card, open the software on your computer, click on the three vertical dots on the top right corner, and select "Settings." In the Settings window, scroll down to the "Backup" section and click on the "Add a folder" button, then navigate to the folder on your SD card that you want to back up. You can choose the type of files to back up and the frequency of the backups, and select the storage location for the backed-up files.
Step 1. Download and install Backup and Sync on your computer.
Step 2. Connect your SD card to the computer.
Step 3. Right-click the software icon and go to Settings > Preferences.
Step 4. Under the "My Computer" tab, find and click USB Devices & SD Cards at the bottom of the window.
Step 5. Choose the SD card you want to backup and click OK to confirm.

Method 3. Backup Data on SD Card with Third-Party Software
You can use Qiling cloud backup software to backup your Android SD card to the cloud, including Google Drive, Dropbox, and OneDrive.
If you're experiencing issues with backing up and syncing SD card data to Google Drive on your Android device, consider resolving the problem on a PC using Qiling Backup, which can assist you in a safe, quick, and easy manner.
Connect your SD card to your PC first and follow the guidelines below to continue the backup process.
Step 1. Launch and run Qiling Backup on your computer. Click "File backup" on the main window.
Step 2. Choose the specific files that you want to backup to your cloud account - Google Drive/OneDrive or Dropbox.

Select the cloud storage device you want to use as the destination, then click the "+" icon to access it.

Step 3. Select your cloud storage - Google Drive/OneDrive or Dropbox - and sign in to allow Qiling Backup access to your account for saving backup images.
Step 4. Allow Qiling Backup to access your files and save backup images to Cloud drive. Click "Proceed" to start backing up your files.
Wait for the process to finish, then all your videos will be saved to your cloud storage in a compressed format, taking up a small amount of space.
Related Articles
- Top 3 Best Cloning Software for HDD and SSD
- How to Run/Boot Windows 10 from USB Drive
- How to Password Protect Flash Drive Windows 10
- How Can I Backup Files in Safe Mode
- How to Clone a Hard Drive on Windows & Mac [2021]
- Top 2 Ways to Transfer OS from Laptop to Desktop🔥
You can transfer an operating system from a laptop to a desktop in two ways: by backing up the entire laptop and restoring it, or by creating a clone and booting it on the desktop. A detailed tutorial on how to do this using a professional backup and cloning tool can be found in the post.