How to Upgrade Acer Aspire Laptop to SSD
Why Do You Need to Upgrade to SSD
You can upgrade your Acer Aspire laptop's hard drive to a new SSD. To do this, you'll need to purchase a compatible SSD and a USB enclosure or a cloning software. You can then clone your existing hard drive to the new SSD, or you can reinstall your operating system and software on the new SSD. It's recommended to back up your important files and data before proceeding with the upgrade. If you're not comfortable with the process, you can also consider seeking professional help. Would you like me to provide more detailed instructions?
Most Acer laptops, especially Aspire series, come with a Hard Disk Drive (HDD) by default, but upgrading to a Solid State Drive (SSD) can greatly improve performance, especially for older models that may lag or freeze.
Upgrading the Acer Aspire laptop to a solid-state drive (SSD) can significantly improve its performance. Compared to traditional hard disk drives (HDD), SSDs offer faster reading and writing speeds, lower power consumption, noise-free operation, shock resistance, and a more portable size. Many users, including Acer laptop users, upgrade their HDD to an SSD or swap to a larger SSD to enhance their computer's running performance. To make this process easy and correct, follow the instructions outlined in this article, which will guide you through the upgrade process.
The Tools You Need
- To upgrade your laptop's storage, you'll need a compatible SSD with free space to copy all your data from the existing HDD. Be sure to check the compatibility of the new SSD with your Acer laptop by contacting their support.
- A hard drive cloning tool.
- An 2.5" SATA III enclosure and a USB 3.0/2.0.
- To connect the new SSD to your Acer laptop, you will need a SATA cable. This cable will allow you to link the SSD to the laptop's motherboard, enabling data transfer and storage.
- A small Phillips #0/#1 head screwdriver is used to remove the hard drive (HDD) and install a solid-state drive (SSD) in a computer. This screwdriver is specifically designed for the type of screws used in this process, making it an essential tool for upgrading a computer's storage.
How to Upgrade Acer Aspire Laptop to the SSD
The process of replacing an old internal hard drive with a new SSD can be divided into two parts: first, clone the files from the old HDD to the new SSD using a data backup and clone tool like Qiling Backup, ensuring a safe and complete transfer of data; and second, physically replace the internal hard drive with the new SSD.
Part 1: Clone Acer Laptop HDD to SSD
To get started, install the SSD into a 2.5" SATA hard drive enclosure, then plug the enclosure into your laptop via USB 3.0/2.0 - using USB 3.0 will significantly outpace USB 2.0.
Step 1. Download and launch Qiling Backup on your PC. Click "Disk/Partition" to start.
Step 2. Choose the hard drive you want to back up, selecting one or more partitions from one or multiple disks as needed.
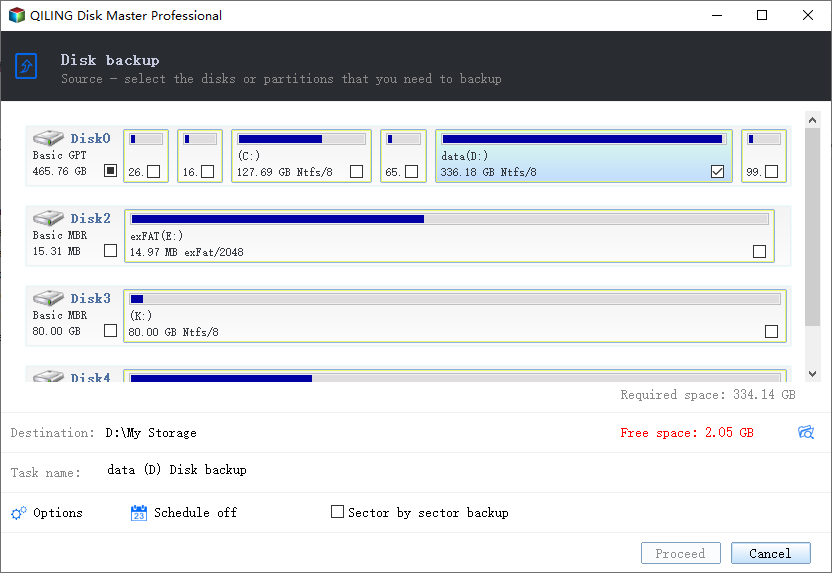
Step 3. To start the backup process, click the folder icon behind "Destination" to select the SSD partition as the storage location for the backup image. Then, enter a name and description for your disk and partition backup, which can be customized as needed. The name and description are automatically generated based on the backup time and type, but can be edited to provide a clear and concise label for the backup.

Tips:
With "Sector by sector backup" enabled, all data sectors and blank ones will be backed up, which can be helpful in case of file system errors. However, this mode can slow down the backup speed and result in a larger image compared to a normal backup.
A clear and concise plan name, along with a detailed description, will help you identify and understand the plan's purpose and objectives, making it easier to distinguish from other plans and ensuring you have a solid grasp of what the plan entails.
Advanced backup settings allow for a flexible and automatic backup plan, providing users with more control over their backup process.
"The schedule" is to create an automatic backup plan.
Backup options can be edited by accessing advanced parameters. The image-reserve strategy involves reserving limited images based on the image retention rule.
Step 4. Click "Proceed" to start to back up your HDD to the SSD.
Tip
You can use Qiling Backup system's clone feature to migrate your OS to an SSD without losing any data or experiencing startup issues.
Part 2: Replace the HDD with SSD
Step 1. Shut down your laptop, unplug the power, remove the battery and uninstall the old hard drive.
Step 2. Remove SSD from the enclosure and install it into the laptop with the SATA cable.
Step 3. Reinstall battery, plug-in power and restart the laptop.
Related Articles
- Create System Image on USB Drive in Windows 10/8/7
- How to Backup Your Computer - Cloud Storage or Backup Software?
- Run Disk Clone Windows 10 with Qiling Backup
- Best Free Norton Ghost Alternative for Windows 10
- How to Automatically Backup Files to An External Hard Drive in 3 Ways
- Does Backup Protect Against Ransomware? Why Ask
A computer backup can protect against ransomware by serving as a data prevention measure for disasters, including malware attacks, allowing a reliable backup service provider to safeguard against such threats.