Windows 10 Incremental Backup | Wise Backup Method
Windows 10 incremental backup is a space-saving method of backing up your computer, where only the changes made since the last backup are saved, rather than the entire system. This guide will walk you through the process of creating a Windows 10 incremental backup, covering what it is and how to set it up.
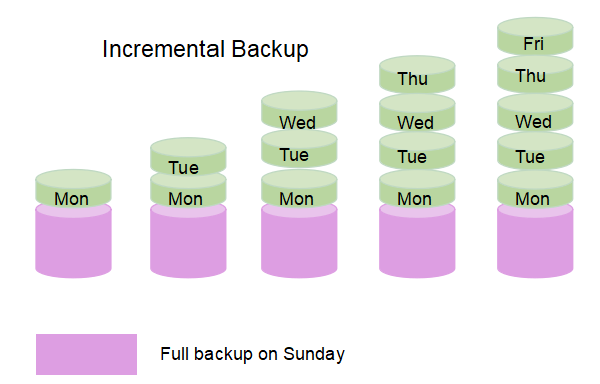
What Is An Incremental Backup?
An incremental backup saves only new or changed files since the last backup, making each subsequent backup smaller in size compared to a full backup that copies all files every time.
There are several advantages to using an incremental backup:
Smaller file sizes: Since only new or changed files are backed up, each subsequent backup will be smaller in size, which can save a significant amount of storage space, especially if you create regular backups.
Faster backups: Only new or changed files need to be copied during an incremental backup, making it faster than a full backup. This allows for quicker completion of the backup process.
Fewer data to transfer: If you're backing up your files to an online service, an incremental backup will use less bandwidth since there are fewer data to transfer.
Creating an incremental backup involves taking snapshots of your data at regular intervals, storing only the changes made since the last backup. This approach is more efficient than a full backup, as it only saves the new or modified files, reducing storage space and backup time.
Does Windows 10 Have A Built-in Incremental Backup Program?
On Windows 10, there are two built-in backup utilities: File History and Backup and Restore (Windows 7). While File History focuses on backing up different versions of files, Backup and Restore (Windows 7) assists users in creating system images. This allows users to have a comprehensive backup solution that covers both their files and system.
File History only backs up files from specific folders, including Documents, Music, Pictures, Videos, and Desktop, and OneDrive files available offline, but it does not create incremental backups.
*Information source:File History in Windows
How to Create Incremental Backups on Windows 10?
There is no built-In Windows 10, the incremental backup feature is not available, but you can use a third-party backup program like Qiling Backup, which is free and easy-to-use, to create a backup. Qiling Backup supports Windows 11/10/8.1/8/7.
Why Qiling?
Qiling, established in 2004, has focused on data security and recovery, then expanding into disk management. With 18 years of experience, the company has gained user recognition and positive reviews from sites like Softonic and Lifewire, which highly approved its backup software, Qiling Backup.
Why Qiling Backup?
Qiling Backup is the best choice for a backup utility due to several reasons. It offers a user-friendly interface, making it easy to navigate and use, even for those who are not tech-savvy. Additionally, it provides a high level of customization, allowing users to tailor their backup settings to their specific needs. Furthermore, Qiling Backup is reliable and efficient, ensuring that data is safely backed up and can be quickly restored in case of a system failure or data loss.
- Convenience: Qiling Backup has a user-friendly interface that makes it easy to use, even for those who are not tech-savvy. The on-screen wizard guides users through the setup process, ensuring a smooth and hassle-free experience.
- Speed: When backing up a computer, gigabytes of data processing are often involved. Qiling Backup can quickly process and complete the task in minutes, saving you a lot of time.
- Powerful: Qiling Backup provides comprehensive backup solutions, allowing users to backup files, systems, disks, and partitions, and also offers full control over backup plans and files, including scheduling, customization, incremental or differential backups, and excluding unwanted files.
- Free: Qiling Backup is completely free, allowing users to create and restore backup files without any cost or obligation to pay for additional features.
Qiling Backup also has a paid version with advanced functions added. If interested, check this link to see if the paid software is worth the cost.
The article compares the features of the free and home versions of Qiling Backup, allowing users to see the differences between the two.
Preparation:
Now that you know why we recommend Qiling Backup and what it can do, download the free version from the button and prepare a backup drive to save your backup files before creating an incremental backup.
To create an incremental backup on Windows 10 with Qiling Backup, follow these steps: First, download and install Qiling Backup on your computer. Next, launch the software and click on the "Backup" button to start the backup process.
Step 1. When you first use Qiling Backup, you can start by selecting the type of files you want to back up, such as pictures, videos, or documents, by clicking on the File backup option on the home screen.

Step 2. Select all the files, folders or directories you want to back up, following the paths to locate them.

Step 3.Choose a location with enough free space to store the backup, such as an external hard drive, network drive, or cloud storage service like Google Drive or Dropbox. Ensure the chosen location is reliable and accessible for future retrieval.

Step 4.Qiling Backup allows users to save backup files to various devices, including local hard drives, external USB drives, SD cards, network drives, and NAS drives, as well as a cloud drive, with cloud storage being recommended for its greater accessibility, flexibility, and safety.

Step 5.To set up an automatic and intelligent backup schedule for the next file backup task, navigate to the "Options" setting. Here, you can enable encryption for confidential file backups, compress the backup image size to save space, or customize a backup schedule to specify the start time for the next backup. This allows you to tailor your backup process to your specific needs and preferences.

Customize an advanced and automatic backup task here:

Step 6. Click "Proceed" to start the file backup process, which will display the completed backup files in a card style on the left area.

FAQs
1. Is Windows 10 file history incremental?
In Windows 10, File History automatically backs up copies of files from the Documents, Music, Pictures, Videos, and Desktop folders, as well as OneDrive files available offline, allowing users to add other files and folders to the backup plan. However, in Windows 11, this option is no longer available.
2. Is Windows Backup and Restore incremental?
Backup and Restore (Windows 7) can only create system images and system repair discs, making it suitable for creating system backups and protecting against sudden corruption.
Related Articles
- How to Backup Google Drive to External Hard Drive [4 Easy Ways]
- One-click System Clone to HDD/SSD
- Clone GPT Disk in Windows 10 - This Method Would Work!
- Top 10 Offline Backup Software Recommended in 2022
- What Is GPT Disk and How to Manage GPT Disk
A GPT disk uses the GUID partition table (GPT) disk partitioning system, which is an alternative to the traditional Master Boot Record (MBR) system. GPT disks are larger in size and can support more partitions than MBR disks. To create a GPT disk drive, you can use a tool like Disk Management in Windows or a bootable Linux live CD. - Qiling Partition Master Full Version Free Download with Serial Code/Key[New 2021]
Qiling Partition Master has been upgraded to version 5.5/5.0 and is now available for download with new features. You can obtain the full version with a serial code or key to easily manage partitions.