How to React to Windows 11/10/8/7 Defender Security Warning
In this post, we'll cover:
- 1. What's Windows Defender Security Warning?
- 2. How Did Windows Defender Security Warning Occur to You?
- 3. How to Remove Windows Defender Security Warning on Different Browsers
- 4. Double-Protection Tips: Use Antimalware Software and Backup Together
If you're getting a Windows Defender security warning popup message in Windows 11, 10, 8.1, or 7, don't panic! This is a common occurrence that can be safely resolved. The security warning is often caused by a specific issue with your antivirus/antimalware software or Windows backup utility, and can appear in mainstream browsers like Google Chrome, Firefox, Microsoft Edge, and Safari. To remove the warning, you can follow the steps outlined in this blog post, which will also provide you with practical tips on how to ensure 100% cyber security with both antivirus/antimalware software and Windows backup utility.
Qiling Backup has released a new backup security strategy that allows users to create a secure zone on a hard disk partition, protecting backup images from viruses and unauthorized access, combining with Windows Defender for a robust defense system.
What's Windows Defender Security Warning?
- Also Known As: Windows Defender - Security Warning technical support scam
- Type: Phishing/Scam
- Damage level: ★★☆☆☆
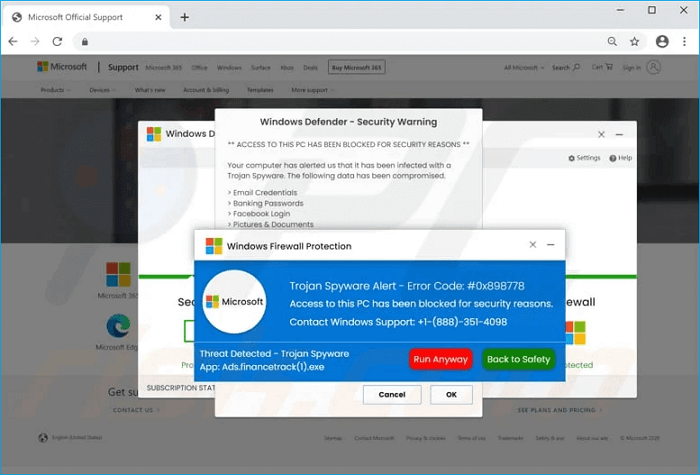
"Windows Defender - "Security Warning" malware is a type of scam that pops up on your screen while browsing, tricking users into contacting scammers by asking them to call a phone number or click on a link.
The involved Tech Support Scammer Phone Number can be:
- +1-888-351-4098
- +1-833-930-2284
- +1-866-849-1382
- +1-877-706-2794
- +1-877-591-6339
- +1-888-481-2681
You can get infected with this malware by visiting a suspicious website, clicking on a malicious link, or having adware on your computer. This malware is dangerous as it can lead to giving away personal or financial information to scammers. If you see a Windows Defender security warning, don't click on links or call phone numbers provided, instead exit the website or close the window.
If you suspect your computer has been infected with malware, run a full scan with a reliable antivirus software to remove it.
The best antivirus software for Windows 11 in 2022 includes top-rated options such as Norton, Kaspersky, and Avast, which provide robust protection against malware, ransomware, and other online threats. These security software solutions also offer additional features like password management, firewall protection, and secure backup capabilities, ensuring comprehensive protection for Windows 11 users.
Keeping your antivirus program running in the background at all times is crucial, as new malware, ransomware, and viruses are created every day. Additionally, it's a good idea to keep your Windows and antivirus software up to date to ensure you have the latest protection against emerging threats.
How Did "Windows Defender - Security Warning" Occur to You?
Visiting a suspicious website or clicking on a malicious link can trigger the Windows Defender security warning on your computer. Additionally, having adware on your device, which displays advertising content, can also cause this warning, especially if the adware is infected with malware.
- Symptoms Scammers often use fake error messages, system warnings, and pop-up errors to trick victims into believing their computer is infected or compromised, when in reality, it's just a hoax computer scan. These fake alerts are designed to create a sense of urgency and fear, leading the user to take unnecessary actions such as downloading malware or paying for fake technical support.
- Damage Phishing scams can result in loss of sensitive private information, monetary loss, identity theft, and possible malware infections.
- Victims Any device with a web browser, particularly Windows-based ones, is the most targeted by cyber threats.
How to Remove Windows Defender Security Warning Popups
To resolve the issue of unwanted popups, first run a malware scan on your computer using a free tool like Malwarebytes or HitmanPro to remove any malicious software that may be causing them.
After removing the malware, run a virus scan using a free virus scanner like Microsoft Security Essentials or AVG Free Antivirus to ensure your computer is clean.
To resolve the issue of popups on your browser, consider resetting your browser settings to their default values, which will remove any malicious extensions or toolbars causing the problem. You can follow the specific instructions below to reset different browsers.
- On Google Chrome
Step 1. 1. Open Chrome.
Step 2. Select "Settings" from the drop-down menu.
Step 3. Scroll to the bottom of the page and click on "Advanced".
Step 4. Click on "Restore settings to their original defaults" under the "Reset and clean up" section.
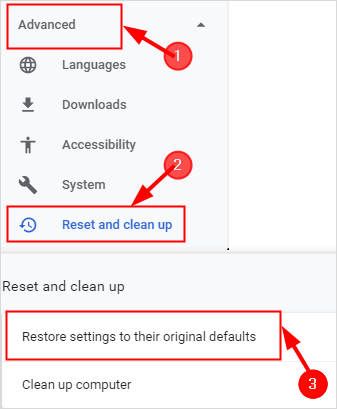
Step 5. A pop-up window will appear asking you to confirm the reset. Click on "Reset settings" to confirm the reset.
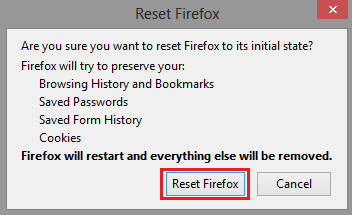
- On Firefox
Step 1. Open Firefox, click the menu button in the top-right corner of the screen and select "Settings".
Step 2. To reset Firefox, go to the "Home" tab, scroll down to the "Reset Firefox" section, click the "Reset Firefox" button, and confirm the message to reset.
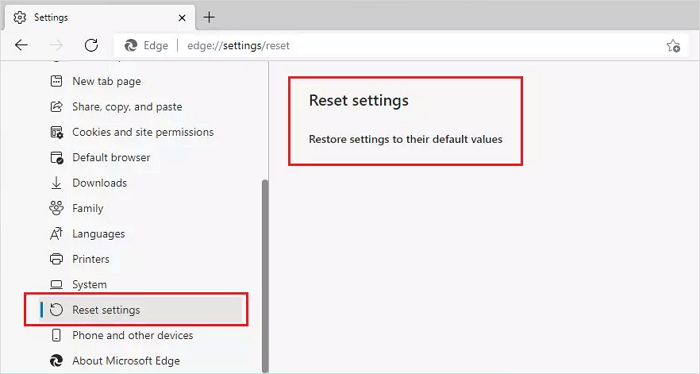
- On Microsoft Edge
Step 1. Open the Edge browser and click on the three dots in the top-right corner.
Step 2. Select "Settings" from the drop-down menu.
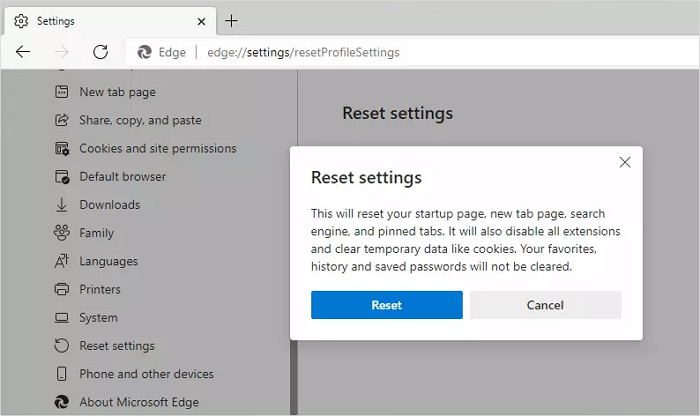
Step 3. Click on "Restore settings to their default values" under the "Reset settings" section.
Step 4. A pop-up window will appear asking if you're sure you want to reset Edge. Click on "Reset" again to confirm.
- On Safari
To reset Safari, the procedure varies across different versions, but a universal method exists through Terminal. This method allows you to reset the browser regardless of the version you're using.
Step 1. To open the Terminal app on a Mac, press the Command (⌘) and Space keys simultaneously to open Spotlight, type in "Terminal", and press enter. This will open a new Terminal window where you can execute commands and interact with the command line interface.
Step 2. 1. `cd` into the directory where the code is located. 2.
rm -Rf ~/Library/Caches/Metadata/Safari;
rm -Rf ~/Library/Caches/com.apple.Safari;
rm -Rf ~/Library/Caches/com.apple.WebKit.PluginProcess;
rm -Rf ~/Library/Preferences/Apple\ -\ Safari\ -\ Safari\ Extensions\ Gallery;
rm -Rf ~/Library/Preferences/com.apple.Safari.LSSharedFileList.plist;
rm -Rf ~/Library/Preferences/com.apple.Safari.RSS.plist;
rm -Rf ~/Library/Preferences/com.apple.Safari.plist;
rm -Rf ~/Library/Preferences/com.apple.WebFoundation.plist;
rm -Rf ~/Library/Preferences/com.apple.WebKit.PluginHost.plist;
rm -Rf ~/Library/Preferences/com.apple.WebKit.PluginProcess.plist;
rm -Rf ~/Library/PubSub/Database;
rm -Rf ~/Library/Safari/*;
rm -Rf ~/Library/Safari/Bookmarks.plist;
rm -Rf ~/Library/Saved\ Application\ State/com.apple.Safari.savedState;
Double-Protection Tips: Use Antimalware Software and Backup Together
Windows Defender is a built-Windows Defender is a built-in security tool in Windows that scans for malware and blocks threats to protect your computer. It also helps remove existing malware.
To keep your computer running safely, you can schedule scans or scan manually at any time, helping to identify and remove potential threats.
Windows Defender is not perfect and can't detect all threats, but it's a good first step in protecting your computer from malware. It's like a brave soldier defending against intrusions, while Qiling Backup is like a warrior saving people from the war.
Having both Windows Defender and Windows Backup enabled on your computer is crucial for protecting your device and its data. Windows Defender, the built-in antivirus software, safeguards your system from malware and other online threats, ensuring your computer runs smoothly and securely.
- 1. Windows Defender and Windows Backup are two tools that can help protect and recover your data. Windows Defender scans for and removes malware, while Windows Backup helps restore your data if it is lost or corrupted.
- 2. In case Windows Defender fails to resist virus infection, data backup can be the last hope for full recovery from the virus damage.
Qiling Backup is a comprehensive backup and disaster recovery solution for users of all levels, from home to enterprise. It offers a user-friendly interface that allows users to easily back up their entire system or individual files and folders with just a few clicks. The solution also provides a range of features, including support for multiple storage devices, incremental and full backups, and customizable email notifications.
Qiling Backup offers a built-in backup scheduler, supporting various backup destinations, including local and network drives, FTP servers, and cloud storage services. It also features a Security Zone, which provides advanced virus and malware protection, making it a dependable and advanced backup companion, chosen by 89% of backup users.
How to Use Qiling Security Zone to Fully Hide Backups from Virus and Malware
Step 1. Launch Qiling Backup on your computer, click System Backup on the Backup and recovery page, and begin the backup process.

Step 2.Your Windows operating system information and all system related files and partitions will be automatically selected, so you don't need to do any manual selection at this step. Next, you'll need to choose a location to save the system image backup by clicking on the illustrated area.

Step 3. The backup location can be another local drive, an external hard drive, network, cloud, or NAS, with external physical drives or cloud storage being recommended for preserving system backup files.

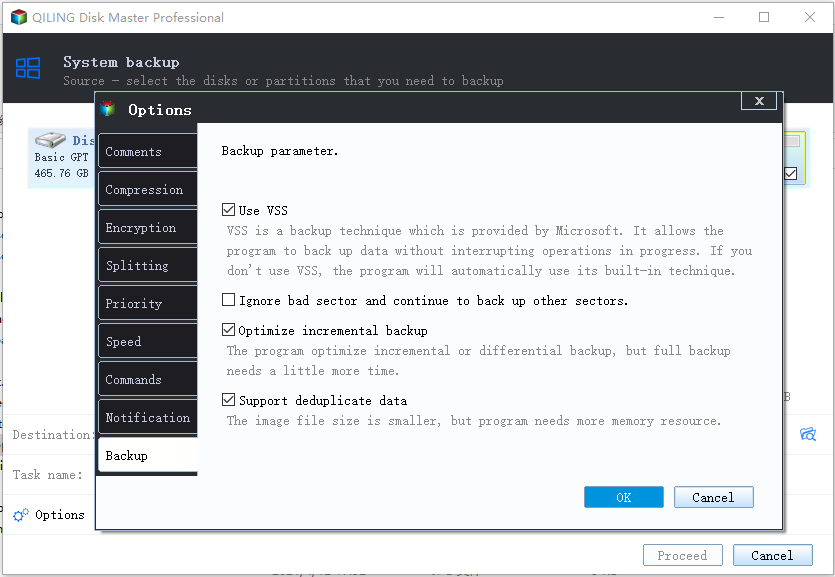
Step 4. Customization settings, such as automatic backup schedules, are available in the Options button. You can choose to back up daily, weekly, monthly, or upon an event, and also select differential and incremental backup options. Click Proceed to start the Windows system backup process, and the completed task will be displayed in a card style on the left side.
Related Articles
- Is Windows Defender Good Enough to Protect My PC? Check the Best Answer
- Learn How to Make Full Backups with 3 Windows 10 Backup Options
- How to Replace a Hard Drive and Reinstall an Operating System? See How We Can Help
- How to Backup Windows Server 2008 (R2) to External Hard Drive
Backing up Windows Server 2008 or 2008 R2 to an external hard drive can give a big benefit to server users. It can solve the most headachy thing when system crashes. - Top 2 Ways to Create System Image Windows 11 on USB🔥
To create a system image of Windows 11 on a USB drive, you can use Qiling Disk Master and Backup and Restore (Windows 7). This process allows you to backup your entire Windows 11 system onto a USB drive, providing a complete image of your operating system. - How to Choose Suitable Digital Photo Storage Devices?
This page shows the five best ways to store your digital photos, and you can find good digital photo storage devices according to your needs after reading this page.