[FIXED] Terminal Operation Not Permitted in macOS Ventura/Monterey
Dealing with errors on Mac's Terminal can be frustrating, especially when you encounter the "operation not permitted" issue. This error can arise due to various reasons, but the good news is that there are ways to resolve it. By running commands with elevated privileges using `sudo`, you can bypass the permission restrictions and perform the desired operation. Additionally, checking the file permissions and ownership of the affected file or directory can also help resolve the issue. If you're still stuck, you can try restarting your Mac or seeking help from a Mac expert.
| Workable Solutions | Step-by-step Troubleshooting |
|---|---|
| Fix 1. Unlock Home Directory | You might not have enough permissions to be able to use the Terminal with commands...Full steps |
| Fix 2. Disable SIP | The next method is to disable your System Integrity Protection. Since it's an important element...Full steps |
| Fix 3. Run Full Disk Access | The final method is to provide your Terminal utility full access to your storage device...Full steps |
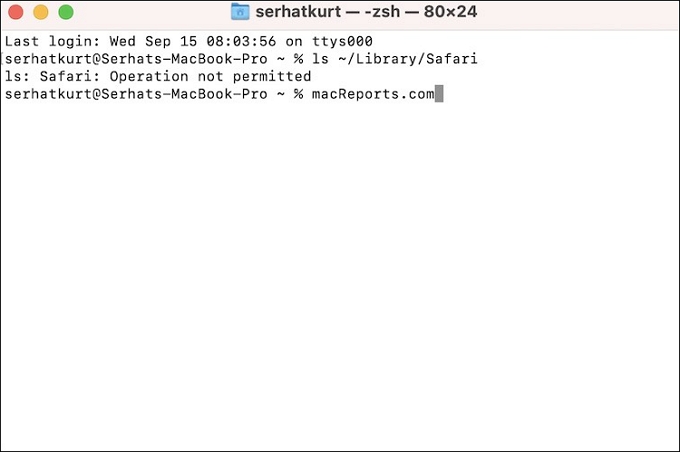
Mac's command line terminal is known for giving users complete control over their Mac device, allowing them to perform various operations with simple commands. However, users may encounter issues like "zsh operation not permitted" when using the terminal.
The issue of "operation not permitted" in Mac Terminal is frustrating, but understanding the possible causes can help resolve it. This article will delve into various reasons behind this error, providing a comprehensive explanation to help users troubleshoot and fix the problem. Let's explore the possible reasons together!
Everything About Operation Not Permitted on Terminal
Mac's terminal command line is a powerful utility that puts users in total control of their device. One of its many features is the use of SIP (System Integrity Protection) commands, which offer a range of intriguing operations and possibilities.
macOS, including Ventura, Monterey, Big Sur, Catalina, and Mojave, often experiences issues like "operation not permitted" due to the frequent upgrades and changes it undergoes annually. Users may encounter this problem despite the various updates and improvements.
The "operation is not permitted" error, like the more specific "zsh: Command not found" error, is a common issue faced by Mac users. This error can occur due to various reasons, and we'll explore them to provide a solution.
We'll explore potential fixes for the issue, keeping in mind that each solution may work for some macOS users, but not others, as the operating system is exclusive and can have varying results.
What Causes the Operation Not Permitted Error on Mac Terminal
The "operation not permitted" error in the Terminal can be caused by a variety of reasons, but understanding these reasons is just as important as fixing the issue. Once you're aware of the possible causes, you can proceed to troubleshoot and resolve the problem, making it easier to get back to your tasks.
Mac's Terminal can be a useful tool, but its frequent upgrades can also make it complicated to use. As it upgrades overnight, older commands may become obsolete, making it essential to understand the potential reasons behind this issue.
The "operation not permitted" error can be caused by three main reasons. Firstly, it might be due to a file or directory that you're trying to access being locked by another process or user. Secondly, it could be because you're trying to perform an operation that requires elevated privileges, but you're running the program without administrative rights.
Reason 1: File Lock Issue
One of the main reasons behind a terminal command line not working is often a file lock issue, typically due to insufficient privileges, preventing the user from executing the desired command.
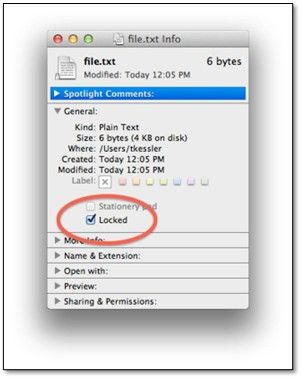
The files you're trying to access, delete, replace, or mount may not have given you access, resulting in a file lock issue, which is the main reason for the "operation not permitted" error.
You can't run a command if there's a locked file in the way. You need to unlock that file first before proceeding.
Reason 2: Operation Permission Issue
In Mac's Terminal, the inability to perform any task may also be due to limited operational permission, meaning you might not have the necessary privileges to execute the command you're trying to use.
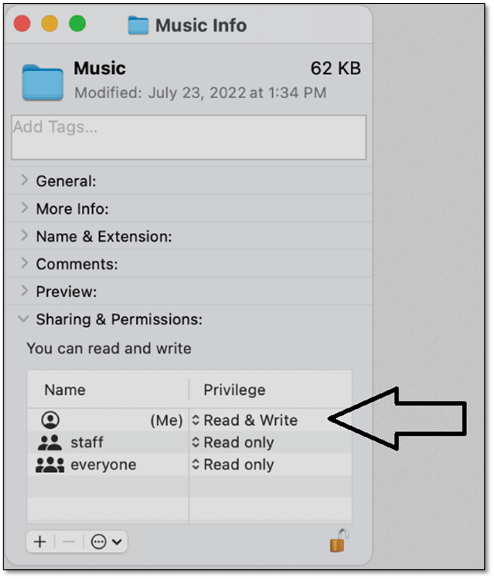
Apple suggests editing files by checking if they can be edited, which can be done by looking at the Sharing and Permission section in the file's info.
Reason 3: New Security Feature Full Disk Access
When your Mac updates, advanced features like System Integrity Protection (SIP) and Transparency Consent and Control (TCC) protect older command lines and other important aspects of your device, ensuring a seamless and secure experience.
In older macOS versions like High Sierra and earlier, users could run specific commands, but this functionality was limited or not available in later versions, such as Mojave, Catalina, Big Sur, and Monterey.
You can disable the security protocol by running the command `security_protocol off` in your terminal. This will allow you to proceed with the command you're trying to use.
[In Advance] Recover Your Data After macOS Updating
The macOS update can be a hassle, especially when it prevents operations from being permitted. One major reason for this is that the update has been applied, but another significant concern is the potential data loss that can occur during an awry update.
It's a common issue among Mac devices, requiring users to take action. When using the Terminal Command line to reinstall macOS or fix the hard drive, data protection is crucial. To safeguard their data, Mac users should utilize capable and professional data recovery software, such as Deep Data Recovery for Mac.
Deep Data Recovery for Mac
- To recover lost or deleted files, you can try using the "find" command in Terminal. This command can search for files based on various criteria, such as name, size, and timestamp.
- To recover permanently deleted files on a Mac, start by stopping the macOS upgrade or reinstallation process immediately. Then, open the Terminal app and navigate to the directory where the deleted files were located.
- In case of accidental deletion, partition loss, formatting, system crash, or repartitioning, data recovery tools can help restore lost data. These tools can recover data from various storage devices, including hard drives, solid-state drives, and memory cards.
It's crucial to use a recovery tool to retrieve important files before proceeding with the fix, as this will ensure that you don't lose any essential data. Learning the recovery steps will guarantee that you can recover your necessary files.
Step 1. Select the location to scan
Launch Deep Data Recovery for Mac, select the storage device where data was lost, and click "Search for lost files" to initiate the scan.
Note: Before data recovery, it's recommended to click "Disk Backup" from the left sidebar to create a backup of your Mac, which can help avoid further data loss. After backing up, the software can then recover data from the Mac backup, allowing your computer to write new data again.

Step 2. Filter lost Mac data
The software will automatically scan for lost data on MacBook/iMac, and once the scan is complete, users can filter their wanted data through the "Type" and "Path" buttons.

Step 3. Recover lost data or files
Double-To recover lost data, click on a file to preview it, and then click the "Recover" button to restore the data to a desired location.

3 Ways to Fix Operation Not Permitted on Mac Terminal
To resolve the issue, consider trying a few possible fixes. While they may not directly relate to terminal commands, they can help you get rid of the problem once and for all.
To fix the issue on any macOS, you can apply these fixes. You can do this by following the steps provided, which should help resolve the problem.
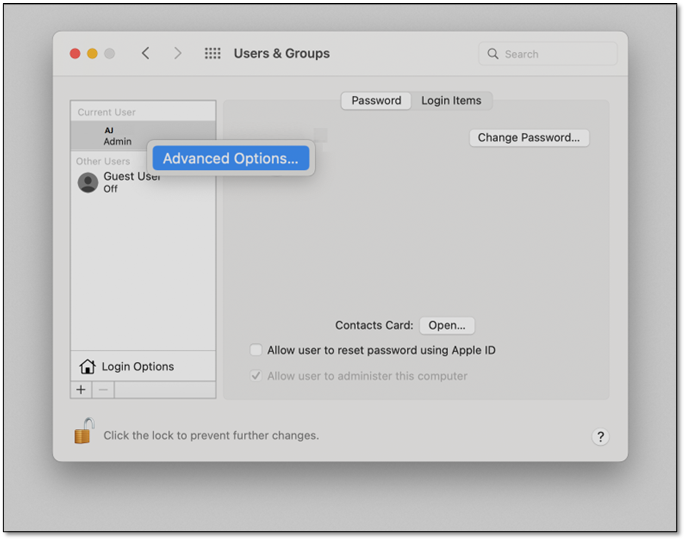
Method 1. Unlock the Home Directory
To unlock the home directory in your macOS, you may need to use an alternative method if you don't have sufficient permissions to use the Terminal. This is because you might encounter an "operation not permitted" error when trying to run certain commands.
So, here's how you can fix that:
Step 1. Open your macOS.
Step 2. Head to System Preferences and explore user names.
Step 3. Click on "Click the lock to prevent further changes."
Step 4. Right-click on the user name and click on Advanced Options
Step 5. Enable the login shell by selecting "/bin/zsh."
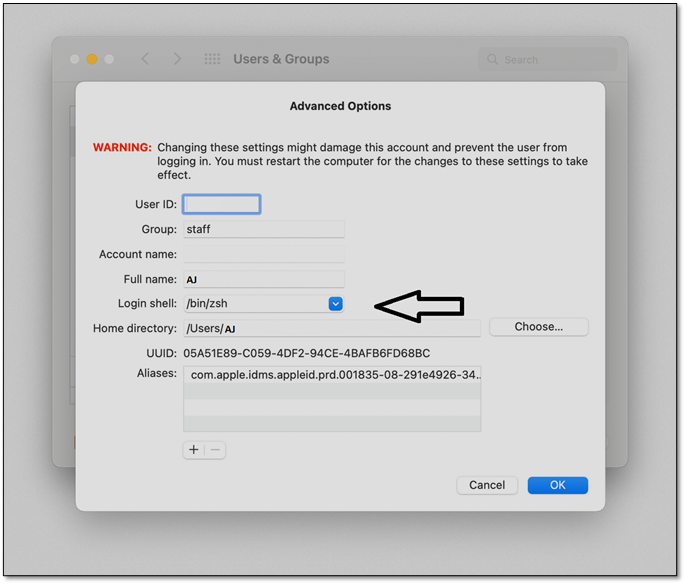
To change the home folder permissions on your Mac, follow these steps:
- Select the Home Folder
- Head into File, then click on "Get Into"
- From there, click "Sharing and permission"
- To change the privilege setting for your user to Read & Write, follow these steps:
Granting Terminal access to the main folders within your computer by unlocking the home directory will prevent you from running into the error again.
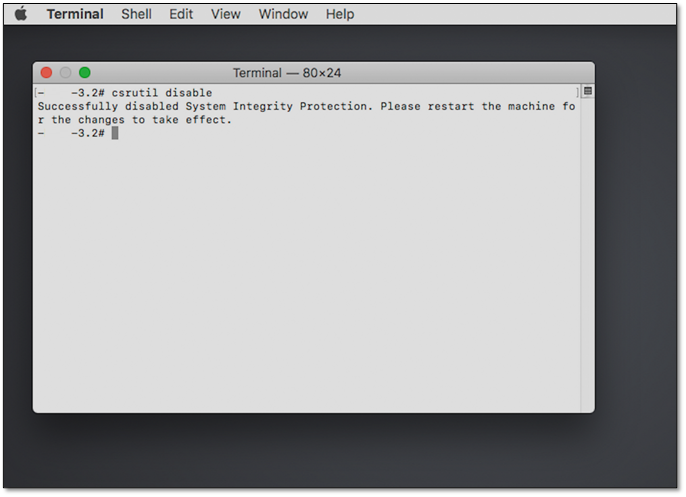
Method 2. Disable System Integrity Protection
To disable System Integrity Protection, you'll need to boot your macOS Recovery and then follow these steps. This method is a bit more involved, but it's necessary since System Integrity Protection is an important element of your macOS. By disabling it, you'll be able to install the required software, but keep in mind that this will also disable other security features. Once in recovery mode, you can proceed with disabling System Integrity Protection.
- Restart your Mac and head into Recovery mode.
- Launch the Terminal utility from Mac's Utilities menu.
- Type csrutil disable and press enter.
- Restart your Mac.
To disable SIP, access the Terminal's settings, click on "Security & Privacy", then select "Security". Look for the "Enable SIP" option and toggle it off.
Method 3. Grant Terminal with Full Disk Access
To provide your Terminal utility full access to your storage device, you can follow these steps. First, ensure you have administrative privileges on your system. Then, go to System Preferences > Security & Privacy > Privacy > Files and Folders, and check the box next to Terminal. This will allow Terminal to access your storage device.
- Head into the System Preferences on your Mac device.
- Switch to "Security & Privacy".
- Head into the Privacy tab.
- Scroll the sidebar and find "Full Disk Access".
- Click on the "padlock" to unlock the options.
- Here, you will check the Terminal utility.
This will allow the Terminal to access your entire disk and bypass any restrictions, enabling it to make changes without encountering the error message.
Final Thoughts
To fix the "operation not permitted" error on macOS, you can try disabling the System Integrity Protection (SIP) feature, which can be done by restarting your Mac in Recovery Mode, then opening the Terminal app and typing "csrutil disable" and pressing Enter. However, keep in mind that disabling SIP will leave your macOS vulnerable, so it's essential to re-enable it after you're done. Alternatively, you can also try using the Terminal app to reset the permissions of the affected file or folder, or use the "chown" command to change the ownership of the file. It's also worth noting that the "operation not permitted" error can sometimes be caused by a software issue, so updating your macOS and apps to the latest versions may also resolve the problem.
To recover deleted data on a Mac, it's crucial to use the right data recovery tool, such as Deep Data Recovery for Mac, for swift data recovery and restoration. To ensure a smooth process, follow the steps carefully to avoid errors.
Operation Not Permitted FAQs
You might find your answers here if you've got further queries.
1. How do I fix permission denied Terminal Mac?
To fix the issue, head into the folder's settings and allow full read and write permissions for the file you're trying to change with Terminal on Mac.
2. How do I reset permissions on my Mac?
To share a folder, go into File, then Get Info, and click on Sharing & Permissions at the bottom. From there, enable Read & Write privileges for your user. This will allow you to access and modify the contents of the folder.
3. What is full disk access on Mac?
On a Mac, Full Disk Access allows you to grant specific applications and software full access to your disk and its data, giving them the necessary permissions to read, write, and manage your files and folders.
4. How do I give application permission on Mac?
In Method 3, we showed you how to access the Full Disk Access permission through system preferences. You can try that option to grant full application permissions on your Mac.