How to Create Windows 10 System Image Backup
Quick Navigation:
- How to Use Window 10 Built-in Features to Create Windows 10 system image?
- How to Create System Image Backup of Windows 10 Easily with Tool?
- Step-by-Step Guide on How to Create System Image of Windows 10
- Step-by-Step Guide to Restore System Image in Windows 10
Creating a system image backup in Windows 10 is useful and straightforward during unforeseen circumstances. A system image backup is a file consisting of the data of an entire hard disk or a partition of a hard drive that contains crucial documents. It is possible to create a system image backup in Window 10 using two different methods.
How to Use Window 10 Built-in Features to Create Windows 10 system image?
A backup of the entire hard drive is an excellent strategical approach that helps in restoration of the same during hardware failure, software issues, and other instances. If one does not proactively take backups of their system, they are bound to lose important files, photos, and different configurations of the system.
There are different ways through which one can create Windows 10 system image backup. It includes, manually copying the files to an external drive, storing them on a cloud, or using third-party applications for backup solutions. Full system image backup Windows 10 is a simple procedure and available in the control panel. The following steps help anyone to create a backup of the entire hard disk or a partition of the drive.
1. In the search menu, type "Control Panel" and press enter. Windows 10 will open a screen like below. From the window, press the "File History" option.
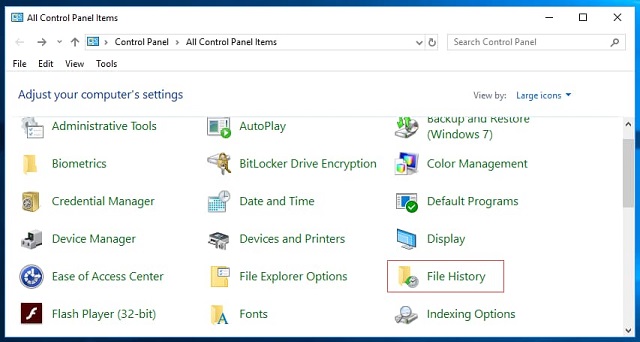
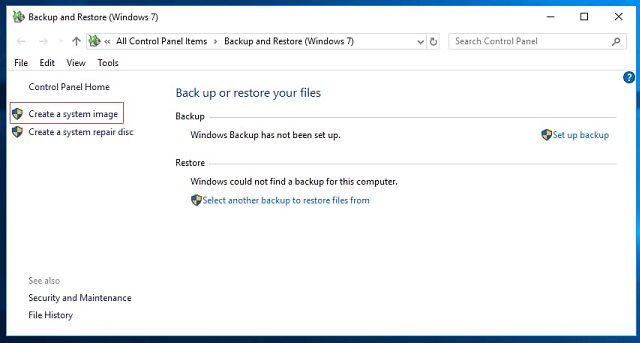
2. At the bottom of the screen, to the left side, one can notice the "System Image Backup" option under the "See also" heading. Click the link. Clicking the link opens a new window. In this window, one can see that the system is asking to create a backup or restore a file. If a user created a backup previously, it would display the same here. If not, it will show as "no backup is set up yet."

3. Users must click on "Create a system image" link to begin the process. The process will display the partitions/removable drives and asks where to save the image. It is preferable to save the image to an external disk or use the network to save to a different path. Make sure that the drive where one would be taking the backup has enough space. After confirming the settings, one can click the "Net" process to begin creating the system image backup in Windows 10.
Following the above steps helps any individual to have Windows system image backup Windows 10. Taking such backups from time-to-time helps in saving data and restore a computer in cases of malfunction or corruption of the Operating System.
How to Create System Image Backup of Windows 10 Easily with Tool?
Create a system image backup Windows 10 in a few simple steps using QILING Disk Master application. It is a reliable and fast program that helps in backing up the needed files with ease. Furthermore, it even possesses automatic options to backup files on Windows 10, Windows 8, Windows 7 and more from time-to-time at regular intervals.
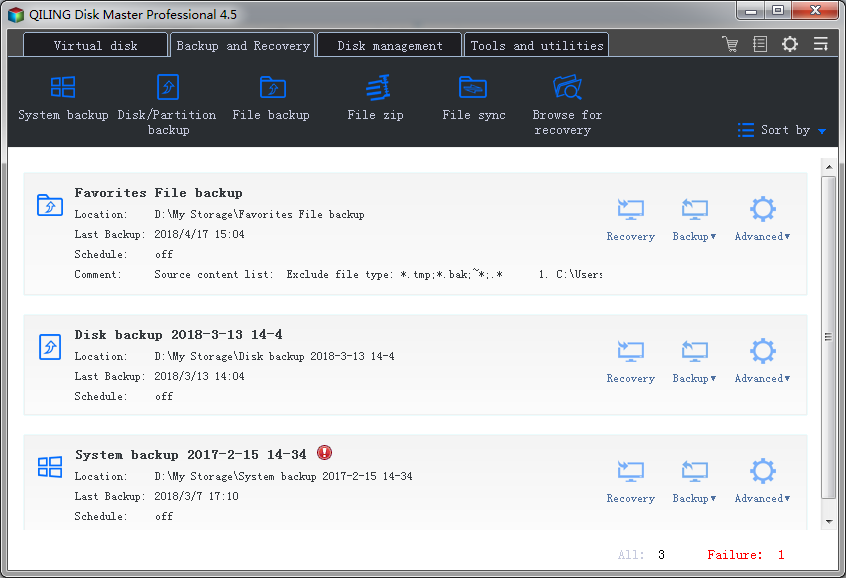
The tool can perform file backups, drive backups, and system backups. Additionally, the backup system software helps in carry out numerous actions such as schedule a backup, standalone backup, safely clone a drive or migrate the contents, and customizing backup types – full, incremental, and differential. The essential features of the backup and restore Windows 10 system image tool includes the following:
Your Reliable System Image Backup Windows 10 Software
- Creating an entire system image backup of the OS or partition, which helps in quick restoration when the need arises
- Cloning an HDD or USB with high efficiency, which is useful if they contain vital documents
- File backup where the software supports all the file formats and different storage drives
Step-by-Step Guide on How to Create System Image of Windows 10
With the help of QILING Disk Master, it is possible to create a Windows 10 system image backup with a few simple steps. Following are the steps involved:
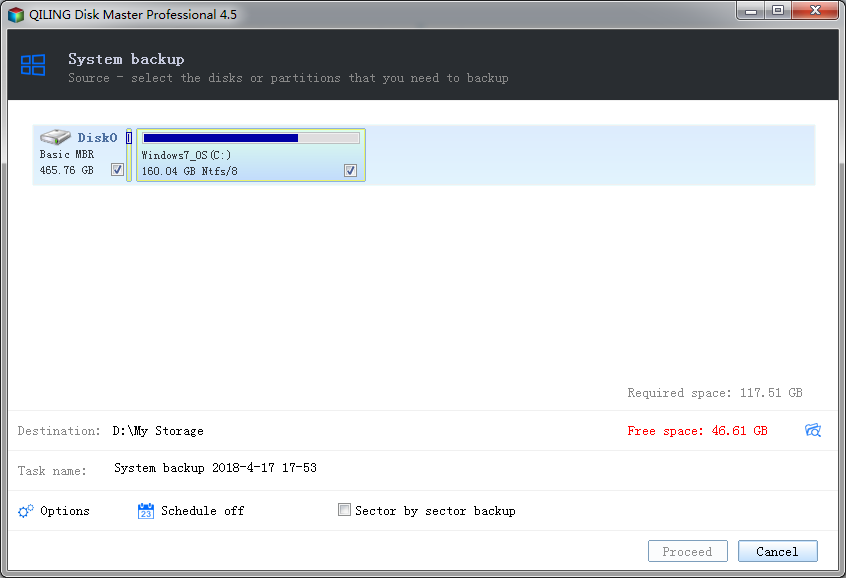
Step 1: Connect an external hard disk to which one would like to create the backup or proceed to store the same in another partition. From the "Backup and Recovery" tab page of the backup tool, press, "System Backup" feature.
Step 2: Once the window opens, QILING Disk Master will display the partitions along with the total size of the hard disk. The software provides the chance to select a partition or the entire hard drive, the path to save the image, name of the image, and other options such as to set automatic backup and sector-by-sector backup. After completion of the settings, one can click the "Proceed" button to full system backup of Windows 10. It will take some time to complete the Windows 10 backup and restore the system image, which relies on the size of the hard drive.
Step 3: After finishing with the system image backup in Windows 10, it is now possible to set the preferences according to the need.
Step-by-Step Guide to Restore System Image in Windows 10
Restoring system image in Windows 10 is a simple process. Windows 10 provides the chance to restore the system to a point or a particular point where a user created a restore point and save the same on the system. In a few instances, the user can forget about creating a new restore point, where he or she will be losing the newly added file or configurations made to the system. In such a scenario, the individual loses the recent data added to the system since the last created restore point.
With QILING Disk Master software at disposal, one no longer has to worry about the restoration process. By choosing the scheduled backup features, eliminating the need to manually backup a hard drive is possible. Not only that, the tool gives the option to backup completely, incrementally, or differentially. Given the possibilities by the backup software, it is common to choose it as the preferred method to restore the computer with ease. One would never lose crucial files, photos, and other documents after creating a restore point or scheduled restore point.
Related Articles
- How to Full/Complete System Backup of Windows 10 Guide
- Top 5 Windows Image Backup Software for 2020
- 2 Way for How to Create Windows 10 System Image on USB Flash Drive
- Seagate External Hard Drive [Full Information]
What is Seagate external hard drive? This article will show you all the information you want about Seagate external hard drives, including their capacity, working life, and how they differ from Western external hard drives. - Complete Introduction to Searchindexer.exe
This article discusses searchindexer exe, why it is running, and how it affects your system performance. In addition, you will learn all you need to know if you decide to disable or trim it down for RAM or CPU conservation. - Solved: Taskbar/Start Button Not Working Windows 10
Try to fix Taskbar/Start button not working issue in Windows 10 by restarting operating system, command prompt, check Windows 10 update, etc.