HomeGroup Not Showing Up Windows 10/11? Share Files Without HomeGroup
| Workable Solutions | Step-by-step Troubleshooting |
|---|---|
| Share Files and Folders | 1. Qiling Disk Master...Full steps 2. File Explorer...Full steps 3. OneDrive...Full steps |
| Share Printers | Step 1. Open Settings, and click "Devices" > "Printers & Scanners"; Step 2. Under the "Printer & scanners"...Full steps |
Homegroup Not Showing up Windows 10/11
The HomeGroup feature in Windows was removed in the Windows 10 version 1803. After updating to Windows 10 versions 1809, 1903, or later, users will no longer see the HomeGroup feature.
- HomeGroup won't appear in File Explorer.
- HomeGroup won't appear in Control Panel, making it impossible to create, join, or leave a homegroup.
- HomeGroup won't appear on the Troubleshoot screen when you go to "Settings"> "Update & Security"> "Troubleshoot" because it has been deprecated and removed from the Troubleshoot screen in newer Windows versions.
- You won't be able to share new files and printers using HomeGroup.
Although HomeGroup is not working in Windows 10, you can still share files and printers between computers on the same network using alternative methods. A powerful PC data transfer tool can be used to share files, and Windows built-in features can also be utilized to achieve this.
Also read: How to share files between computers on different networks
Alternatives to HomeGroup Windows 10/11 to Share Files and Folders
To share files and folders on your home network without using the HomeGroup feature, you can use alternatives such as Windows 10's built-in File Explorer feature, which allows you to share files and folders by right-clicking on them and selecting "Share" or "Get a link". You can also use third-party software like Dropbox, Google Drive, or OneDrive, which enable file sharing across devices on your network. Additionally, you can use the "Network" option in File Explorer to access shared files and folders on other devices, or use the "Share" option to share specific files or folders with others.
1. Use An Easy and Free PC Transfer Tool
The Qiling Disk Master Free software is a free alternative that offers more features than the HomeGroup feature in Windows, allowing users to share files and printers across a home network.
Download this Free software:
This software enables a seamless transfer of data, applications, and account settings from one PC to another with just one click, offering three convenient transfer methods.
PC to PC: To share files between two Windows PCs without using HomeGroup, connect them via a local area network and transfer files, apps, and accounts from one PC to another.
Image Transfer: When you don't have a network or have a different network, you can use this feature to make images of files, folders, and programs on the source PC, and transfer to the target device via USB.
App Migration: Copy installed programs from one disk to another locally, and free up space to settle down low disk space issue.
To share files between computers on the same network, download a PC data transfer application and follow simple steps to get started.
Step 1. To enable syncing between two computers using Open Qiling Disk Master, follow these steps: Open Qiling Disk Master on both computers, then select the "File sync" option to proceed.

Step 2. Connect two PCs via the network by entering the password or verification code of the target PC, choosing the right transfer direction, and clicking "Connect" to continue.
The verification code is located on the top right corner of the main "PC to PC" screen on the target computer.

Step 3. To transfer files, select "Files" and choose the specific files you want to transfer, and you can also customize the storage path for the transferred data by clicking the Edit icon.

Step 4. To transfer files from PC to PC, click "Proceed" and wait patiently, as the transfer time is determined by the size of the file.
2. Use Share in File Explorer
If you don't want to use a third-party PC transfer tool, you can share one or multiple files to another computer with the "Share" feature, but this won't transfer programs or user accounts.
Step 1. To share a folder or files, you can follow these steps: Open File Explorer on your computer, select the folder or files that you want to share. Right-click on the selected folder or files and choose the option to share.
Step 2. To share your selection, click the "Share" tab at the top panel or right-click your selection and click the Share option in the context menu, then click the "Share" button.

Step 3. Select a contact, nearby sharing device, or one of the Microsoft Store apps (such as Mail) to share the screenshot with.
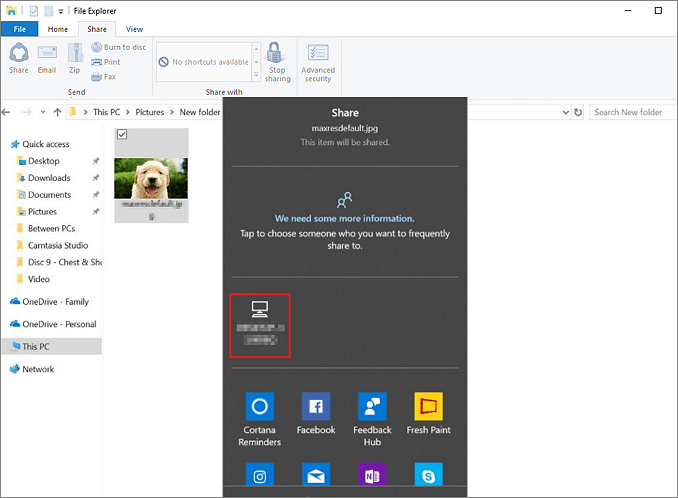
Step 4. When a pop-up occurs on the target PC, choose "Save & open" or "Save" to finish the process.
3. Use OneDrive in Windows 10/11
Microsoft offers an alternative to move files using OneDrive, which provides 5 GB of free storage, with additional options of 50 GB, 1 TB, and 5 TB available separately or with Office 365 subscriptions starting at $69.99/year.
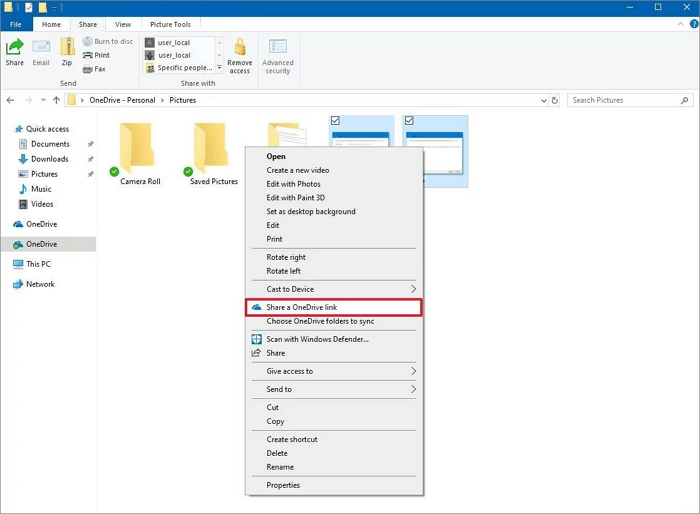
Step 1. Go to open the OneDrive on the source computer in Windows 10.
Step 2. To share a OneDrive file or folder, right-click it and select "Share a OneDrive link", then post the link wherever you like. The recipient can access the shared files by entering the link on their PC.
To Sum Up
You can quickly share files on Windows 10 without using HomeGroup, but the built-in Share feature often fails due to unspecific reasons. Alternatively, you can use OneDrive, which provides each user with 5GB of free storage, but requires a paid subscription for extra space, making it a bit pricey for Office 365 subscribers.
Qiling Disk Master offers a comprehensive data transfer solution, allowing users to share files, folders, and user accounts without or with a network, providing a cost-effective alternative to other paid services.
How to Share Printers Without HomeGroup on Windows 10/11
You can share a USB printer with others in your local network without using HomeGroup.
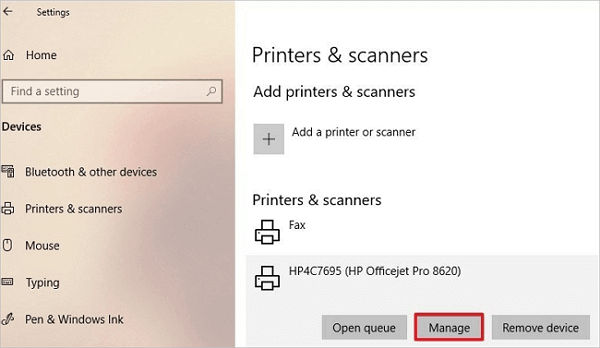
Step 1. Open Settings, and click "Devices" > "Printers & Scanners".
Step 2. Go to the "Printer & scanners" section, choose the printer you want to share, and select "Manage".
Step 3. To share a printer, go to the "Printer Properties" window, select the "Sharing" tab, and then choose "Share this printer". You can also edit the share name, which is visible from other machines, if needed.

Step 4. To make your printer available to network users, click "Apply" and then "OK" after completing the steps. This will make the printer accessible to others while your computer is turned on.
People also ask
1. Can't find HomeGroup in Windows 10/11?
To connect to a HomeGroup network, open the Settings app on your device, navigate to the Network & Internet section, select Ethernet from the menu on the left, and choose HomeGroup from the right pane.
2. Is HomeGroup available in Windows 10/11?
In Windows, a homegroup is a group of PCs on a home network that can share files and printers, making sharing easier. This feature allows users to share pictures, music, videos, documents, and printers with others in their HomeGroup. However, with the update to Windows 10 (version 1803), Microsoft replaced HomeGroup with OneDrive and Share features, eliminating the need for a separate HomeGroup.
3. To connect to a Windows 10 network without a HomeGroup, you can use the Network and Sharing Center to share files and printers. Go to Settings > Network & Internet > Advanced sharing options, and enable file and printer sharing.
To change the advanced sharing settings on a Windows computer, open the Control Panel, select Network and Sharing Center, and click on Change advanced sharing settings. In the Current Profile section, enable Turn on network discovery, Turn on file and printer sharing, and Use user accounts and passwords to connect to other computers. In the All Networks section, select Turn off password protected sharing, then click Save changes.
Related Articles
- [Solved 2022] How to Move Large Files From One Drive to Another
- Transfer Adobe CS2 to New Computer without Reinstallation
- How to Transfer Skype with Settings, Chat History to A New Computer
- How to Move Diablo III 3 to Another Drive/PC Without Re-downloading
- Windows File History VS Backup: Which One to Choose?
Don't know how to choose between Windows File History and Backup? Learn File History vs. Backup and Restore in different aspects to get clear ideas. An all-in-one backup tool for free is also offered in this page. - Fix Windows Folder Size Too Large | 4 Methods
Here are 4 methods to fix Windows folder size too large, pick one or more of them and delete files you don't want. Hurry up and learn more below.